
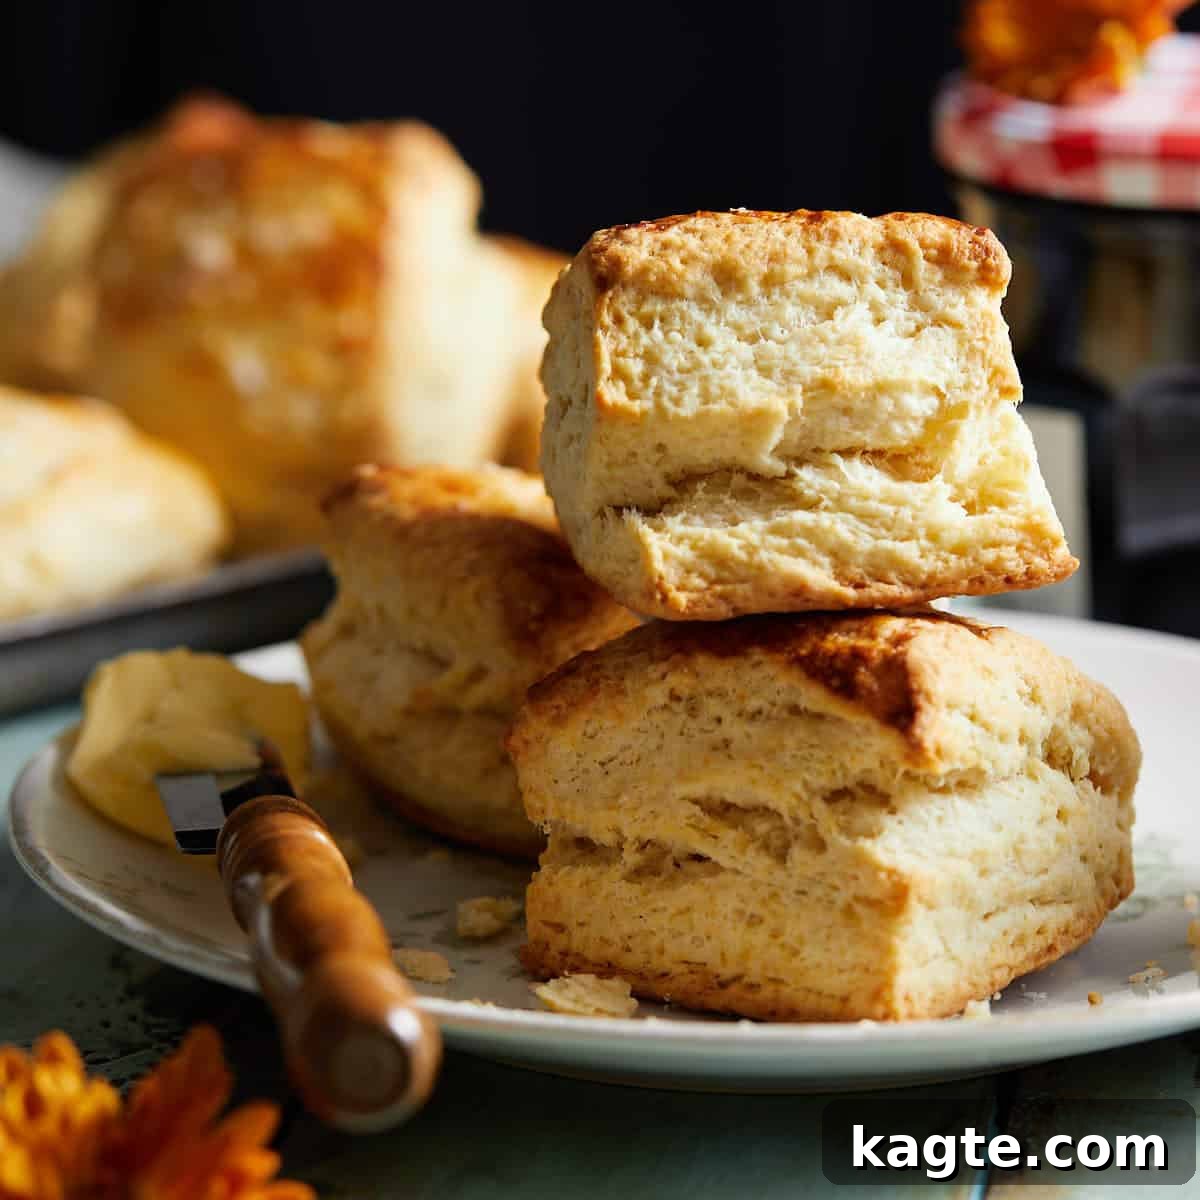
Welcome to the definitive guide for crafting the most delectable, flaky, and impossibly buttery homemade biscuits from scratch. Forget complicated recipes and specialty flours; this easy-to-follow method uses common all-purpose flour to deliver a batch of Southern-style biscuits that are ready in approximately 30 minutes. Whether you’re planning a lavish brunch, a cozy breakfast, or simply craving a warm, comforting treat, these biscuits are guaranteed to impress with their tender crumb and rich flavor. Get ready to elevate your baking skills and enjoy the pure delight of truly exceptional homemade biscuits.
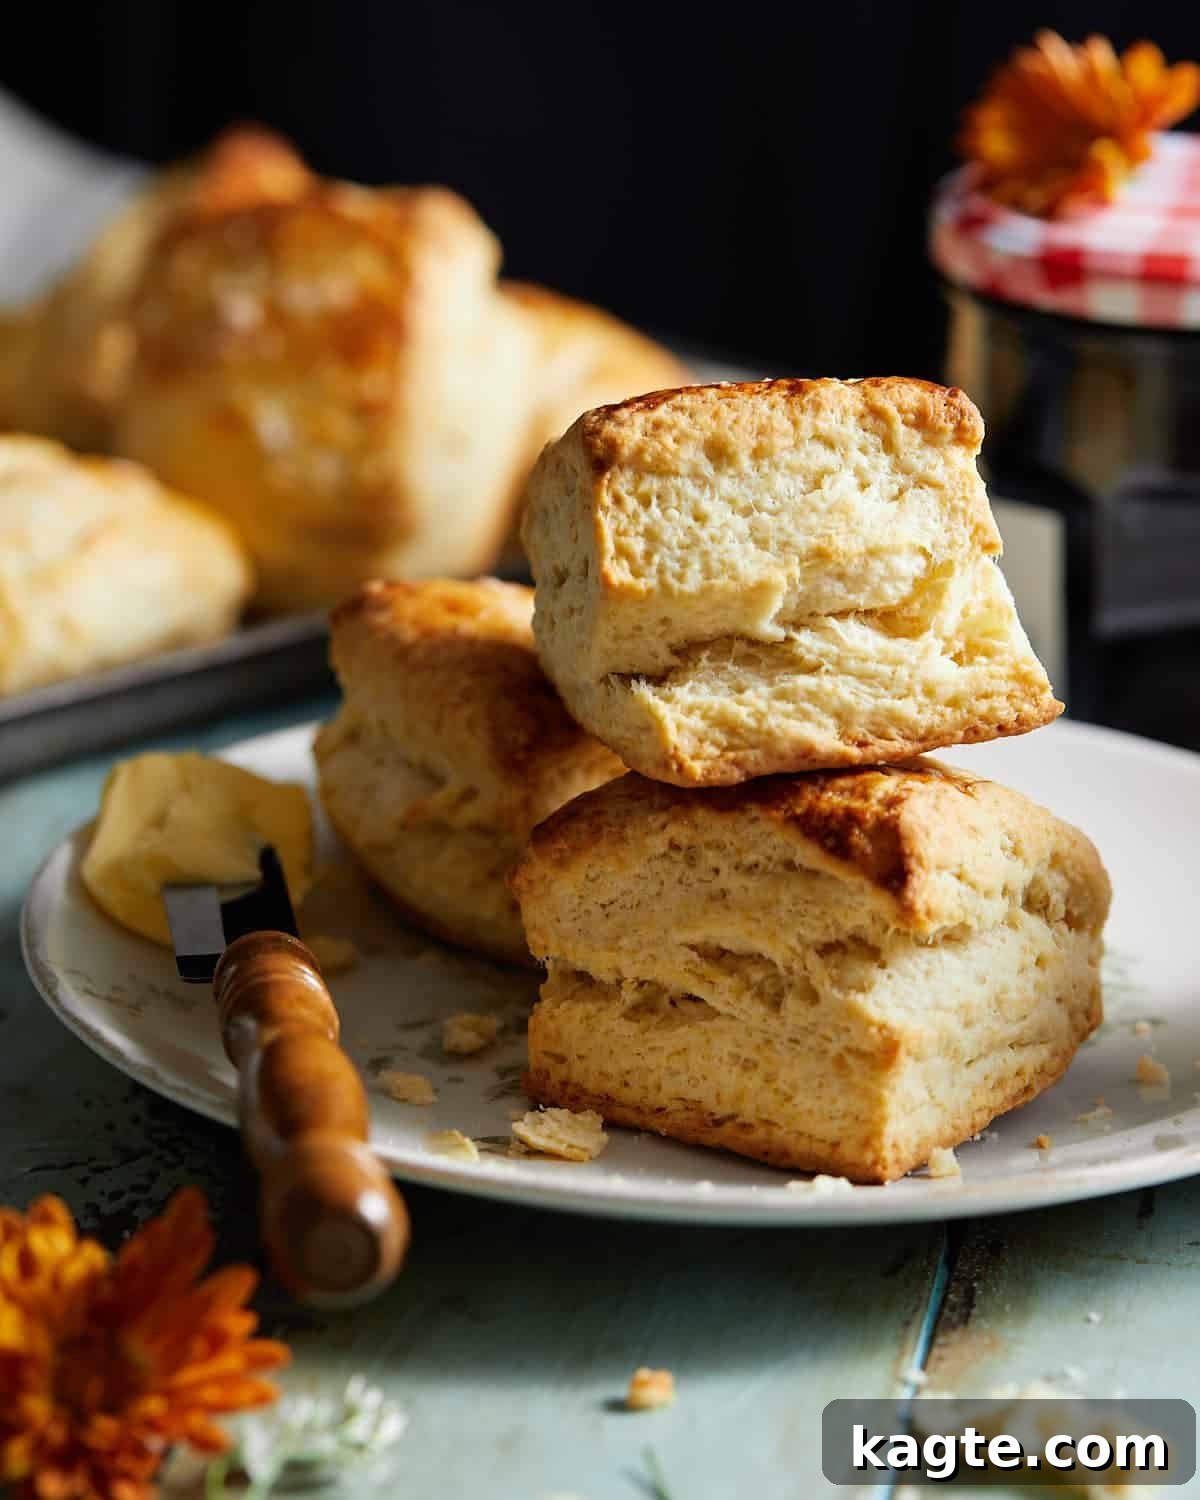
For those seeking an even quicker route to biscuit bliss, explore my No Milk Drop Biscuits. This alternative recipe eliminates the need for rolling, cutting, or freezing, offering a simple solution for instant gratification.
Table of Contents
- Why You’ll Adore These Easy Homemade Biscuits
- Essential Ingredients & Smart Substitutions
- Step-by-Step Guide: Crafting Your Homemade Biscuits
- Delicious Serving Suggestions for Biscuits
- Expert Tips & Creative Variations for Perfect Biscuits
- Frequently Asked Questions About Biscuit Baking
- More Irresistible Breakfast & Brunch Recipes
- Easy Homemade Biscuits Full Recipe Card
Why You’ll Adore These Easy Homemade Biscuits
- Unbelievably Buttery: This recipe calls for a generous 10 tablespoons of high-quality, salted European butter, infusing every bite with an unparalleled richness. The butter not only provides incredible flavor but also contributes significantly to the biscuits’ tender, melt-in-your-mouth texture, reminiscent of true Southern hospitality.
- Remarkably Soft & Tender: Thanks to the ample fat content from the butter and the careful handling of the dough, these biscuits boast an exceptionally soft and tender crumb. Each biscuit practically melts away, leaving a satisfying, comforting warmth.
- Impressively Tall & Flaky Layers: The secret to their impressive height and distinctive flaky layers lies in a specific layering technique during the dough preparation. This method, often referred to as lamination, ensures numerous delicate strata of buttery dough that separate beautifully when baked, creating that coveted flaky texture.
- Just 7 Simple Ingredients: You’ll be amazed that such magnificent biscuits require only seven basic ingredients, most of which are likely already in your pantry and refrigerator. There’s no need for specialty self-rising flour or shortening; just straightforward, accessible staples.
- Freezer-Friendly Convenience: Life gets busy, but that doesn’t mean you have to compromise on homemade goodness. These biscuits are perfectly suited for freezing, either before or after baking, allowing you to enjoy fresh, warm biscuits whenever the craving strikes with minimal effort. They truly taste just as delicious after thawing and reheating!
- Perfect for Any Occasion: Whether it’s a leisurely weekend brunch, a special holiday breakfast gathering, or a quick weeknight indulgence, these biscuits fit seamlessly into any meal plan. Their ability to be made in advance also makes them ideal for entertaining guests without added stress.
Essential Ingredients & Smart Substitutions
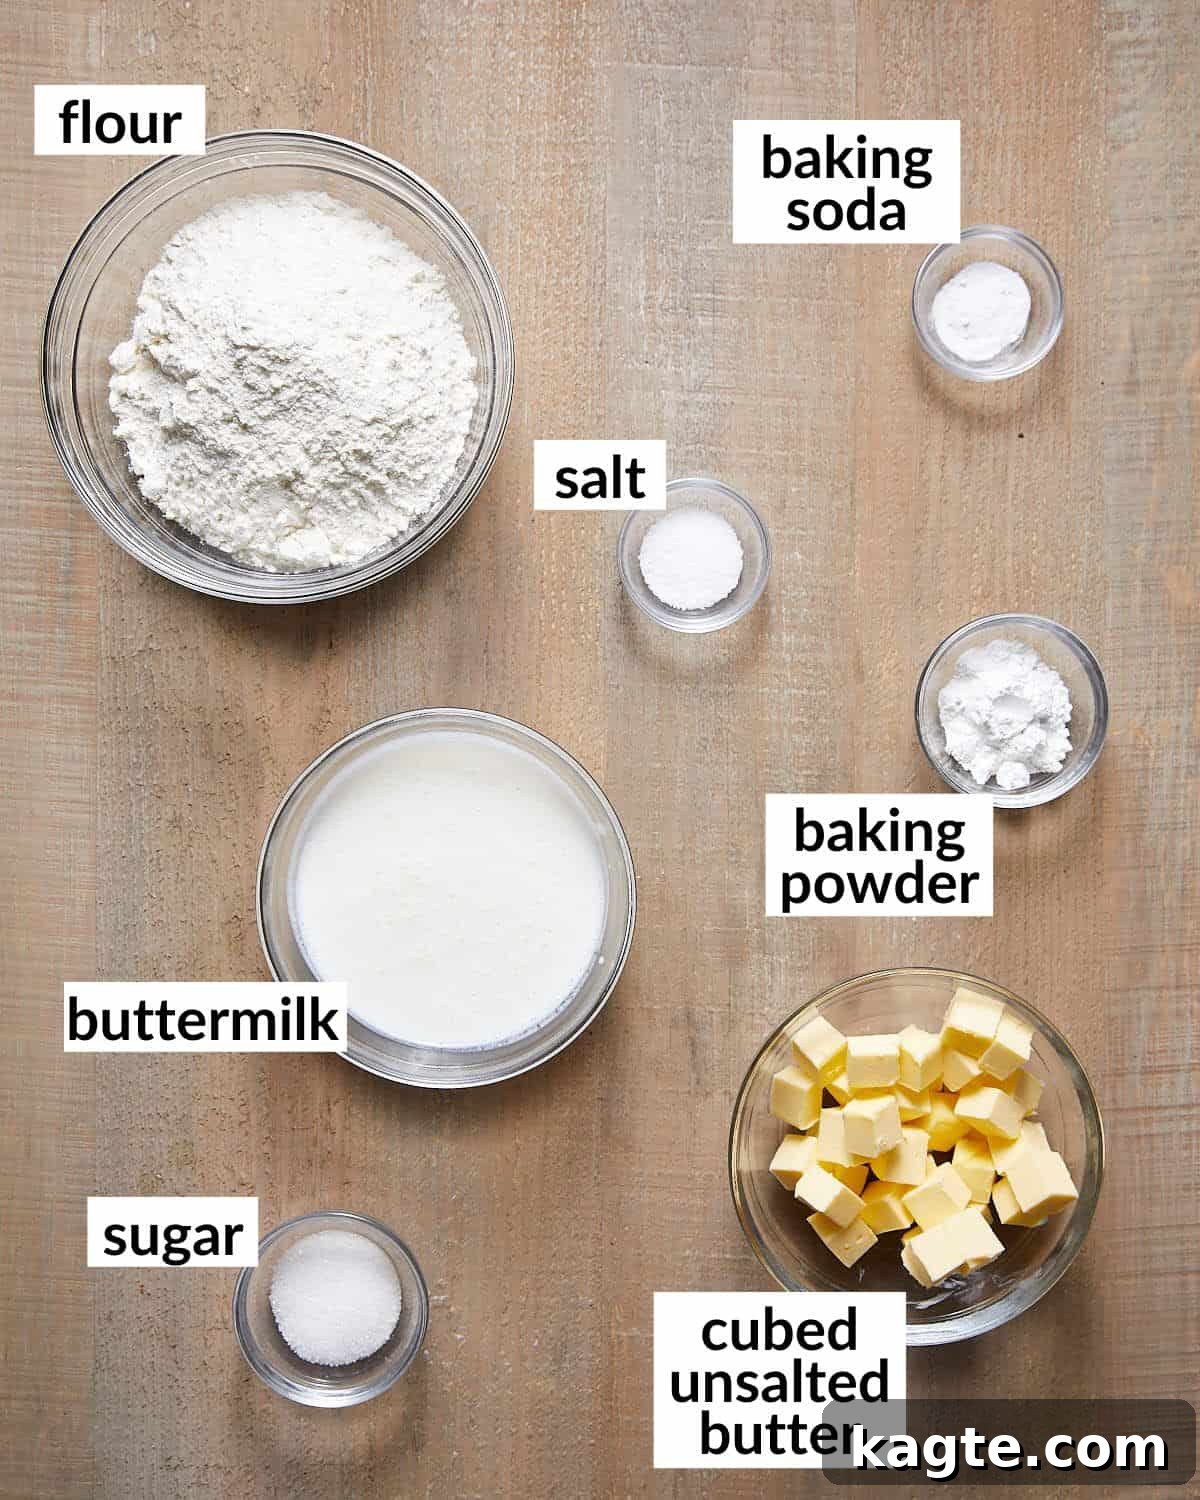
- All-Purpose Flour: The foundation of our biscuits. For best results, measure your flour by weight (grams) if possible, or use the “spoon and level” method to avoid over-packing. Over-packed flour can lead to dense biscuits.
- Granulated Sugar: A small amount of sugar enhances the flavor and promotes a lovely golden-brown crust. While granulated sugar is preferred, you can substitute it with an equal amount of light brown sugar for a slightly richer, molasses-like undertone.
- Baking Powder & Baking Soda: This dynamic duo provides the primary lift for our tall, fluffy biscuits. Baking powder reacts with liquid and heat, while baking soda requires an acid (like the buttermilk) to activate, ensuring maximum rise and tenderness.
- Kosher Salt: All recipes on this site are developed using Morton kosher salt, known for its consistent crystal size and pure flavor. If you’re using finer table salt, reduce the amount by half to prevent over-salting, as table salt is denser. Investing in kosher salt is highly recommended for its versatility in everyday cooking.
- Unsalted European Butter: The star ingredient! European butter typically has a higher fat content than American butter, contributing to a richer flavor and more tender texture. Crucially, ensure your butter is cubed and thoroughly frozen for 10-15 minutes before use. This cold temperature is vital for creating those distinct flaky layers.
- Cold Buttermilk: Buttermilk is essential for these biscuits, reacting with the baking soda to create lift and imparting a unique tangy flavor that balances the richness of the butter. If you don’t have buttermilk, you can easily make a substitute: combine 3/4 cup + 1 tablespoon of whole milk with 1 tablespoon of white vinegar or lemon juice. Let it sit for 5-10 minutes until it slightly curdles before adding to the dry ingredients. Remember, the acid is non-negotiable for activating the baking soda!
- Flaky Salt (Optional): A sprinkle of flaky sea salt on top before baking adds a beautiful finish and a delightful textural contrast, enhancing the overall savory-sweet balance of the biscuit.
A complete list of exact ingredients and precise amounts can be found on the detailed recipe card below.
Step-by-Step Guide: Crafting Your Homemade Biscuits
Quick Overview of the Process
- Prepare the simple, buttery dough.
- Shape and layer for maximum flakiness.
- Briefly freeze to ensure the butter stays cold.
- Bake until golden and enjoy them warm!
Detailed Step-by-Step Instructions
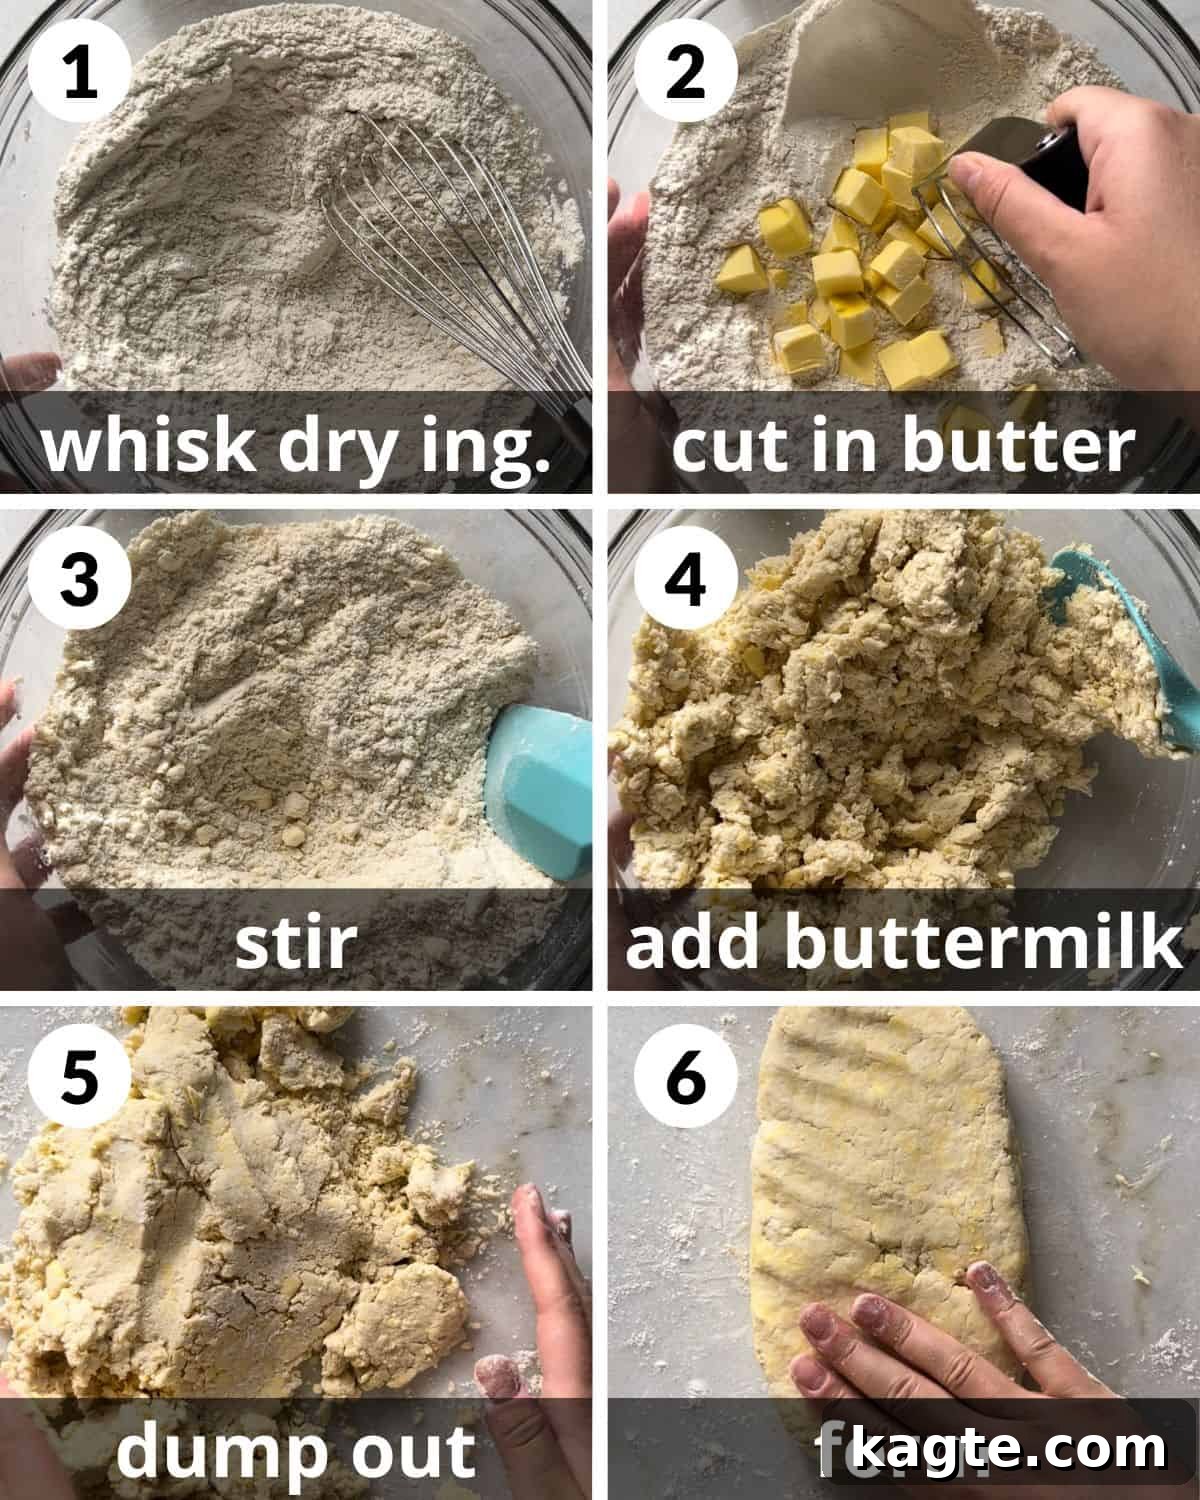
For truly flaky biscuits, it’s essential to see distinct butter chunks dispersed throughout the dough, ranging from pea-sized to small almond-sized pieces. Don’t be afraid of visible butter!
Step 1: Begin by preheating your oven to a precise 425°F (220°C). In a spacious mixing bowl, thoroughly whisk together the dry ingredients: the all-purpose flour, baking powder, granulated sugar, baking soda, and kosher salt. Ensure they are well combined to distribute the leavening agents evenly.
Step 2: Introduce the crucial cold butter to your dry mixture. Using a pastry cutter, work the frozen, cubed butter into the flour until the pieces resemble small peas or even slightly larger crumbs. The key here is not to over-incorporate the butter; you want visible chunks. Alternatively, you can use a coarse cheese grater to grate the cold butter directly into the flour, or if you have a large food processor, combine the flour and butter and pulse just a few times until the mixture forms coarse crumbs with butter pieces. This prevents the butter from melting too soon.
Step 3: After cutting in the butter, take a moment to stir the flour and butter mixture with a spoon. This ensures that the butter pieces are uniformly dispersed throughout the dry ingredients, leading to consistent flakiness in every biscuit. Then, create a shallow well in the center of your mixture.
Step 4: Pour the cold buttermilk (or your homemade buttermilk substitute) into the well. With a gentle hand, use a spoon or spatula to fold the dry ingredients into the buttermilk until the dough just barely comes together. It’s absolutely critical not to overmix at this stage; overworking the dough develops gluten, which results in tough, rather than tender, biscuits.
Step 5: Carefully transfer the slightly shaggy dough onto a clean, cold surface that has been lightly floured. The cold surface helps maintain the butter’s temperature.
Step 6: With very light pressure, gently form the dough into a rough, rectangular shape using your hands. The exact dimensions aren’t critical at this point, but aim for a relatively even thickness.
Do not strive for perfection in shaping the dough; rustic charm is part of the appeal of homemade biscuits. What truly matters is working quickly and efficiently to keep the butter as cold as possible.
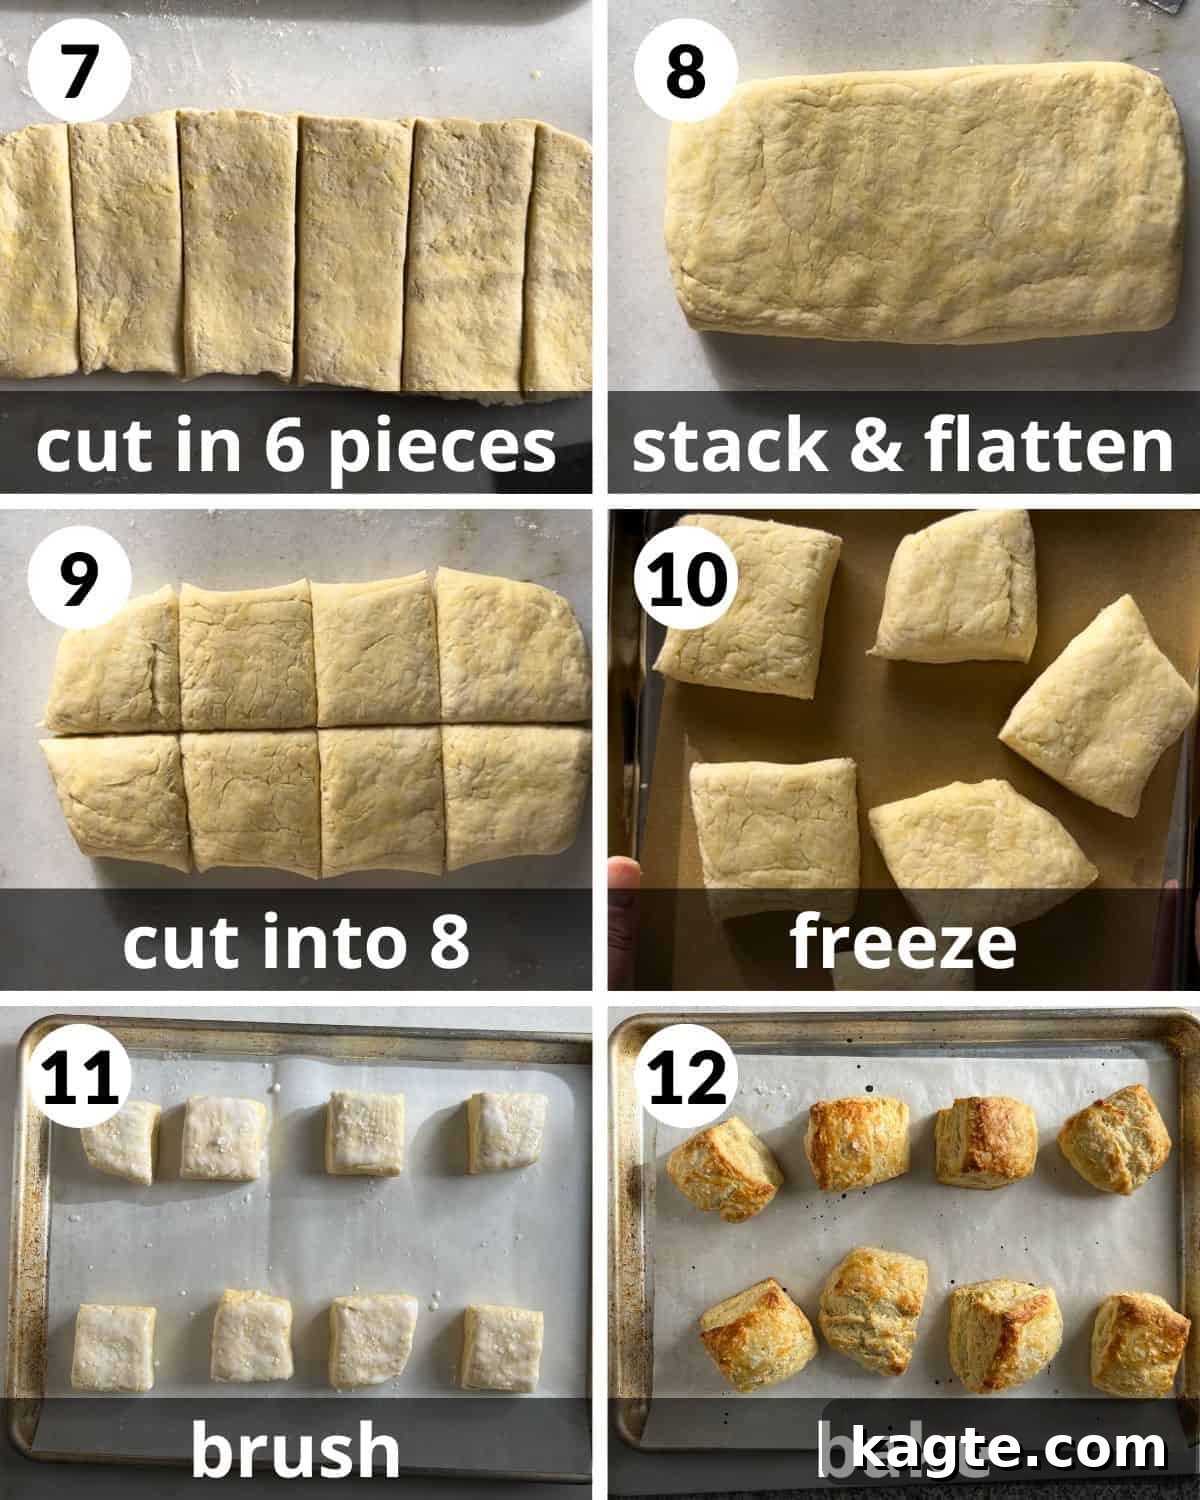
Step 7: Using a rolling pin with a light touch, or simply pressing with your hands, flatten the dough into a rectangle approximately 1/4 inch thick. Then, cut this rectangle into 5-6 equal pieces. When cutting, avoid pressing down too hard or twisting your knife/cutter, which can seal the edges and prevent proper rise.
Step 8: Stack these cut pieces directly on top of each other. Gently flatten the stacked dough again into a new rectangle, this time aiming for a thickness of about 1.25 inches. This crucial layering step is what creates those desirable tall, flaky layers in your finished biscuits.
Step 9: Now, cut the thickened dough into 8 roughly equal-sized biscuits. We embrace the rustic aesthetic here, so don’t worry about perfectly uniform shapes. Square cuts are recommended to minimize scraps and rework.
Step 10: Arrange the freshly cut biscuits onto a plate or a small baking sheet lined with parchment paper. Place them in the freezer for 10-15 minutes. This quick chill helps solidify the butter once more, ensuring maximum lift and flakiness during baking.
Step 11: After their brief chill, remove the biscuits from the cold plate or sheet and transfer them to a large baking sheet, also lined with parchment paper. Arrange them with a little space between each. For an extra golden top and subtle tang, gently brush the tops of each biscuit with a small amount of extra buttermilk. If desired, sprinkle a pinch of flaky salt over each for a gourmet touch.
Step 12: Bake the biscuits in your preheated 425°F (220°C) oven for 18-22 minutes, or until their tops are beautifully golden brown and they have risen magnificently. Keep an eye on them towards the end of the baking time, as oven temperatures can vary. Serve immediately and savor every warm, buttery bite!
Delicious Serving Suggestions for Biscuits
These glorious homemade biscuits are at their absolute best when served piping hot, straight from the oven. Their versatility makes them a fantastic accompaniment to an array of dishes, transforming a simple meal into something truly special. Here are some inspired serving ideas:
- Classic Sweet Toppings: Slather them generously with extra salted butter and your favorite fruit preserve. Try them with homemade spreads like Homemade Strawberry Jam, bright Egg Free Apple Curd, or a dollop of lemon curd for a delightful tangy contrast. A drizzle of honey or maple syrup is also heavenly.
- Hearty Breakfast Sandwiches: Transform your biscuit into a gourmet breakfast sandwich. Pair it with a perfectly cooked Over Hard Egg and crispy protein like Baked Turkey Bacon or savory Instant Pot Bacon. Add a slice of cheese for extra indulgence.
- Brunch Centerpiece: Serve these biscuits alongside a satisfying main dish like this simple yet flavorful Egg & Sausage Casserole for a complete and comforting brunch spread. They also pair wonderfully with fresh fruit salads or creamy grits.
- Savory Soup & Chili Companion: Don’t limit biscuits to breakfast! They make an incredible side for lunch or dinner. Dip them into a hearty bowl of Turkey Lentil Soup, rich Dutch Oven Chili, or any stew for a truly satisfying meal.
- Southern Delights: Experience true Southern comfort by pairing them with sausage gravy for a classic Biscuits and Gravy. They’re also excellent with fried chicken or country ham.
Expert Tips & Creative Variations for Perfect Biscuits
- The Golden Rule: Keep Everything Cold! This is perhaps the most critical tip for flaky biscuits. Ensure your butter is cubed and frozen for at least 10-15 minutes, and your buttermilk is straight from the fridge. Cold ingredients prevent the butter from melting into the flour too soon, allowing it to create steam pockets during baking that result in distinct, airy layers. If your kitchen is warm, you can even chill your mixing bowl.
- Flour Your Workspace and Hands Judiciously: A light dusting of flour on your surface and hands will prevent the dough from sticking, making it easier to handle. However, avoid using excessive flour, as this can toughen the dough and alter the biscuit’s texture.
- Master the Lamination Technique: The process of cutting the dough into pieces and stacking them is known as lamination. This crucial step is what builds those incredible, distinct layers within your biscuits, ensuring they rise tall and flaky. Repeat this stacking and flattening process once or twice for even more dramatic layers.
- Handle with Care – Be Gentle: When shaping and cutting the dough, use the lightest possible touch. Whether you’re using a rolling pin or simply pressing with your hands, apply minimal pressure. This prevents overworking the dough (which develops gluten and leads to tough biscuits) and keeps the butter pieces intact.
- Avoid Twisting the Cutter: If you opt for a round biscuit cutter (though squares are recommended for less waste), press straight down and lift straight up. Twisting the cutter can seal the edges of the biscuit, preventing it from rising properly and inhibiting the formation of beautiful layers.
- Resist the Urge to Overwork the Dough: Warm hands are the enemy of cold butter. Excessive handling will melt the butter into the flour prematurely, leading to flat, dense biscuits instead of light, flaky ones. Work swiftly and confidently. If the dough starts to feel warm or the butter begins to soften, pop it into the freezer for 5 minutes to firm up before continuing.
- Embrace the Square Cut for Efficiency: To eliminate waste and avoid the need to re-roll scraps (which can overwork the dough and reduce flakiness), simply cut your flattened dough slab into equal squares or rectangles. This method ensures every piece is usable and contributes to the rustic charm of homemade biscuits.
- Freezing for Future Enjoyment: These biscuits are wonderfully freezer-friendly. You can freeze the raw dough or baked biscuits. To freeze raw dough, place cut biscuits on a parchment-lined baking sheet and freeze until solid (this is called par-freezing, preventing them from sticking together). Then transfer to a freezer-safe bag or container. Bake from frozen, adding about 5-7 minutes to the baking time. For baked biscuits, allow them to cool completely, then par-freeze before storing. Reheat in a microwave or oven.
- Oven Temperature Matters: Ensure your oven is fully preheated to 425°F (220°C). A hot oven creates a burst of steam from the cold butter, which helps the biscuits rise rapidly and achieve that perfect golden crust.
- Baking Sheet Choice: Use a light-colored baking sheet. Darker sheets can cause the bottom of the biscuits to brown too quickly before the inside is fully cooked. Lining with parchment paper is also essential for easy cleanup and preventing sticking.

Frequently Asked Questions About Biscuit Baking
The primary secrets to achieving truly excellent, flaky biscuits revolve around three core principles: utilizing very cold butter and buttermilk, meticulously layering the dough, and avoiding overworking the dough. Cold butter creates steam pockets during baking, leading to flakiness, while layering enhances this effect. Overworking develops tough gluten, counteracting the desired tenderness. Refer to the “Expert Tips” section above for a comprehensive breakdown of these techniques.
While shortening can produce very tender biscuits due to its higher melting point, butter is generally considered the superior choice for flavor. High-quality butter, especially European-style butter with its higher fat content, imparts an incredibly rich, nuanced taste that shortening simply cannot replicate. For this recipe, butter is strongly recommended for its flavor profile, contributing significantly to the overall deliciousness.
There are typically four main categories of quick breads often referred to as “biscuits” in various culinary contexts. These include: Rolled Biscuits (like the ones in this recipe, which are kneaded lightly, rolled, and cut), Drop Biscuits (a wetter dough that is simply spooned onto a baking sheet, requiring no rolling or cutting), Scones (often sweeter and richer than traditional biscuits, sometimes containing eggs and fruit, typically cut into wedges), and Shortcakes (sweetened biscuits, usually served with fruit and whipped cream).
No, traditional homemade biscuit recipes typically do not include eggs. The richness and structure in classic biscuits come from butter, flour, and the leavening agents (baking powder and soda), along with buttermilk. Eggs are more commonly found in richer quick breads like scones or certain types of rolls, where they contribute to a different texture and richness.
This recipe is specifically developed for all-purpose flour, combined with precise amounts of baking powder and baking soda. If you wish to use self-rising flour, you would need to adjust or omit the baking powder, baking soda, and salt called for in the recipe, as self-rising flour already contains these leavening agents and salt. However, for guaranteed results and the exact texture described, sticking to all-purpose flour as specified is highly recommended.
Leftover baked biscuits are best stored at room temperature in an airtight container for up to 2-3 days. For longer storage, they can be frozen for up to 2-3 months. To reheat, you can briefly warm them in a microwave, or for a crisper exterior, reheat them in a preheated oven (around 350°F / 175°C) for 5-10 minutes until warmed through.
Tough biscuits are almost always a result of overworking the dough. When dough is handled too much, the gluten strands develop excessively, leading to a chewy, dense texture instead of the desired light and flaky one. Ensure you mix just until the ingredients are combined, and handle the dough gently and quickly during shaping and cutting. Keeping ingredients very cold also helps prevent overworking by making the dough less sticky and easier to manage with minimal handling.
Shop my Amazon Storefront for recommended baking tools and ingredients!
More Irresistible Breakfast & Brunch Recipes
Fall
20 Sweet Pumpkin Recipes for Fall (From Breakfast to Dessert)
Breakfast
Blueberry Coffee Cake with Greek Yogurt & Streusel
Bread
Chocolate Chunk Banana Bread (Easy & Moist)
Side Dish
What To Serve With Quiche (20 Side Dishes)
If you try this recipe, please leave a star rating in the recipe card below and/or comment! I always appreciate your feedback. Follow me on Pinterest, Facebook & Instagram.
Easy Homemade Biscuits
Equipment
-
Baking Sheets
-
Mixing Bowls
-
Pastry Cutter
-
Large Food Processor
-
Box Grater
Ingredients
- 2 1/2 cups (325 g) all purpose flour
- 4 teaspoons baking powder
- 1 Tablespoon granulated sugar*
- 1/4 teaspoon baking soda
- 1 teaspoon kosher salt*
- 10 Tablespoons (142 g) unsalted european butter, cubed & frozen for 10-15 minutes
- 3/4 cup + 1 Tablespoon cold buttermilk plus more for brushing*
- flaky salt optional for sprinkling
Instructions
-
Preheat the oven to 425 degrees. In a large mixing bowl whisk together the flour, baking powder, sugar, baking soda, and salt.
-
Using a pastry cutter, cut the butter into the dry ingredients. The butter pieces should be pea-sized and not overly incorporated. You can also use a cheese coarse grater to grate the butter or a large food processor. Pour the flour and butter in the bowl and pulse a few times.
-
Stir the flour and butter with a spoon after cutting it to make sure it is evenly dispersed. Make a well in the center.
-
Pour the buttermilk in the well and gently fold until the dough comes together. Do not over mix.
-
Dump onto a clean cold lightly floured surface.
-
Form into a rough rectangle.
-
Roll or press gently in a rectangle that is about 1/4 of an inch thick. Cut into 5-6 pieces. When cutting, do not press down too hard
-
Stack the pieces and flatten again into a rectangle that is about 1.25 inches thick.
-
Cut into 8 biscuits that are roughly the same size. (These are supposed to be rustic!)
-
Place onto a plate or small baking sheet lined with parchment paper. Freeze for 10-15 minutes.
-
Remove from the cold plate or sheet and place on a large baking sheet lined with parchment paper. Brush the tops with buttermilk and sprinkle with flaky salt if desired.
-
Bake for 18-22 minutes or until golden brown.
Notes
- Granulated Sugar: Substitute for brown sugar for a slightly different flavor profile.
- Kosher Salt: This recipe is formulated with Morton kosher salt. If using table salt, reduce the quantity by half due to its finer grain and denser nature. Kosher salt offers a cleaner flavor and is easier to measure accurately.
- Buttermilk: If true buttermilk is unavailable, create a quick substitute by adding 1 Tablespoon of white vinegar or lemon juice to 3/4 cup + 1 Tablespoon of whole milk. Let it sit for 5-10 minutes until it curdles slightly. The acid is crucial for reacting with the baking soda and for the overall flavor.
- Use Cold Ingredients: For optimal flakiness, ensure your butter is frozen for 10-15 minutes and your buttermilk is chilled from the refrigerator. Cold butter creates steam, forming layers as the biscuits bake.
- Flour the Surface and Hands: A light dusting of flour helps prevent sticking but avoid excess, which can lead to dry, dense biscuits.
- Cut, Stack, and Flatten (Laminating): This technique is key to achieving multiple flaky layers. Don’t skip it! It mimics traditional pastry lamination on a smaller scale.
- Be Gentle While Shaping & Cutting: Handle the dough lightly to avoid developing gluten, which can make biscuits tough. Use minimal pressure with a rolling pin or just your hands. When cutting, press straight down without twisting.
- Do Not Overwork the Dough: Overworking melts the butter and develops gluten, both leading to tough, less-flaky biscuits. Work quickly. If the dough warms up, chill it briefly.
- Cut into Squares: Cutting the dough into squares minimizes scraps and eliminates the need for re-rolling, which helps maintain the delicate layers and prevents overworking.