
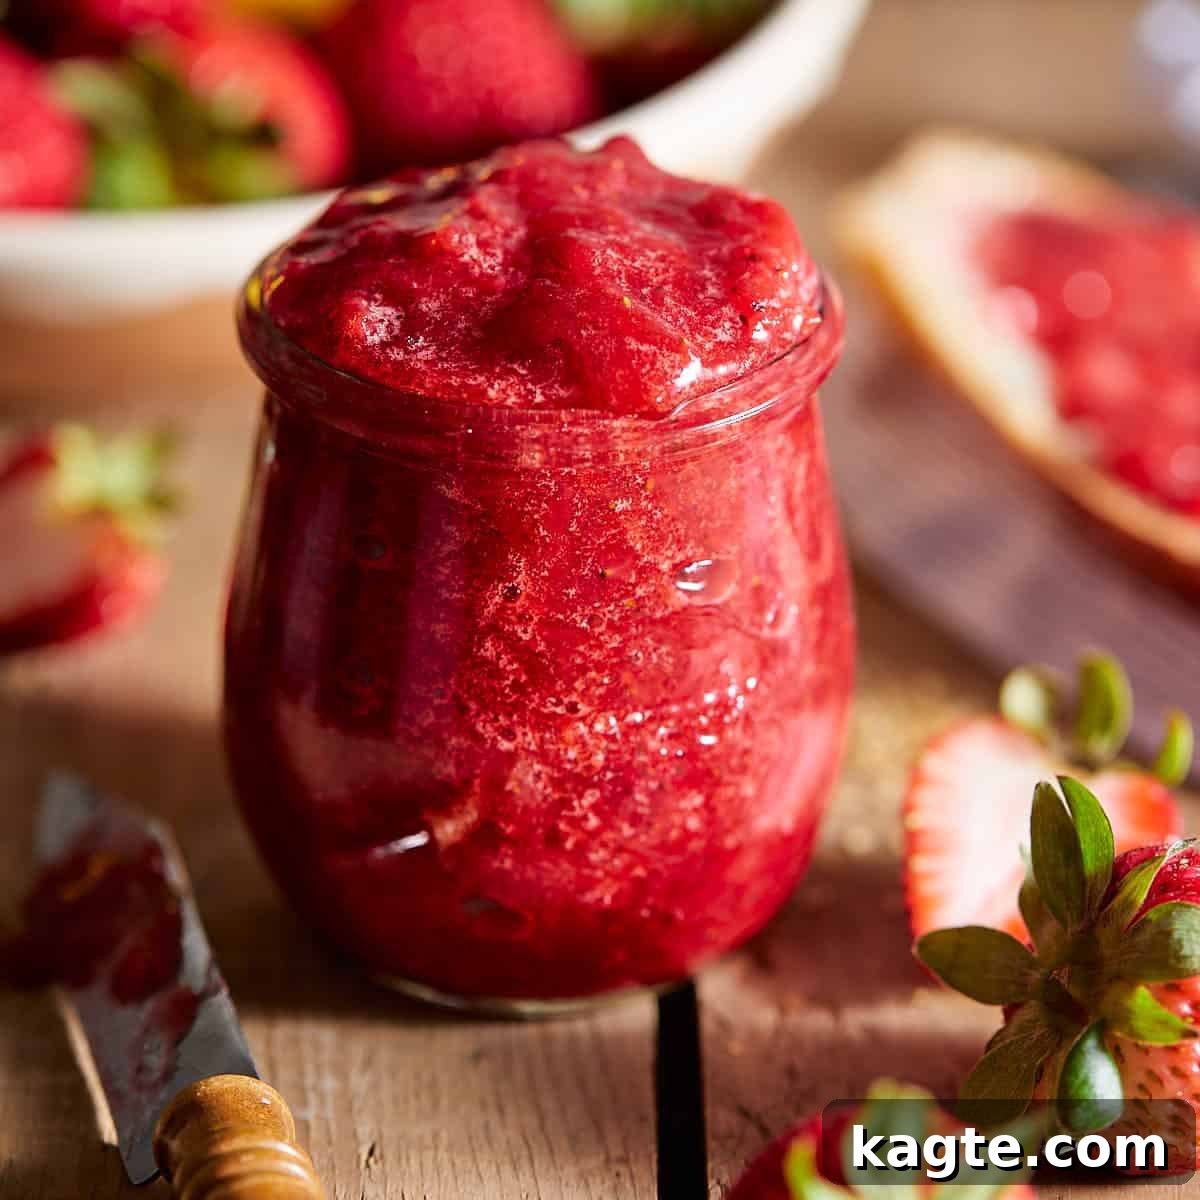
Delight in the sweet simplicity of homemade strawberry preserves! This **Easy Strawberry Preserves Recipe** captures the vibrant flavor of ripe, in-season strawberries, transforming them into a luscious, sweet spread that’s perfect for countless culinary uses. Designed with beginners in mind, this recipe bypasses the complicated canning process, making it wonderfully approachable. Imagine slathering these fresh preserves on warm biscuits, fluffy pancakes, crunchy toast, or even spooning them over creamy vanilla ice cream. Each bite delivers an authentic taste of summer, making everyday meals feel special.
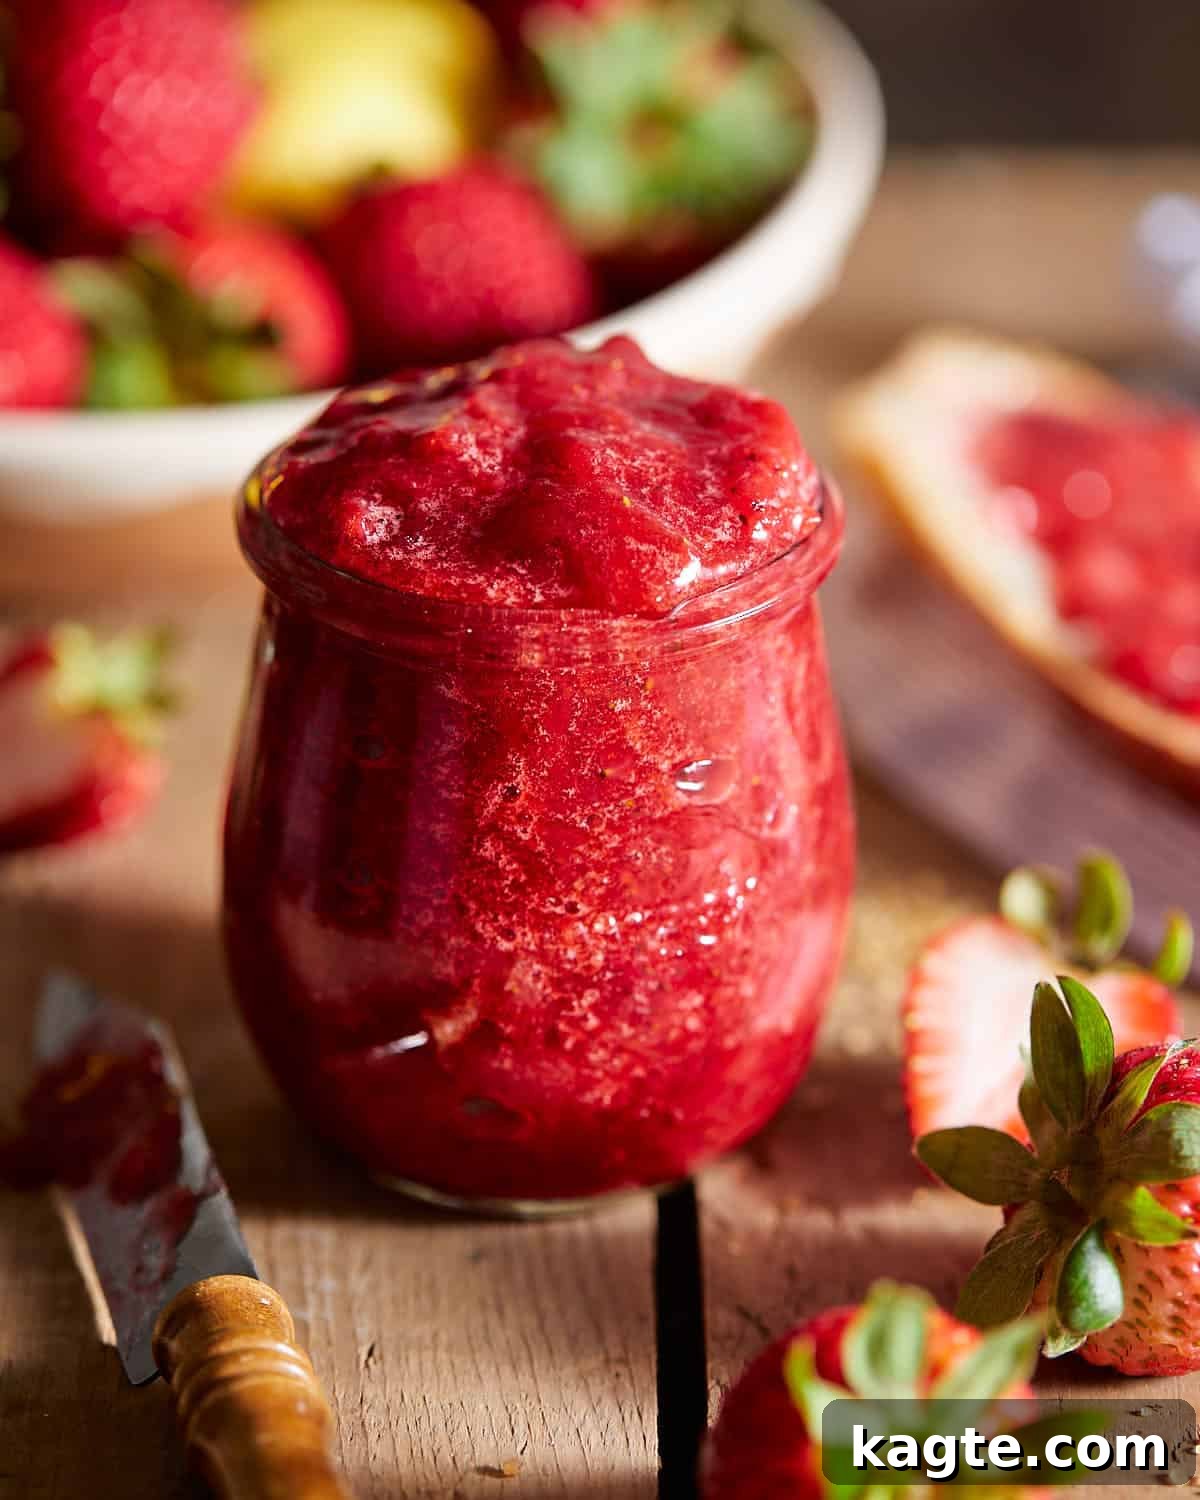
Making your own strawberry preserves is a fantastic way to utilize an abundance of fresh strawberries before they pass their peak. There’s a unique satisfaction in creating something so delicious from scratch, and these homemade preserves truly shine in their versatility. Whether you prefer sweet or savory dishes, this bright and fruity spread can enhance a wide array of culinary creations.
This recipe is particularly ideal for anyone who finds traditional preserve-making, with its requirements for specific canning knowledge and equipment, a bit daunting. Since these preserves are intended for fresh consumption rather than long-term shelf storage through canning, the process is streamlined and remarkably easy to follow. As an added bonus, the ingredients for these delightful strawberry preserves are few, budget-friendly, and readily available at your local grocery store!
Consider pairing these delightful strawberry preserves with a variety of baked goods and sweet loaves. They are exceptional with rustic breads, adding a burst of fruity sweetness to a wholesome bite. Imagine them alongside my Easy Rustic Bread, enriching a slice of Cornbread without Buttermilk, or bringing a vibrant complement to my Blackberry Lemon Bread. The possibilities are truly endless for incorporating this homemade goodness into your meals.
Table of Contents
- Why You’ll Love This Recipe
- Ingredient Essentials & Substitutions
- How to Make Homemade Strawberry Preserves
- Recipe Serving Suggestions
- Expert Tips for Perfect Preserves
- Storage Guidelines
- Additions & Variations
- Strawberry Preserves Vs. Jam: The Difference
- Frequently Asked Questions
- More Sauce & Dip Recipes
- Homemade Strawberry Preserves (3 Ingredients) Recipe
Why You’ll Love This Homemade Strawberry Preserves Recipe
There are countless reasons to fall in love with making your own strawberry preserves at home. This recipe stands out for its simplicity, incredible flavor, and versatile applications, making it a must-try for any home cook.
- Effortlessly Easy – Forget about complicated water baths or specialized equipment. This recipe is designed for ease, requiring only a few basic kitchen tools and straightforward steps. Even if you’re a complete novice to preserve making, you’ll find this recipe a breeze to follow, yielding professional-tasting results without the fuss.
- Remarkably Simple – You need just three core ingredients to create this delectable strawberry preserve. The magic lies in the quality of these simple components – fresh strawberries, granulated sugar, and a touch of lemon juice – working together to produce a naturally vibrant and sweet spread.
- Bursting with Flavor – The secret to truly outstanding preserves lies in using peak-season strawberries. When berries are at their ripest, they offer the most intense and authentic strawberry flavor, which translates directly into a preserve that is profoundly delicious and aromatic. Avoid out-of-season berries for preserves, as their milder flavor can lead to a less vibrant end product.
- Perfectly Sweet & Tangy – The combination of naturally sweet, ripe strawberries and granulated sugar creates a harmonious balance of sweetness. The addition of lemon juice provides a delightful tangy counterpoint, preventing the preserves from being overly saccharine and adding a bright, fresh dimension to the overall taste.
- Incredibly Versatile – These chunky whole strawberry preserves are far more than just a breakfast topping. Their vibrant flavor and appealing texture make them suitable for a wide range of culinary uses. Think beyond toast – use them as a glaze for desserts, a flavorful component in marinades, a base for salad dressings, or even a delightful accompaniment to savory cheese boards.
- Cost-Effective & Healthier – Making preserves at home is often more economical than buying gourmet versions. Plus, you have complete control over the ingredients, allowing you to choose fresh, high-quality berries and adjust the sugar content to your preference, resulting in a healthier alternative to many store-bought options.
- Satisfying & Rewarding – There’s immense satisfaction in creating something so flavorful and beautiful with your own hands. The process, from hulling the berries to watching them transform into a thick, glistening preserve, is a rewarding culinary journey.
Ingredient Essentials & Substitutions
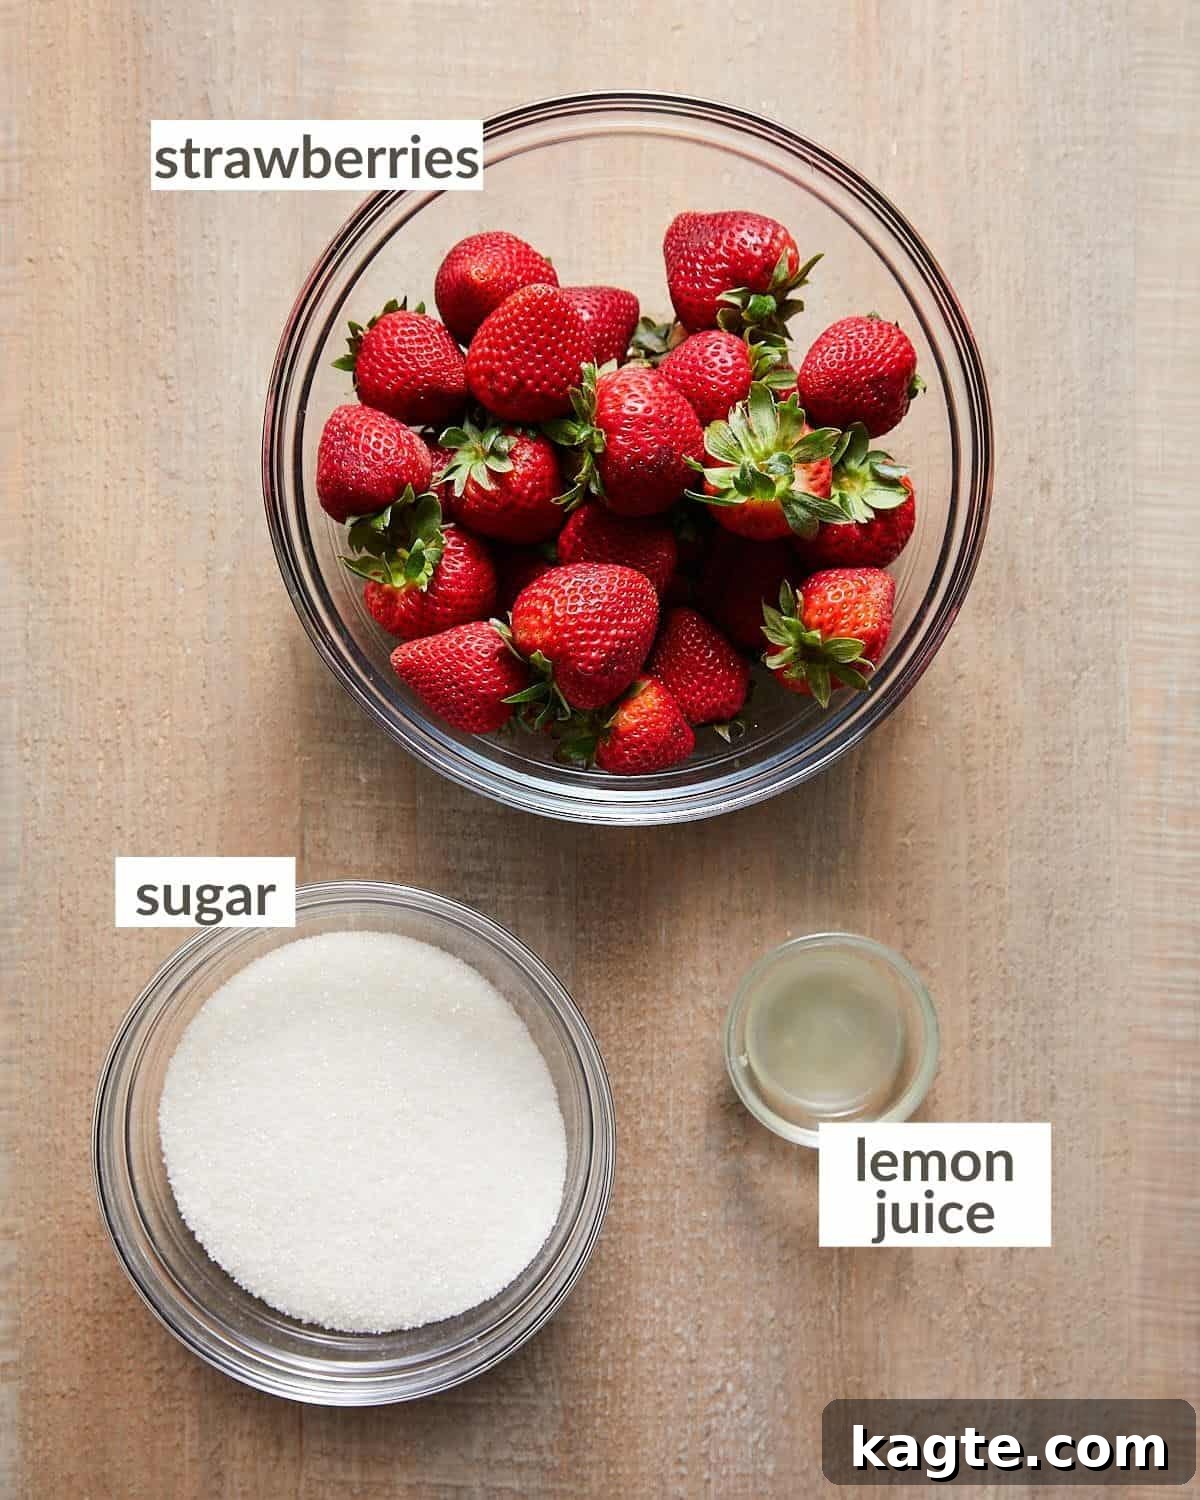
Crafting perfect strawberry preserves begins with selecting the right ingredients. Here’s a closer look at what you’ll need and how to make smart substitutions:
- Fresh Strawberries: The star of our show! For the most vibrant flavor and natural sweetness, always opt for fresh, in-season strawberries. Look for berries that are bright red, firm, and fragrant, as these indicate peak ripeness. If fresh strawberries are not available or out of season, you can certainly use frozen strawberries. Frozen berries are typically picked at their prime, ensuring they retain much of the sweetness and flavor of their fresh counterparts. Remember to thaw the frozen strawberries completely before proceeding with the recipe, draining any excess liquid.
- Granulated Sugar: Beyond its role in sweetening, sugar acts as a crucial element in preserves, contributing to their texture and helping to draw out moisture from the fruit. While granulated sugar is standard, you can adjust the amount based on the sweetness of your berries and personal preference. Using slightly less sugar may result in a thinner preserve, but the flavor will still be delightful.
- Lemon Juice: Freshly squeezed lemon juice serves multiple important functions in this recipe. It brightens the overall flavor, adding a pleasant tangy note that beautifully balances the sweetness of the strawberries. Furthermore, lemon juice contains natural pectin, which aids in the setting process, helping the preserves achieve that desirable thick consistency. While it can be omitted if you prefer a sweeter, slightly thinner preserve, its inclusion significantly enhances both taste and texture. Bottled lemon juice can be used as a convenient substitute, but fresh is always recommended for superior flavor.
- Optional Additions: A tiny pinch of salt can actually enhance the sweetness of the berries. A splash of vanilla extract can add a warm, aromatic depth. These are entirely optional but can elevate the flavor profile even further.
For a comprehensive list of ingredients and precise measurements, please refer to the recipe card below.
How to Make Homemade Strawberry Preserves
Quick Overview of the Process
- Hull the fresh strawberries.
- Roughly chop the hulled strawberries.
- Combine strawberries, sugar, and lemon juice in a large pot.
- Stir mixture continuously until sugar dissolves and liquid releases.
- Bring the mixture to a rapid boil.
- Reduce heat slightly and continue to boil, stirring frequently, until thickened.
- Turn off the heat once preserves reach the desired consistency.
- Allow the preserves to cool completely in the pan before transferring.
Detailed Step-by-Step Instructions
Preparing the Strawberries: Hulling
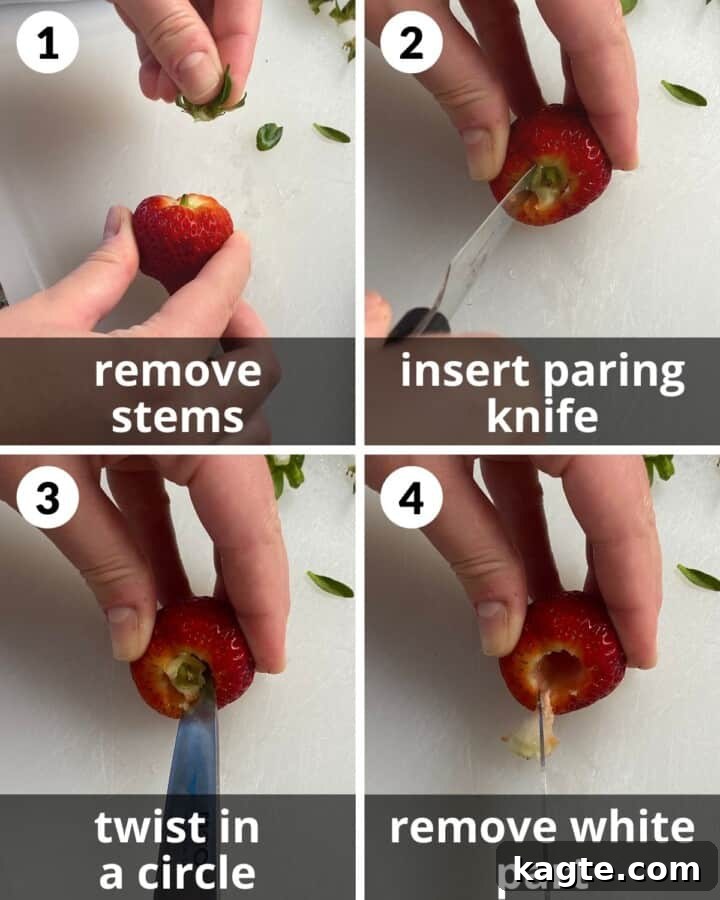
Pro Tip: Removing the green leaves and tough white core of the strawberries, known as hulling, is crucial. This step prevents a bitter taste and ensures your preserves are smooth and flavorful.
Step 1: Begin by gently pulling or twisting the green stem and leaves off each strawberry.
Step 2: Using a small paring knife, carefully insert the knife into the strawberry at the edge of the white core, angling it inward towards the center. Refer to the photos above for visual guidance.
Step 3: Rotate the knife around the white core, creating a full circle, effectively detaching the core from the red flesh.
Step 4: Use the knife to gently scrape out the removed white part. This ensures only the sweet, red fruit remains.
Step 5: Repeat this hulling process for all the remaining strawberries until every berry is perfectly prepared.
Cooking the Strawberry Preserves
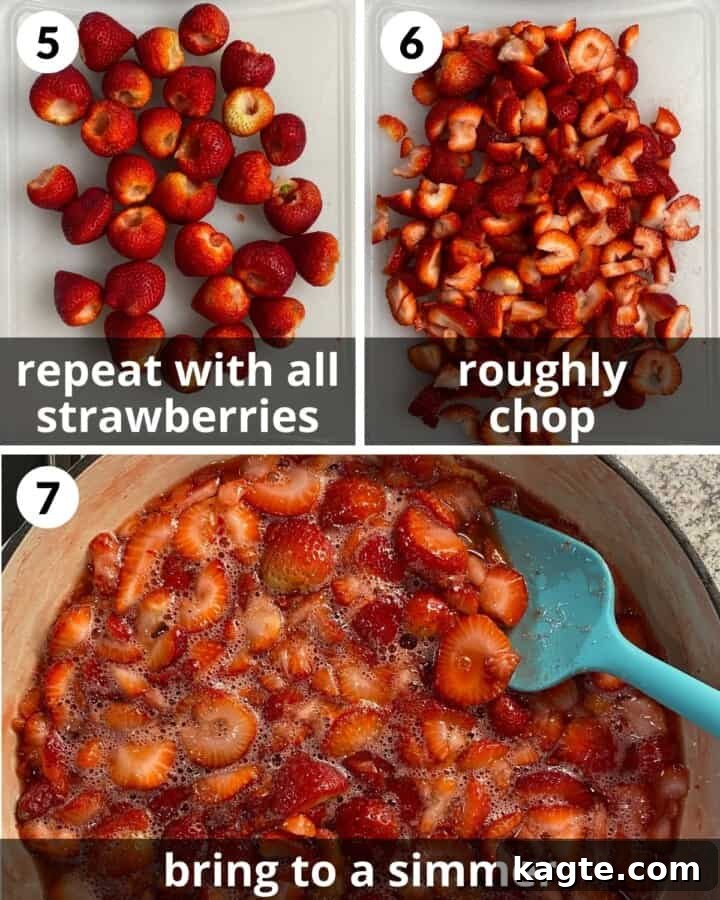
Step 6: Once hulled, use a large, sharp knife to roughly chop all of the strawberries. You can chop them into smaller pieces for a more jam-like consistency or leave larger chunks for a true preserve experience with distinct fruit pieces. The beauty of homemade is customizing it to your liking!
Step 7: Transfer the chopped strawberries to a large, heavy-bottomed pan or Dutch oven. Add the granulated sugar and freshly squeezed lemon juice. Place the pan over medium heat and begin stirring continuously. At this stage, the sugar will start to dissolve, and the strawberries will gradually release their natural juices, creating a syrupy liquid in the pan.
Pro Tip: For precise results, use a candy thermometer to measure the strawberry preserves temperature, aiming for about 220°F (104°C) for optimal setting.
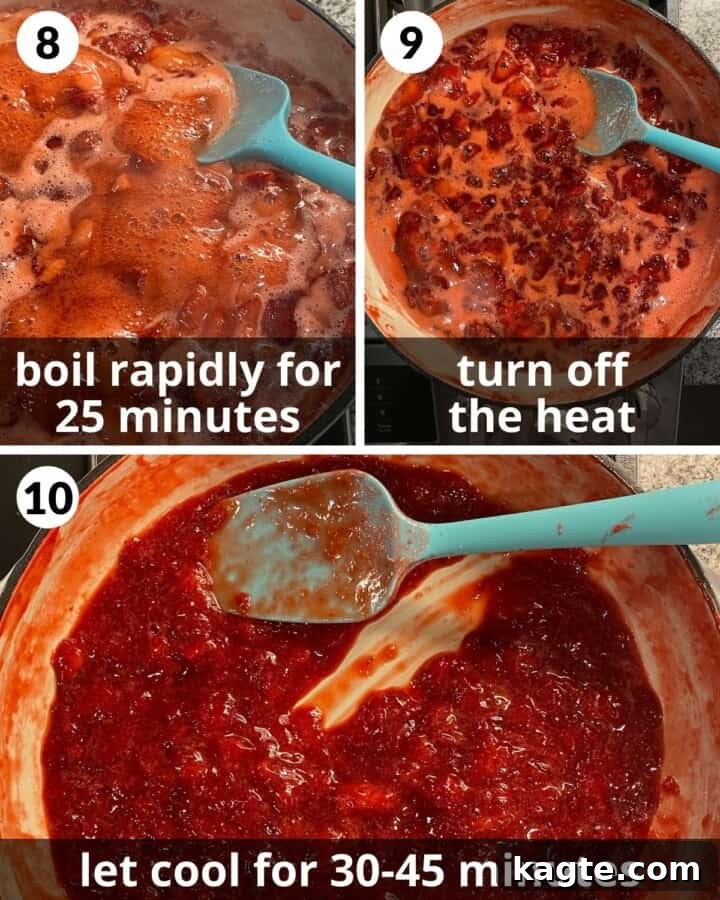
Step 8: Once the strawberries have released a good amount of liquid and the sugar has fully dissolved, increase the heat to medium-high. Bring the mixture to a full, rolling boil. This is a vigorous boil that cannot be stirred down. Maintain this strong boil for approximately 20-25 minutes, stirring frequently and continuously to prevent any sticking or burning at the bottom of the pan. This sustained boiling allows the water to evaporate, concentrating the flavors and thickening the preserves.
Step 9: Keep a close eye on the mixture. As it cooks, it will begin to visibly thicken, and the bubbling will become heavier. Most of the excess water should have evaporated. The preserves should appear syrupy, not frothy, and you’ll notice them starting to cling slightly to the sides and bottom of the pan as you stir. For those using a thermometer, the target temperature for a good set is usually around 220°F (104°C). This indicates that enough moisture has cooked off.
Step 10: Once the preserves reach the desired thickness and temperature, turn off the heat. Allow the preserves to cool in the pan for about 30-45 minutes, stirring occasionally during this time. Cooling in the pan helps the preserves begin to set naturally. After this initial cooling, you can transfer them to clean jars or airtight containers. As they continue to cool, they will thicken further in the refrigerator.
Recipe Serving Suggestions
These homemade strawberry preserves are incredibly versatile and can elevate nearly any meal or snack. For an extra touch of elegance and flavor when serving, consider garnishing your preserves with a sprinkle of fresh lemon zest or a delicate sprig of mint. Here are numerous delightful ideas for enjoying your freshly made strawberry preserves, especially alongside breakfast classics and a refreshing glass of fresh orange juice:
- Classic Breakfast Toppings: Spoon generously over Easy Homemade Biscuits, fluffy pancakes, crispy waffles, or French toast.
- Elevated Baked Goods: Swirl into Blueberry Lemon Poppy Seed Muffins before baking, or use as a delicious filling for tarts, crêpes, and turnovers.
- Delicious Breads: Serve alongside slices of Pumpkin Cream Cheese Bread, brioche, challah, or even simple white bread for a comforting treat.
- Yogurt and Oatmeal: Stir a spoonful into your morning Greek yogurt or creamy oatmeal for a natural fruit sweetener.
- Dessert Enhancer: A perfect topping for vanilla ice cream, panna cotta, cheesecake, or as a vibrant layer in trifles and parfaits.
- Savory Pairings: Unexpectedly delicious on a cheese board with creamy brie or goat cheese, or as a glaze for roasted pork or chicken.
- Cocktails & Beverages: Mix into sparkling water for a refreshing soda, use as a base for strawberry lemonade, or add a fruity twist to your favorite cocktail.
- Sandwich Spreader: Beyond PB&J, try it with almond butter or cream cheese for a satisfying sandwich.
- Thumbprint Cookies: Use as the fruity center for classic shortbread thumbprint cookies.
- French Toast Casserole: Drizzle over a warm slice of Brioche French Toast Casserole for an extra burst of flavor.
Expert Tips for Perfect Preserves
Achieving delicious homemade strawberry preserves is simple, but a few expert tips can ensure your batch turns out perfectly every time:
- Prioritize In-Season Berries: The foundation of exceptional preserves is the quality of your fruit. Always choose ripe, vibrant, in-season strawberries. These berries are naturally sweeter and more flavorful, resulting in preserves with a superior taste and aroma. Avoid using out-of-season berries, as they tend to be less sweet and can yield a preserves recipe that is more tangy or even bland.
- Stir Continuously for Best Results: Sugar can easily burn and stick to the bottom of the pan, especially as the mixture thickens. It is absolutely crucial to stir your preserves continuously, particularly during the boiling phase. Consistent stirring prevents scorching, ensures even cooking, and helps to break down the fruit evenly, contributing to a smooth yet chunky texture.
- Boil Adequately to Evaporate Moisture: This step is vital for achieving the desired thick, gooey, and spreadable consistency. Allowing the preserves to boil long enough helps evaporate excess water from the strawberries, concentrating the flavors and the natural pectin. If too much moisture remains, your preserves will be watery and won’t set properly. Look for a full, rolling boil that doesn’t subside when stirred.
- Test for Doneness with Precision: Before turning off the heat, ensure your preserves have reached the perfect setting point. A simple and effective method is the “cold plate test”: place a small spoonful of hot preserves onto a chilled plate, wait 30 seconds, then push it with your finger. If it wrinkles, it’s ready. Alternatively, aim for a temperature of 220°F (104°C) on a candy thermometer.
- Don’t Overcook Your Preserves: While boiling long enough is important, overcooking can lead to undesirable results. Overcooked preserves can become excessively thick, gummy, dark in color, or even develop a slightly caramelized, burnt taste. Keep a close watch and perform doneness tests as described above.
- Allow for Proper Cooling and Setting: Once cooked, allowing the preserves to cool fully in the pan before transferring them to jars is an important step. This cooling period gives the pectin time to activate and the preserves to begin setting. Keep in mind that preserves will continue to thicken significantly as they chill in the refrigerator. If your preserves appear a bit too runny after cooling, don’t despair – they will firm up considerably once fully chilled. Overly watery preserves can also be gently reheated and cooked for a few more minutes to reduce excess moisture.
- Prepare Your Jars: Even without traditional canning, it’s good practice to use clean, sterilized glass jars for storing your preserves. This helps ensure freshness and prevents spoilage during refrigeration.
Storage Guidelines
Proper storage is key to enjoying your homemade strawberry preserves at their best. Since this recipe does not involve a traditional canning process, the storage methods differ from store-bought, shelf-stable jams and preserves.
- Allow the homemade strawberry preserves to cool completely to room temperature within the cooking pan before transferring them.
- Carefully spoon the cooled preserves into clean, airtight containers or glass jars. Ensure there is about half an inch of headspace at the top of the jar to allow for expansion if freezing.
- Always keep these fresh preserves refrigerated between uses. This is crucial for maintaining their quality and safety.
- When stored correctly in the refrigerator, this homemade jam recipe can last for up to one month.
Note on Canning vs. Fresh Preserves: It’s important to understand that these preserves are *not* canned in the traditional sense, unlike the shelf-stable preserves you might purchase from a grocery store. Traditional canning is a method of food preservation that involves processing food in airtight jars at high temperatures to kill microorganisms and create a vacuum seal. This process allows canned goods to be stored at room temperature for extended periods. Homemade, fresh preserves like this recipe skip that intensive canning step, meaning they have a much shorter shelf life and require refrigeration at all times, similar to any other fresh condiment or leftover food.
Additions & Variations to Your Strawberry Preserves
While delicious on its own, this strawberry preserves recipe can be customized with various additions and variations to suit your taste or culinary adventures:
- Reduced Sugar Option – If you prefer your strawberry preserves to be less sweet and more tart, you can easily reduce the amount of granulated sugar. Try starting with 1 cup of sugar for a noticeably less sweet spread. Keep in mind that reducing sugar might slightly affect the thickness and shelf life, making the preserves potentially thinner and suitable for quicker consumption.
- Multi-Berry Delight – Create a vibrant mixed berry preserve by incorporating other seasonal berries. Blueberries, blackberries, and raspberries pair beautifully with strawberries. You can use a frozen mixed berry pack for convenience, just remember to thaw the berries thoroughly and drain any excess liquid before adding them to the pot with the strawberries.
- Aromatic Spice Infusions – For a warm and complex flavor, consider adding whole spices during the cooking process. A vanilla bean pod split lengthwise, a cinnamon stick, a few star anise pods, or a pinch of freshly ground black pepper can add intriguing depth. Remove whole spices before jarring.
- Herbaceous Notes – Surprisingly, fresh herbs can complement strawberries beautifully. A sprig of fresh basil, thyme, or even a tiny amount of rosemary added during the last few minutes of cooking can provide a sophisticated, gourmet touch. Remove herbs before jarring.
- Citrus Zest Boost – In addition to lemon juice, a teaspoon of finely grated orange or lime zest can amplify the bright, tangy notes and add another layer of aromatic complexity to your preserves.
- A Touch of Liqueur – For an adult twist, stir in a tablespoon or two of a complementary liqueur, such as Grand Marnier, Cointreau, or a fruit-flavored brandy, after turning off the heat but before the preserves fully cool.
- Texture Tweaks – For a smoother, more jam-like consistency, you can mash the cooked strawberries more aggressively with a potato masher or even use an immersion blender briefly (be careful not to over-process) before the preserves cool completely.
Strawberry Preserves Vs. Jam: The Difference
While often used interchangeably, there are distinct differences between strawberry preserves and jam, primarily concerning texture and how the fruit is prepared. Understanding these nuances can help you appreciate each spread for its unique qualities.
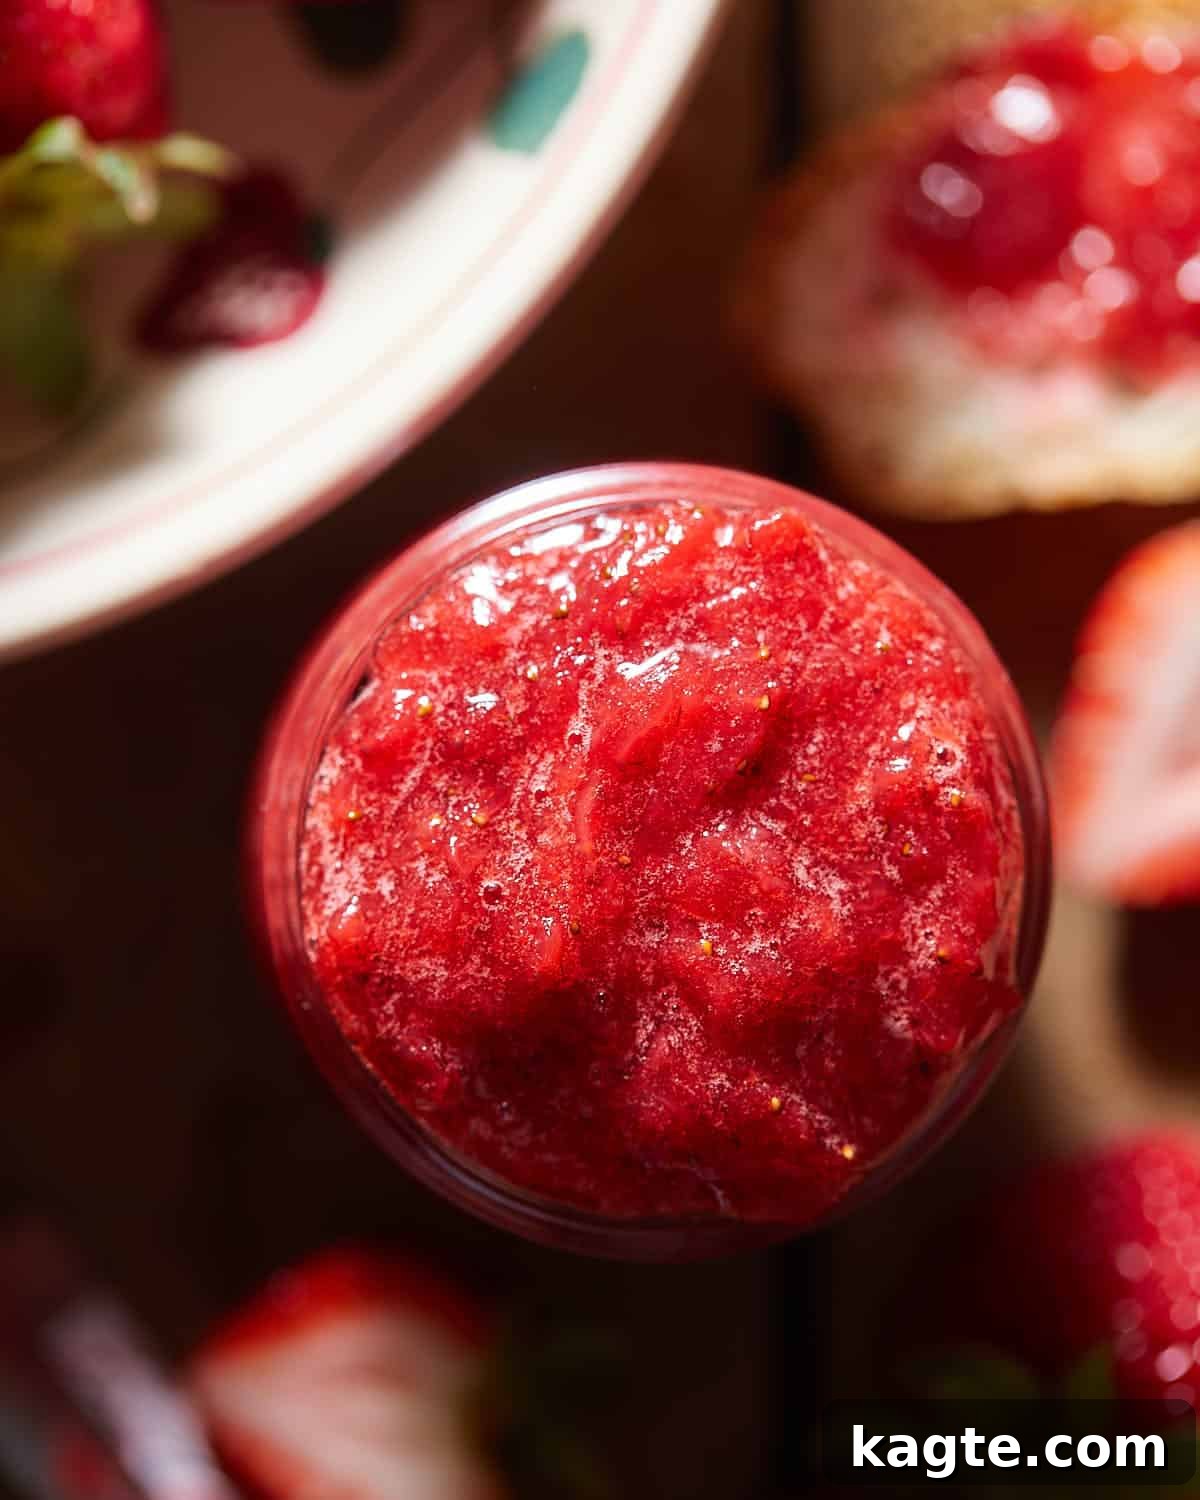
The main distinguishing factor lies in the fruit content. A **strawberry preserves recipe** (like this one) typically uses whole fruit or large, coarsely chopped pieces of fruit. This results in a chunky, robust texture where you can clearly see and taste distinct pieces of strawberry within the syrupy gel. The natural pectin in the fruit, combined with sugar and acid, creates the set, allowing the fruit to maintain its form. On the other hand, a **strawberry jam recipe** utilizes mashed or crushed fruit, often with added pectin, which creates a much smoother, more uniform consistency without large fruit chunks. While both are sweet fruit spreads, preserves offer a more intense, ‘fruit-forward’ experience with a satisfying textural bite.
Frequently Asked Questions (FAQs)
Generally, homemade strawberry preserves take about 24-48 hours to fully set after being transferred to the refrigerator. Some recipes, depending on their pectin content and cooking time, might take a bit longer. To check if your preserves have set, observe them after a day or so in the fridge; they should drip slowly and thickly off a spoon, or you can perform the wrinkle test on a cold plate.
Yes, it is definitely possible to overcook preserves. Overcooking them can lead to a few undesirable outcomes: the preserves might become too thick, rubbery, or difficult to spread. They can also take on a darker, caramelized color and a slightly burnt or overly sweet flavor, losing their fresh fruit essence. Always monitor the cooking process closely and test for doneness.
You’ll know your preserves are done when the mixture visibly thickens, becoming syrupy and starting to lightly stick to the edges of the pan as you stir. The bubbling will also change from thin and watery to heavier and more viscous. The preserves should not appear frothy. For the most accurate measure, use a candy thermometer to reach 220°F (104°C), or perform the cold plate wrinkle test.
Strawberry preserves are a type of fruit spread made primarily from whole or large pieces of strawberries, cooked with sugar and often lemon juice. Unlike jam, which uses mashed fruit, preserves are characterized by their chunky texture, allowing you to enjoy distinct pieces of fruit suspended in a thick, sweet syrup. It’s a delightful way to capture the natural essence of strawberries.
No, this particular recipe for fresh strawberry preserves does not require added commercial pectin. Strawberries, while not super high in pectin, release enough natural pectin when combined with sugar and lemon juice and cooked down sufficiently to achieve a good set for refrigerator preserves. The lemon juice helps activate the natural pectin present in the fruit.
Yes, you can reduce the amount of sugar if you prefer a less sweet preserve. However, keep in mind that sugar plays a role in the setting process and preservation. Reducing the sugar significantly may result in a thinner preserve that also has a shorter shelf life in the refrigerator. If you reduce the sugar, ensure you consume the preserves within a week or two.
More Delicious Sauce & Dip Recipes
Appetizers
Homemade Caramelized French Onion Dip
Sauce
Creamy Balsamic Vinaigrette Dressing
Sauce
Homemade Pineapple Teriyaki Sauce Recipe
Sauce
Homemade Greek Yogurt Ranch Dressing
Shop my Amazon Storefront for recommended kitchen tools and ingredients!
If you try this delightful recipe, please consider leaving a star rating in the recipe card below and/or sharing your comments! Your feedback is always valued and appreciated. Follow me on Pinterest, Facebook & Instagram for more delicious recipes.
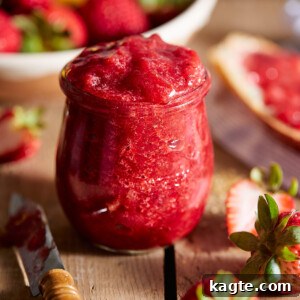
Homemade Strawberry Preserves (3 Ingredients)
This **Easy Homemade Strawberry Preserves Recipe** is crafted with peak-season strawberries, creating a naturally sweet and chunky spread you can enjoy in countless ways. This beginner-friendly recipe skips the complex canning process, focusing on fresh, vibrant flavor. Serve these preserves on biscuits, pancakes, toast, or even over vanilla ice cream for a delightful strawberry treat.
10 minutes
25 minutes
30 minutes
1 hour 5 minutes
20
Equipment
- Paring Knife
- Large Stainless Steel Cookware (or Dutch oven)
- Candy Thermometer (optional, but recommended for precision)
Ingredients
- 2 pounds fresh strawberries* (or frozen, thawed and drained)
- 1 1/2 cups (300 g) granulated sugar
- 1/2 lemon, juiced* (about 2 tablespoons fresh lemon juice)
Instructions
How To Hull Strawberries
- Pull the stem and leaves off of each strawberry.
- Insert a paring knife on the edge of the white part of the strawberry, angling it inward. (Refer to photos in the main article for visual guidance.)
- Rotate the knife around the white core, making a full circle.
- Scrape the white part out cleanly with the knife.
- Repeat this hulling process with all remaining strawberries.
Cooking the Strawberries
- Using a large knife, roughly chop all of the hulled strawberries. You can choose to leave larger chunks for a more rustic preserve or chop them finer for a slightly smoother texture.
- In a large, heavy-bottomed pan or Dutch oven, combine the chopped strawberries, granulated sugar, and fresh lemon juice. Place the pan over medium heat, stirring continuously. As it heats, the sugar will dissolve, and the strawberries will begin to release their juices.
- Once the fruit has released its liquid, increase the heat to medium-high and bring the mixture to a full, rolling boil. Continue boiling vigorously for 20-25 minutes, stirring continuously and frequently to prevent sticking and ensure even cooking.
- The preserves are done when the mixture visibly thickens, becoming syrupy and starting to cling to the sides of the pan. It should no longer be frothy. If using a candy thermometer, the ideal temperature is around 220°F (104°C).
- Turn off the heat. Allow the preserves to cool in the pan for 30-45 minutes, stirring occasionally. This cooling period helps them to set. Once cooled, transfer the preserves to clean, airtight jars or containers. They will continue to thicken further in the refrigerator.
Did you make this recipe?
Leave a comment below!
Notes
- Fresh Strawberries: For the best flavor, use fresh, in-season strawberries. If using frozen, ensure they are thawed and any excess liquid is drained before starting the recipe.
- Lemon: Lemon juice brightens the flavor and helps the preserves set. While it can be omitted, doing so will result in a slightly thinner texture and a sweeter flavor profile.
- In-Season Berries: Always opt for peak-season berries for superior taste. Out-of-season berries can yield a less flavorful or more tart preserve.
- Continuous Stirring: Stirring constantly during cooking prevents the sugar from burning and sticking to the pan, ensuring a smooth, evenly cooked preserve.
- Adequate Boiling: Boil the preserves long enough to evaporate sufficient moisture. This is crucial for achieving the desired thick, spreadable consistency. Insufficient boiling will result in watery preserves.
- Cooling Process: Allowing the preserves to cool in the pan for the specified time helps them to set properly. Remember that preserves will continue to thicken significantly once fully chilled in the refrigerator. If still too thin, gentle reheating and further cooking can rectify it.
Nutrition
|
Carbohydrates: 19g
|
Protein: 0.3g
|
Fat: 0.2g
|
Saturated Fat: 0.01g
|
Polyunsaturated Fat: 0.1g
|
Monounsaturated Fat: 0.02g
|
Sodium: 1mg
|
Fiber: 1g
|
Sugar: 17g
Nutrition information is automatically calculated and should be used only as an approximation.