

The holiday season simply isn’t complete without a spread of delicious, heartwarming treats. Among the vast array of festive sweets, few evoke such a strong sense of nostalgia and comfort as the classic peanut butter blossom cookie. But for a truly special Christmas touch, we transform this beloved favorite into Christmas Peanut Butter Blossoms. Imagine: perfectly soft and chewy peanut butter cookies, generously coated in vibrant red, green, and white sanding sugar, each crowned with a decadent Hershey’s Kiss. These aren’t just cookies; they’re edible little parcels of holiday cheer, designed to bring joy to every gathering, gift exchange, or quiet moment by the fire. Easy to bake and even easier to adore, these festive delights promise to be the star of your holiday dessert table, capturing the spirit of Christmas in every delightful bite.

The holidays are a time for indulgence, and nothing makes the season brighter than an abundance of homemade treats. While these Christmas Peanut Butter Blossoms are undeniably iconic, you might be looking to expand your festive dessert repertoire. For another show-stopping peanut butter creation, consider my Reese’s Peanut Butter Cup Pie. This rich and creamy dessert combines a luscious peanut butter filling with a smooth, dark chocolate ganache layer, creating an irresistible treat for any special occasion. If you’re searching for a fun and simple activity to do with children, my Rice Krispie Peanut Butter Balls are an excellent choice. These no-bake delights feature a crunchy Rice Krispie center enveloped in a sweet peanut butter mixture and coated in melted chocolate, making them a delightful, kid-friendly project perfect for holiday snacking or gifting.
Table of Contents
- Why You’ll Love This Recipe
- Ingredients & Expert Substitutions
- How to Make Christmas Peanut Butter Blossoms
- Pro Tips for Perfect Blossoms
- Recipe Serving Suggestions
- Additions & Variations
- Storage Instructions
- Frequently Asked Questions
- More Christmas Recipes
- Christmas Peanut Butter Blossoms Recipe
Why You’ll Love This Recipe
There’s a reason why peanut butter blossoms have stood the test of time, especially during the holidays. Our Christmas version takes everything you love about the original and amps up the festive charm. Here’s why these cookies are about to become your new favorite holiday tradition:
- Unmistakably Festive and Fun: The vibrant red, green, and white sanding sugar isn’t just for show; it immediately signals the holiday season, making these cookies a visually appealing addition to any celebration. They’re like little edible ornaments!
- The Classic Peanut Butter + Chocolate Combo: This pairing is a culinary match made in heaven. The salty-sweet richness of peanut butter perfectly complements the smooth, milky chocolate of a Hershey’s Kiss, creating an irresistible flavor profile that appeals to everyone.
- Effortlessly Simple Ingredients: You won’t need to hunt for exotic components. This recipe relies on common pantry staples, meaning you can whip up a batch (or two!) whenever the craving strikes, without a last-minute grocery run.
- A Delightful Activity for Kids: Baking these cookies is a fantastic way to involve little ones in the holiday preparations. Rolling the dough in colorful sugars is a particularly fun step for small hands, fostering cherished memories in the kitchen.
- The Ultimate Shareable Treat: These cookies are designed for sharing. They are always a crowd-pleaser at holiday parties, perfect for cookie exchanges, or make thoughtful, handmade gifts for friends, family, and neighbors. Their charming appearance and delicious taste ensure they disappear quickly!
- Soft, Chewy, and Perfectly Peanut Buttery: Every bite offers a delightful texture—a soft, yielding cookie with a slight chew, bursting with authentic peanut butter flavor, all crowned with that iconic chocolate center.
Ingredients & Expert Substitutions
Crafting the perfect Christmas Peanut Butter Blossoms starts with understanding each ingredient and how it contributes to the cookie’s texture and flavor. Here’s a breakdown of what you’ll need and some expert tips for substitutions:
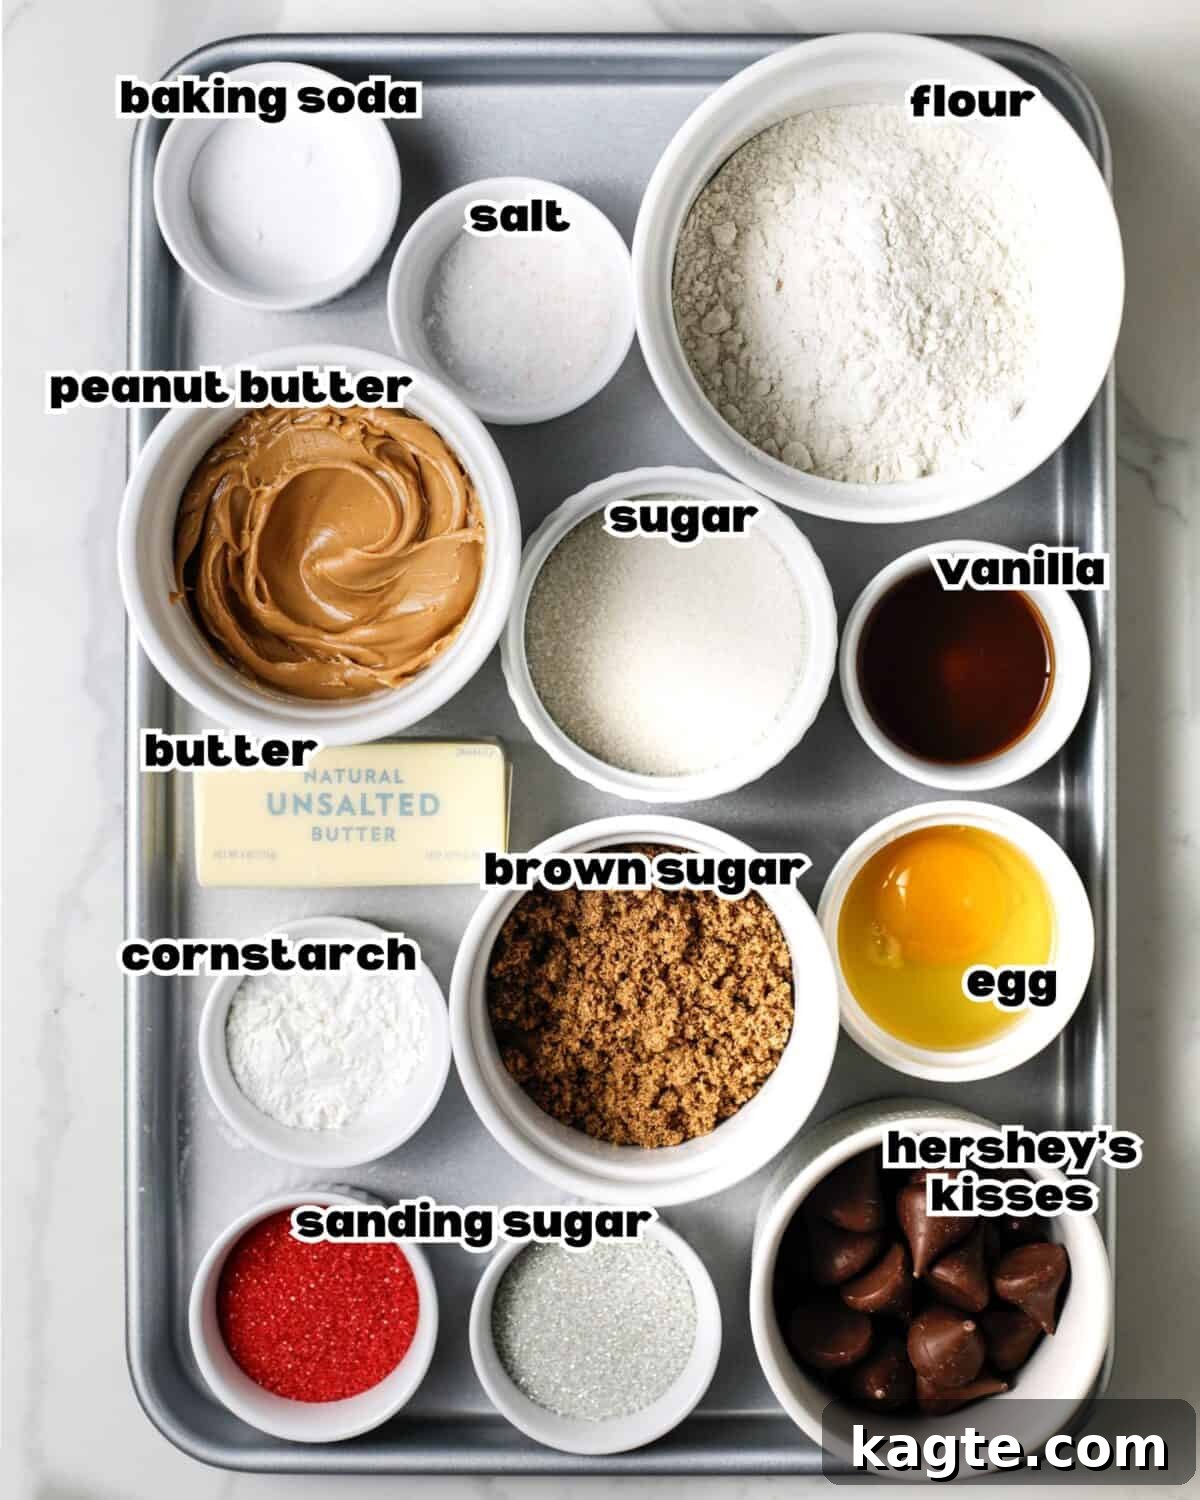
- Natural Peanut Butter: The key to these blossoms! Opt for natural peanut butter where the only ingredients are roasted peanuts and salt. This ensures a purer peanut flavor and the right consistency. Avoid “no-stir” varieties or those with added sugars and oils, as they can alter the dough’s texture and moisture, leading to dry or crumbly cookies. Creamy regular peanut butter can work, but you might need to adjust flour slightly if it’s very oily.
- Unsalted Butter: Using unsalted butter allows you to precisely control the overall salt content of your cookies. Ensure it’s softened to room temperature for optimal creaming. If salted butter is all you have, reduce the added salt in the recipe by about ¼ teaspoon.
- Vanilla Extract: Pure vanilla extract is essential for adding a warm, aromatic depth that complements the peanut butter beautifully. While imitation vanilla can be used in a pinch, it won’t provide the same rich, nuanced flavor.
- Brown Sugar: This provides moisture, chewiness, and a delightful hint of molasses flavor. Light brown sugar is generally preferred for a balanced sweetness, but dark brown sugar will yield a deeper, more robust molasses note if you desire.
- White Granulated Sugar: Granulated sugar contributes to the crisp edges and helps the cookies spread slightly. It also provides the perfect balance of sweetness alongside the brown sugar. Do not substitute with powdered sugar, as it will drastically change the dough’s consistency.
- Egg: A single large egg acts as a binder, holding the dough together and adding moisture. For a vegan alternative, a flax egg (1 tbsp ground flaxseed mixed with 3 tbsp water, let sit for 5 minutes) can be used, though the final texture may be slightly denser.
- All-Purpose Flour: Standard all-purpose flour is ideal for these cookies, providing the necessary structure. Ensure you measure it correctly, preferably by weight, to avoid a dense or dry cookie.
- Cornstarch: This secret ingredient is what makes these peanut butter blossoms incredibly soft and chewy, preventing them from becoming too crisp. It can be substituted with an equal amount of arrowroot powder if cornstarch isn’t available.
- Baking Soda: A crucial leavening agent, baking soda helps the cookies rise slightly, creating a lighter, more tender crumb. Always check that your baking soda is fresh for the best results; it should bubble when mixed with a bit of vinegar or lemon juice.
- Salt: A pinch of salt is vital for balancing the sweetness and enhancing the rich flavors of both the peanut butter and chocolate. Fine sea salt or kosher salt are excellent choices.
- Granulated Sugar for Rolling: Rolling the dough in granulated sugar before baking adds a lovely sparkling finish and a subtle textural contrast with each bite. This step is optional if you prefer a less sweet or softer exterior.
- Sanding Sugar (Red, Green, White): This is what truly makes them “Christmas” blossoms! These coarse sugars provide a beautiful sparkle and festive color. Feel free to substitute with any color of sanding sugar to match other holidays or themes.
- Hershey’s Kisses: The iconic topping! Classic milk chocolate Hershey’s Kisses are traditional. However, don’t hesitate to experiment with different Hershey’s Kiss flavors (like caramel, peppermint, or dark chocolate) or even mini peanut butter cups for an extra layer of decadence.
The complete list of ingredients and precise amounts is conveniently located on the recipe card below.
How to Make Christmas Peanut Butter Blossoms
Creating these festive peanut butter blossoms is a straightforward and enjoyable process. Follow these steps for perfect, holiday-ready cookies:
Quick Overview
- Cream softened butter and peanut butter.
- Blend in sugars and vanilla.
- Incorporate the egg.
- Whisk together dry ingredients.
- Combine wet and dry mixtures to form dough.
- Portion and roll cookie dough balls.
- Coat dough balls in festive sugars.
- Bake until lightly cracked.
- Press Hershey’s Kisses into warm cookies.
- Cool completely for chocolate to set.
Step by Step Instructions
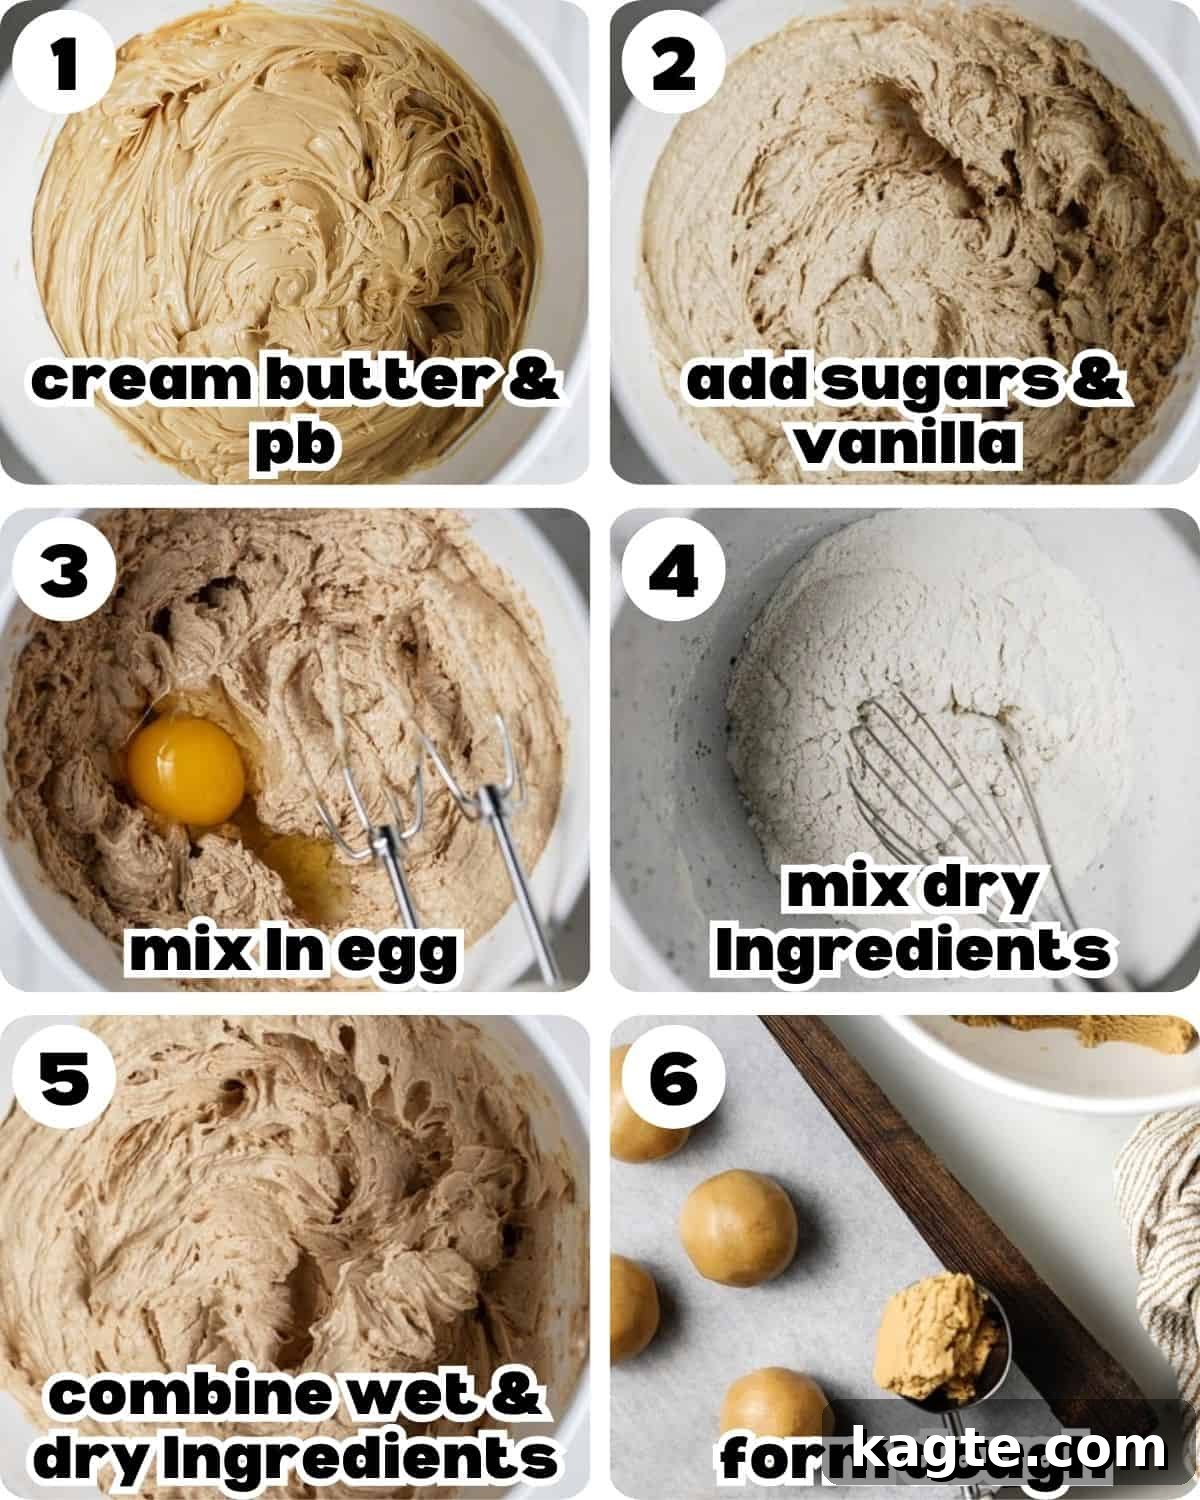
- Prepare Your Workspace and Cream Butter and Peanut Butter: Begin by preheating your oven to 350°F (175°C). Line two large baking sheets with parchment paper or silicone baking mats to prevent sticking and ensure even baking. In a spacious mixing bowl, combine the softened unsalted butter and natural peanut butter. Using an electric hand mixer or a stand mixer fitted with the paddle attachment, beat these ingredients together on medium speed for about 1-2 minutes until the mixture is smooth, light, and creamy. This step is crucial for incorporating air and achieving a tender cookie.
- Incorporate Sugars and Vanilla: Next, add the brown sugar, white granulated sugar, and pure vanilla extract to the creamed mixture. Continue beating on medium speed for an additional 2-3 minutes, until the mixture appears noticeably lightened in color and fluffy in texture. Scrape down the sides of the bowl as needed to ensure all ingredients are well combined.
- Mix in the Egg: Crack in the large egg. Beat on low speed just until the egg is fully incorporated into the dough. Overmixing at this stage can lead to a tougher cookie.
- Whisk Dry Ingredients: In a separate medium-sized bowl, whisk together the all-purpose flour, cornstarch, baking soda, and salt. This ensures all dry ingredients are evenly distributed, preventing pockets of leavening or salt in your finished cookies.
- Combine Wet & Dry Ingredients: Gradually add the whisked dry ingredients to the wet mixture in the large bowl. Mix on low speed, just until a soft, pliable dough forms. Be careful not to overmix; stop as soon as no streaks of flour are visible. The dough should be soft but easy to handle.
- Form the Dough Balls: Using a cookie scoop (a #40 scoop, approximately 1.7 tablespoons, is ideal for consistent sizing), portion out the dough. Roll each portion gently between your palms to form a smooth ball. You should get about 26 cookies from this recipe.
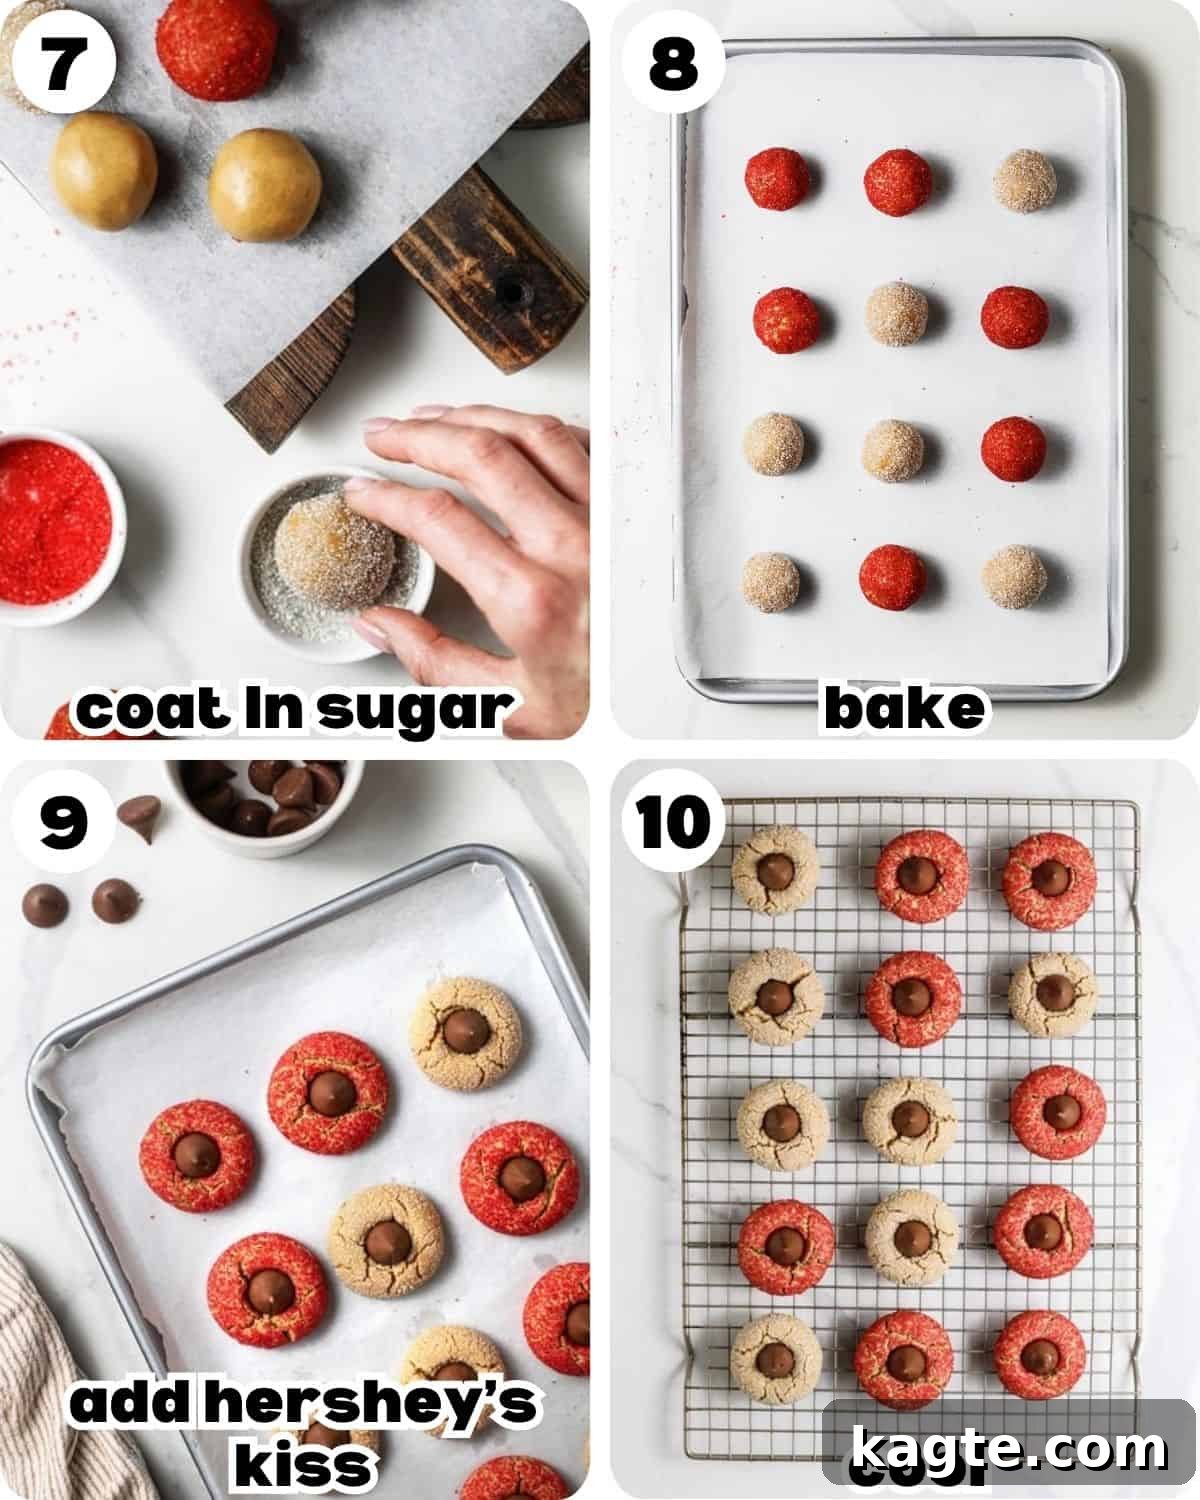
- Coat in Festive Sugars: Prepare three shallow bowls: one with granulated white sugar, one with red sanding sugar, and one with green sanding sugar. Roll each dough ball in one of these sugars, ensuring a generous and even coating. For a classic red, green, and white Christmas theme, aim to roll approximately 8-9 dough balls in each color. This step adds both sparkle and a delightful crunch.
- Bake the Cookies: Place the sugar-coated dough balls on your prepared baking sheets, ensuring they are spaced about 2 inches apart to allow for proper spreading. Bake for 10-12 minutes. The cookies are ready when their edges are lightly set and the tops show faint cracks. They might still seem slightly soft in the center—this is desired for a chewy texture and they will firm up as they cool.
- Add Hershey’s Kiss: Immediately upon removing the cookies from the oven, gently press an unwrapped Hershey’s Kiss into the center of each warm cookie. The warmth of the cookie will cause the chocolate to soften and adhere, creating those characteristic, charming cracks around the edges of the cookie. Don’t worry if the chocolate looks a bit soft; it will firm up.
- Cool Completely: Allow the cookies to cool on the baking sheet for a minimum of 5 minutes. This crucial step helps them set and prevents them from breaking when moved. After 5 minutes, carefully transfer the cookies to a wire rack to cool completely. It’s important to let the chocolate fully set before serving or storing to maintain the cookie’s structure and prevent smudging.
Pro Tips for Perfect Blossoms
Achieving bakery-quality Christmas Peanut Butter Blossoms is easy with a few expert tricks up your sleeve. These tips will ensure your cookies are consistently soft, chewy, and picture-perfect:
- Room Temperature Ingredients are Key: Always ensure your butter and peanut butter are at true room temperature. Cold ingredients won’t cream together properly, leading to a lumpy dough and potentially denser cookies. If your butter is too cold, microwave it in 5-second intervals, flipping it each time, until just softened.
- Weigh Your Ingredients for Accuracy: For the most consistent and accurate results, especially with flour, use a kitchen scale to weigh your ingredients. Measuring by volume can be inconsistent and impact the cookie’s texture, leading to cookies that are too dry or too spread out.
- Choose Natural Peanut Butter Wisely: Stick to natural peanut butter (ingredients: peanuts and salt). Other varieties, especially “no-stir” or those with added sugars and oils, contain stabilizers that can make your cookies dry or cause them to spread too much. If your natural peanut butter has separated, stir it well before measuring.
- Do Not Overbake: Peanut butter blossoms are meant to be soft and chewy. They should be removed from the oven when the edges are just set and the tops show faint cracks, even if the centers still look slightly soft. They will continue to set and firm up as they cool on the baking sheet. Overbaking leads to dry, crumbly cookies.
- Pre-unwrap Hershey’s Kisses: Save yourself a scramble! Unwrap all your Hershey’s Kisses before the cookies even go into the oven. This way, you can press them into the cookies immediately after baking while they are still piping hot, ensuring the chocolate melts just enough to adhere and create those signature cracks.
- Customize the Colors: While red, green, and white are perfect for Christmas, don’t limit yourself! Switch up the sanding sugar colors to match any occasion – pastels for Easter, orange and black for Halloween, or school colors for a graduation party.
- Don’t Skip the Cooling Time: Allowing the cookies to cool on the baking sheet for 5 minutes before transferring them to a wire rack is crucial. This helps them firm up enough to prevent breakage and allows the warm chocolate to set without melting completely. Ensure the chocolate is fully set before stacking or storing.
Recipe Serving Suggestions
These Christmas Peanut Butter Blossoms are undeniably fantastic on their own, but they truly shine as part of a festive holiday dessert spread. Consider adding them alongside:
- Christmas Chocolate Chip Cookies: A delightful contrast, these cookies are packed with gooey semi-sweet chocolate chips, vibrant red and green M&Ms, and cheerful sprinkles, offering another classic holiday favorite.
- Old Fashioned Ginger Snaps: For a touch of traditional spice, these ginger snaps are a must. Their warm, aromatic flavors and crisp-chewy texture provide a wonderful complement to the peanut butter and chocolate.
- Cranberry Pistachio Shortbread Cookies: Elegant and buttery, these shortbread cookies feature bursts of sweet cranberries, crunchy pistachios, and a delicate hint of orange zest, adding a sophisticated touch to your cookie platter.
For an extra special presentation, arrange your Christmas Peanut Butter Blossoms on a decorative platter with other holiday cookies. They also make wonderful homemade gifts when packaged in festive tins or cellophane bags, tied with a pretty ribbon. Pair them with a warm mug of hot cocoa, eggnog, or coffee for the ultimate cozy holiday treat.
Additions & Variations
While these Christmas Peanut Butter Blossoms are perfect as is, they’re also incredibly versatile. Feel free to get creative and customize them to your heart’s content:
- Swap the Chocolate: Don’t limit yourself to classic milk chocolate Kisses! Experiment with different Hershey’s Kiss flavors like Dark Chocolate, Caramel, Mint Truffle, or even Peppermint Kisses for an extra holiday zing. Mini peanut butter cups or even Rolo candies can also create a delicious twist.
- Nut-Free Option: To make these cookies allergy-friendly for those with peanut allergies, you can successfully substitute the natural peanut butter with an equal amount of sunflower seed butter (like SunButter). Ensure all other ingredients are also nut-free.
- Seasonal Color Options: Beyond Christmas, these cookies can be adapted for any celebration. Use blue and white sanding sugar for a winter wonderland theme, pastels for Easter, orange and black for Halloween, or school colors for a graduation party.
- Extra Sprinkles Fun: For an even more whimsical and celebratory look, gently press festive sprinkles or edible glitter onto the cookie dough balls before rolling them in sugar, or dust the finished, cooled cookies with a light coating of powdered sugar.
- Miniature Version: Make bite-sized blossoms perfect for small appetites or large platters by using a smaller cookie scoop (like a #60 or #70) and mini Hershey’s Kisses or chocolate chips. Adjust baking time slightly (usually 8-10 minutes).
- Add Chocolate Chips to the Dough: For the ultimate chocolate-peanut butter experience, fold in ½ cup of mini chocolate chips or chopped chocolate into the cookie dough during the last step of mixing the dry ingredients.

Storage Instructions
Proper storage is essential to keep your Christmas Peanut Butter Blossoms fresh and delicious for as long as possible:
- At Room Temperature: Once completely cooled, store the cookies in an airtight container at room temperature for up to 5-7 days. Placing a slice of bread in the container can help keep them soft, though it’s usually not necessary for these naturally soft cookies.
- Freezing Baked Cookies: These cookies freeze beautifully! Once fully cooled and the chocolate has set, arrange them in a single layer on a baking sheet and flash freeze for about 30 minutes until firm. Then, transfer them to a freezer-safe airtight container or heavy-duty freezer bag, layering with parchment paper if stacking. They can be frozen for up to 3 months. Thaw at room temperature before serving.
- Freezing Cookie Dough: You can also prepare the dough ahead of time. Form the dough balls, roll them in the colored sugars, then arrange them on a baking sheet and flash freeze until solid. Transfer the frozen dough balls to a freezer-safe bag. When ready to bake, place them on a prepared baking sheet and bake from frozen, adding a few extra minutes to the baking time (about 12-15 minutes).
Frequently Asked Questions
Here are some common questions about making Christmas Peanut Butter Blossoms:
- Why did my cookies spread too much? This can happen for several reasons:
- Too much butter or not enough flour: Ensure precise measurements, ideally using a kitchen scale.
- Warm dough: If your kitchen is very warm or you’ve handled the dough extensively, chilling it for 30 minutes before rolling and baking can help.
- Oven temperature issues: An oven that’s too cool can cause cookies to spread before setting. Use an oven thermometer to verify accuracy.
- Type of peanut butter: Using “no-stir” peanut butter with added oils can also lead to excessive spreading.
- Why are my cookies dry and crumbly? Overmixing the dough or overbaking are the most common culprits. Mix only until the flour is just incorporated, and remove cookies from the oven when the edges are set but the centers still look slightly soft.
- Can I use chocolate chips instead of Hershey’s Kisses? Yes, you can! For a variation, press chocolate chips into the warm cookies immediately after baking. You can also mix chocolate chips directly into the dough for a double chocolate boost.
- Can I make these cookies ahead of time? Absolutely! The cookie dough can be made and stored in the refrigerator for up to 3 days, or frozen for up to 3 months (as dough balls). Baked cookies also freeze well for up to 3 months.
- What if I don’t have sanding sugar? You can still make these cookies! Simply roll them in granulated white sugar for a classic look, or skip the sugar coating altogether. The flavor will still be delicious, just without the festive sparkle.
More Christmas Recipes
Complete your holiday feast with more delectable Christmas recipes:
Dessert
No-Chill Chocolate Chip Cookies (Easy)
Christmas
20 Sweet Peppermint Recipes for Christmas
Dessert
Classic Sugar Cookies with Royal Icing
Drinks
Homemade Hot Chocolate Bombs
Did you make this recipe?
If you try this recipe, please leave a star rating in the recipe card below and/or comment! I always appreciate your feedback.
Follow me on all of the platforms below.

Save
Christmas Peanut Butter Blossoms
Equipment
-
Baking Sheets
-
Parchment Paper
-
Mixing Bowls
-
Hand Mixer
-
#40 Cookie Scoop
-
Wire Rack
Ingredients
- 3/4 cup (188g) natural peanut butter (only ingredients should be roasted peanuts and salt)
- 1/2 cup 1 stick; (113g) unsalted butter, softened
- 2 teaspoons vanilla extract
- 2/3 cup (133 g) brown sugar
- 1/3 cup (67 g) white granulated sugar
- 1 large egg
- 1 1/2 (195 g) cups all-purpose flour
- 2 teaspoons cornstarch
- 1/2 teaspoon baking soda
- 1/2 teaspoon salt
- granulated sugar, for rolling
- red & green sanding sugar, for rolling
- 26 unwrapped Hershey’s Kisses
Instructions
-
Cream the Butter and Peanut Butter: Preheat your oven to 350°F (175°C) and line two baking sheets with parchment paper or silicone baking mats. In a large mixing bowl, use an electric hand mixer or stand mixer fitted with the paddle attachment to beat the softened butter and peanut butter together on medium speed until smooth and creamy (about 1-2 minutes).
-
Add Sugars and Vanilla: Add the brown sugar, white sugar, and vanilla extract. Beat on medium speed until the mixture is light and fluffy (2-3 minutes).
-
Mix in Egg: Add the egg and beat on low speed until just combined.
-
Mix Dry Ingredients: In a separate bowl, whisk together the flour, cornstarch, baking soda, and salt.
-
Combine Wet & Dry Ingredients: Gradually add the dry ingredients to the wet mixture, mixing on low speed until a soft dough forms.
-
Form the Dough: Use a cookie scoop or spoon to portion out 1.7 tablespoons of dough (approximately 26 cookies). Roll each portion into a ball.
-
Coat in Sugar: Roll each dough ball in one of the following sugars: granulated white sugar, red sanding sugar, or green sanding sugar. For a festive red, green, and white color scheme, roll about 8-9 dough balls in each color.
-
Bake: Place the sugar-coated dough balls on the prepared baking sheets, spacing them about 2 inches apart. Bake for 10-12 minutes, or until the tops begin to crack.
-
Add Hershey’s Kiss: Remove the cookies from the oven and immediately press a Hershey’s Kiss into the center of each cookie. The cookies will crack slightly around the edges—this is normal!
-
Cool: Let the cookies cool on the baking sheet for 5 minutes, then transfer them to a wire rack to cool completely. Allow the chocolate to set before serving or storing.
Notes
- Room Temperature Ingredients: Ensure butter and peanut butter are at room temperature for smooth mixing.
- Weighing Ingredients: For precision, use a kitchen scale to measure flour and other dry ingredients.
- Use Natural Peanut Butter: Choose peanut butter with only peanuts and salt as ingredients for the best texture and flavor.
- Don’t Overbake: Bake just until edges are set and tops begin to crack; cookies will continue to firm as they cool.
- Prepare Hershey’s Kisses: Unwrap Kisses before baking so you can press them into hot cookies immediately.
Nutrition
Nutrition information is automatically calculated, so should only be used as an approximation.