

Welcome to the ultimate guide for creating incredibly simple, juicy, and irresistibly crispy Baked Chicken Legs. This recipe transforms humble drumsticks into a star meal with a mouthwatering blend of spices, expertly enhanced with cornstarch for that perfect crunch. Forget complicated steps or lengthy preparations; these oven-baked chicken legs are designed for ease, flavor, and convenience, making them an ideal choice for busy weeknights or relaxed weekend dinners. Imagine biting into tender, succulent chicken with a beautifully seasoned, golden-brown skin – a culinary delight that pairs effortlessly with your favorite side dishes, from creamy mashed potatoes to vibrant roasted vegetables.

This oven-baked chicken legs recipe is not only incredibly straightforward but also incredibly fast, clocking in at less than an hour from start to table. The secret lies in a carefully crafted spice mix that elevates the natural flavors of the chicken, though it’s easily adaptable to your personal taste preferences. Composed of readily available pantry staples, this dish is wonderfully budget-friendly, proving that gourmet flavors don’t have to come with a hefty price tag. Get ready to impress your family and friends with a dish that’s both comforting and undeniably delicious.
Table of Contents
- Why You’ll Love These Crispy Baked Chicken Legs
- Essential Ingredients & Clever Substitutions
- Step-by-Step Guide: How to Bake Chicken Legs
- Perfect Pairings: Recipe Serving Suggestions
- Expert Tips for Flawless Baked Drumsticks
- Creative Additions & Flavor Variations
- Frequently Asked Questions (FAQs)
- More Delicious Chicken Recipes
- The Ultimate Crispy Baked Chicken Legs Recipe
Why You’ll Love These Crispy Baked Chicken Legs
There are countless reasons to make these baked chicken legs a staple in your meal rotation. They truly stand out for their exceptional texture and depth of flavor, combined with an unbeatable ease of preparation.
- Unbelievably Crispy Skin – The Cornstarch Secret: The star ingredient here isn’t just the chicken; it’s the cornstarch! When coated on the drumsticks and roasted at a high temperature, cornstarch works wonders to create an incredibly crispy, golden-brown exterior. This technique ensures that every bite offers a satisfying crunch, without the need for traditional breading or deep frying. It’s a simple yet highly effective trick that transforms the texture from good to gourmet.
- Effortlessly Easy & Quick: You’ll be amazed at how little effort is required to achieve such outstanding results. With minimal ingredients and standard kitchen tools, this recipe is designed for maximum flavor with minimal fuss. From prep to plate, it’s ready in under an hour, making it a perfect solution for those busy weeknights when you crave a homemade meal without the lengthy commitment.
- Explosive Flavor Profile: Our specially crafted spice blend is a symphony of flavors, featuring aromatic paprika, pungent garlic powder, savory Italian seasoning, and a hint of onion powder and ground mustard, balanced with a touch of white sugar to enhance browning and flavor complexity. This combination penetrates the chicken as it bakes, ensuring juicy meat brimming with deliciousness. Each ingredient plays a vital role in creating a well-rounded and deeply satisfying taste.
- Naturally Gluten-Free & Breading-Free: For those seeking gluten-free options or simply looking to avoid heavy breading, this recipe is a dream come true. The cornstarch provides all the crispiness you desire without any flour-based coatings, making it a naturally gluten-free dish that doesn’t compromise on texture or taste. Enjoy a lighter, yet equally indulgent, meal.
- Remarkably Versatile: The beauty of these baked chicken legs lies in their adaptability. While our recommended spice blend is fantastic, you have the freedom to customize the seasoning to your exact preferences. Want a smoky flavor? Add smoked paprika. Craving a spicy kick? Introduce some cayenne pepper or chili powder. This versatility allows you to easily align the chicken with various cuisines or side dishes, ensuring a fresh experience every time.
- The Ultimate Weeknight Dinner Solution: This recipe truly shines as a go-to for weeknight dinners. Its quick preparation, simple ingredients, and universal appeal make it a family favorite. It pairs seamlessly with an array of side dishes – from simple steamed greens and fluffy rice to hearty roasted root vegetables – offering endless possibilities to create a complete and satisfying meal without stress.
Essential Ingredients & Clever Substitutions
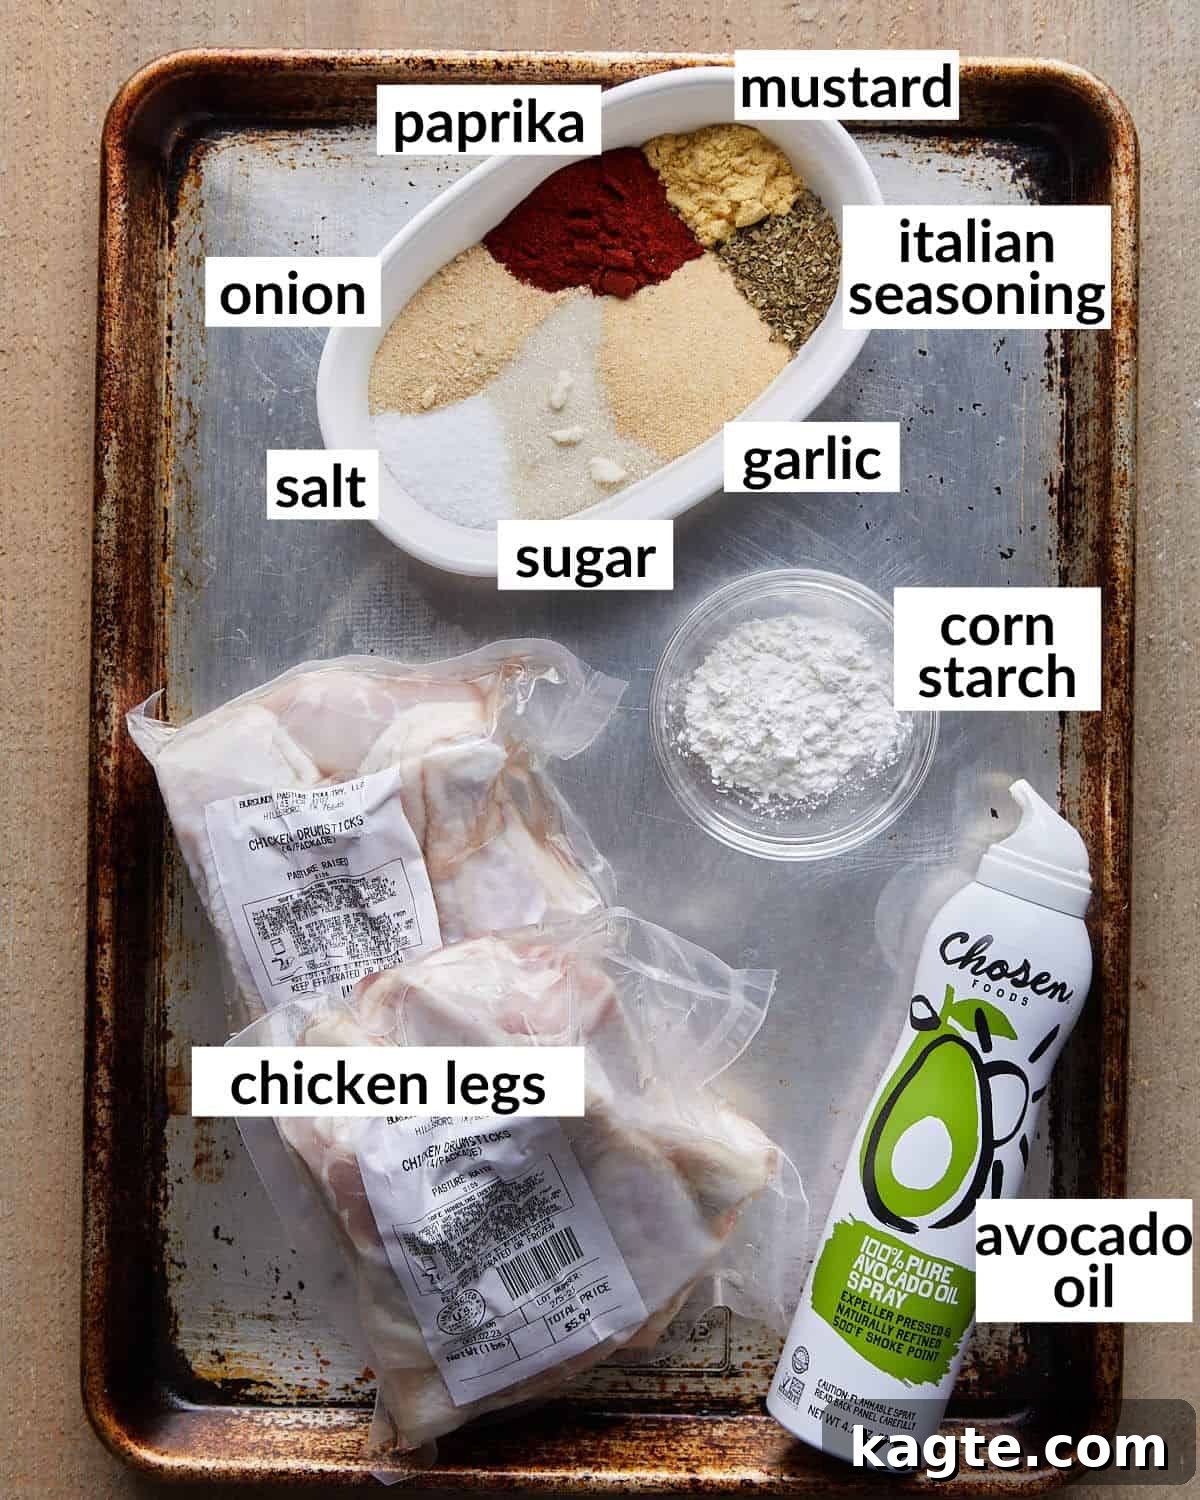
Crafting these perfectly baked chicken legs requires a few key ingredients, most of which you likely already have in your pantry. Let’s dive into each component and discuss any potential adjustments.
- Chicken Legs (Drumsticks): We recommend using bone-in, skin-on chicken drumsticks for this recipe. The bone helps to conduct heat, resulting in more even cooking and juicier meat, while the skin crisps up beautifully to create that desirable texture. You’ll need about 8 drumsticks, totaling around 2 pounds. While chicken thighs can be substituted, they are larger and will require slightly more seasoning and a longer baking time.
- Cornstarch: This is our secret weapon for achieving that incredible crispy skin without any traditional breading. Cornstarch absorbs moisture from the chicken skin, preventing it from steaming and instead allowing it to brown and crisp up in the high heat of the oven. Do not skip this ingredient! If you don’t have cornstarch, you could try arrowroot powder as an alternative, though results may vary slightly.
- Kosher Salt: All of our recipes are developed and tested using Morton kosher salt due to its consistent grain size and clean flavor profile. Its larger flakes distribute more evenly, offering a better seasoning experience. If you’re using table salt, which is much finer and saltier by volume, you’ll need to reduce the amount by roughly half to prevent over-salting. We highly recommend picking up some kosher salt for your everyday cooking needs.
- Granulated Garlic & Onion Powder: These two powdered aromatics are essential for building a robust flavor base. They provide a foundational savory taste that permeates the chicken. Feel free to adjust the quantities to your liking; if you prefer a stronger garlic kick, add a little extra.
- Paprika: Beyond its beautiful reddish hue, paprika contributes a mild, earthy sweetness and a subtle peppery note. For a deeper, richer flavor, consider using smoked paprika, which adds an incredible dimension, especially if you enjoy a hint of BBQ-like essence.
- Italian Seasoning: This blend of dried herbs (typically oregano, basil, thyme, rosemary, and marjoram) adds a wonderfully aromatic and herbaceous quality to the chicken. It complements the other spices perfectly. If you don’t have Italian seasoning, you can create your own mix using individual dried herbs, or simply omit it and increase the other spices slightly.
- Ground Mustard: A small amount of ground mustard powder provides a subtle tang and a slight peppery heat that cuts through the richness of the chicken, brightening the overall flavor profile. It’s a fantastic secret ingredient that adds complexity without being overtly mustardy.
- White Sugar: Just a touch of white sugar is included to aid in the caramelization and browning of the chicken skin, contributing to that beautiful golden crust and enhancing the crispiness. Don’t worry, it won’t make your chicken sweet, but rather balances the savory notes.
- Fresh Cracked Black Pepper: For a fresh, pungent heat that elevates the entire dish. Always use fresh cracked pepper for the best flavor.
- Spray Oil: A generous coating of spray oil (such as avocado oil, olive oil, or any high-heat cooking oil spray) is crucial. It helps the spices adhere, promotes browning, and contributes significantly to the skin’s crispiness. Using a spray ensures an even, light coating.
A complete list of ingredients with precise amounts can be found on the recipe card below.
Step-by-Step Guide: How to Bake Chicken Legs
Achieving perfectly crispy and juicy baked chicken legs is surprisingly simple. Follow these straightforward steps for a delicious meal every time.
Quick Overview
- Preheat your oven to the optimal temperature.
- Combine chicken with our flavorful spice mix and cornstarch.
- Bake until golden brown, crispy, and cooked through.
Step-by-Step Instructions
Pro Tip: Do not skip the cornstarch! It is the key to achieving that incredibly crispy, breading-free crust on your chicken legs. It draws out moisture, allowing the skin to become perfectly golden and crunchy.
Crucial for Crispiness: Allow plenty of space between each chicken leg on the wire rack. This ensures proper air circulation, which is essential for even cooking and achieving maximum crispiness. Overcrowding will steam the chicken, resulting in soggy skin.
Step 1: Begin by preheating your oven to a robust 425 degrees Fahrenheit (220 degrees Celsius). A high temperature is crucial for searing the skin and locking in juices, contributing significantly to both tenderness and crispiness. While the oven heats, take a large mixing bowl or a sturdy zip-top bag. Add all of your chicken legs along with the cornstarch, Morton kosher salt, granulated garlic, onion powder, paprika, Italian seasoning, ground mustard, white sugar, and fresh cracked black pepper. Toss everything together vigorously until each chicken leg is thoroughly and evenly coated with the spice mixture. Ensure the cornstarch is well distributed for optimal crisping.
Step 2: Prepare your baking setup. Place a metal wire rack on top of a large, rimmed baking sheet. The wire rack is a game-changer, allowing hot air to circulate around the entire surface of the chicken, preventing the bottoms from getting soggy and promoting an all-over crispy finish. The baking sheet below will catch any drippings, making cleanup much easier.
Step 3: Carefully arrange the seasoned chicken legs on the prepared wire rack. It is absolutely vital to leave ample space between each drumstick – ideally, they should not be touching. This critical step ensures that air can freely circulate, promoting even cooking and the development of that desirable crispy skin. Once arranged, spray the chicken legs generously with cooking oil. This initial coating helps in browning and contributes to the overall crispness.
Step 4: Transfer the baking sheet with the chicken legs to your preheated oven. Bake for approximately 40-45 minutes. The precise timing may vary slightly depending on the size of your drumsticks and your oven’s calibration. For the best texture and safety, use a meat thermometer to check the internal temperature. While chicken is safe to eat at 165 degrees Fahrenheit (74 degrees Celsius), for fall-off-the-bone tenderness and ultimate juiciness in drumsticks, aim for an internal temperature of 185-190 degrees Fahrenheit (85-88 degrees Celsius) in the thickest part of the meat, avoiding the bone. During the baking process, spray the chicken generously with oil an additional 2-3 times. This periodic reapplication of oil helps maintain moisture, encourages further browning, and enhances crispiness. Once cooked, remove from the oven and let rest for a few minutes before serving to allow the juices to redistribute.
Perfect Pairings: Recipe Serving Suggestions
These crispy baked chicken legs are incredibly versatile and can be paired with a multitude of side dishes to create a complete and satisfying meal. Here are some ideas to inspire your dinner plate:
Garnish for Freshness and Flavor:
- Fresh Parsley: A sprinkle of freshly chopped parsley adds a vibrant pop of color and a touch of herbaceous freshness that brightens the rich flavors of the chicken.
- Parmesan Cheese: For an extra layer of savory depth, grate some fresh Parmesan cheese over the hot chicken legs immediately after they come out of the oven. The residual heat will slightly melt it, creating a delicious crust.
- Hot Sauce: If you love a bit of heat, a drizzle of your favorite hot sauce can add a fantastic kick, transforming these classic drumsticks into a more adventurous dish.
Delicious Dipping Sauces and Gravies:
Serving these easy baked chicken legs with a dipping sauce or a rich gravy takes the flavor experience to another level. Here are some fantastic options:
- Cilantro Garlic Sauce: A zesty and aromatic sauce that provides a bright, refreshing contrast to the savory chicken.
- The Best Poblano Cream Sauce: For a touch of creamy indulgence with a mild, smoky chili flavor, this sauce is an absolute winner.
- Easy Brown Gravy: A classic, comforting choice that perfectly complements the chicken, making it ideal for a traditional meal.
- Chipotle Crema Sauce: A creamy, smoky, and slightly spicy sauce that adds an exciting Southwestern flair to your drumsticks.
Hearty Side Dish Ideas:
Beyond sauces, consider these categories for a well-rounded meal:
- Starches: Creamy mashed potatoes, fluffy rice (white or brown), roasted sweet potatoes, or a simple pasta salad.
- Vegetables: Steamed green beans, roasted broccoli or asparagus, a fresh garden salad, or sautéed spinach with garlic.
- Grains: Quinoa or couscous mixed with herbs and lemon for a lighter, healthy option.
Expert Tips for Flawless Baked Drumsticks
Achieving consistently crispy and juicy baked chicken legs every time requires attention to a few key details. These expert tips will help you master the art of oven-baked drumsticks.
- Roast at a High Temperature: This is arguably the most crucial tip for crispy chicken. Baking your chicken legs at a high temperature, specifically 425°F (220°C), creates an intense heat environment. This high heat quickly sears the chicken skin, rendering the fat underneath and allowing the skin to become wonderfully crisp and golden. Simultaneously, it helps to cook the meat quickly, locking in moisture and resulting in incredibly tender, juicy drumsticks. Avoid lower temperatures, as they can lead to soggy skin and dry meat.
- Aim for 185-190 Degrees Internally: While the generally accepted safe internal temperature for chicken is 165°F (74°C), drumsticks (and other bone-in, dark meat cuts) benefit greatly from being cooked to a slightly higher temperature. Baking them until they reach an internal temperature of 185-190°F (85-88°C) in the thickest part of the meat (without touching the bone) will make them exceptionally tender, practically falling off the bone, and even juicier. The connective tissues in dark meat break down more effectively at these higher temperatures, yielding a superior texture. Always use an instant-read meat thermometer for accuracy.
- Always Use a Wire Rack: For truly crispy skin all around, a wire rack placed over a baking sheet is indispensable. This setup lifts the chicken off the pan, allowing hot air to circulate completely around each drumstick. This ensures that the bottom of the chicken skin crisps up just as nicely as the top, preventing it from stewing in its own juices and becoming soggy. The baking sheet below catches any drippings, simplifying cleanup.
- Do Not Overcrowd the Baking Sheet: This is a common mistake that can undermine all your efforts for crispy chicken. When chicken legs are packed too closely together on the baking sheet, they release moisture, creating steam. This steam prevents the skin from browning and crisping up, instead leaving it rubbery and unappealing. Ensure there is at least an inch of space between each drumstick to allow for proper air circulation. If you’re cooking a large batch or have a smaller baking sheet, it’s always better to cook the chicken in multiple batches to maintain optimal crispiness.
- Pat Chicken Dry Before Seasoning: Excess moisture on the chicken skin is the enemy of crispiness. Before you add any spices or cornstarch, thoroughly pat the chicken legs dry with paper towels. Removing surface moisture allows the spices to adhere better and promotes quicker browning and crisping in the oven.
- Don’t Forget the Oil Spray: A generous and even coating of oil is vital. It acts as a heat conductor, helping to transfer the oven’s high heat directly to the chicken skin for maximum crisping. Spraying multiple times throughout the baking process further aids in achieving that perfect golden, crackling exterior.
Creative Additions & Flavor Variations
While our base recipe for baked chicken legs is a crowd-pleaser, it also serves as an excellent canvas for culinary creativity. Don’t be afraid to experiment and tailor this dish to your palate or to suit specific meal themes.
- Experiment with Different Spice Blends: The world of spices is your oyster! Adjust the seasoning for these baked chicken legs to reflect diverse culinary traditions or simply your personal favorites.
- Smoky & Spicy: Swap regular paprika for smoked paprika and add a pinch of cayenne pepper or chili powder for a bolder, spicier profile.
- Herby Mediterranean: Incorporate dried oregano, thyme, and a hint of lemon zest.
- Asian-Inspired: Use a blend of Chinese five-spice powder, a touch of ginger powder, and perhaps brush with a glaze of soy sauce and honey towards the end of baking.
- BBQ Flavor: Include a tablespoon of your favorite dry BBQ rub into the cornstarch mixture for a sweet and savory backyard barbecue taste.
- Boost the Crunch with Breadcrumbs: For those who love an extra layer of crunch, you can certainly add breadcrumbs to the cornstarch and spice mixture.
- Mix about 1/4 to 1/2 cup of plain panko breadcrumbs with the seasoning. Panko breadcrumbs are excellent for crispiness.
- If using seasoned breadcrumbs, be mindful of the salt content in your spice blend. You might need to reduce the amount of added kosher salt to prevent the chicken from becoming too salty.
- Elevate Flavor with Marinating: For an even deeper and more complex taste, consider marinating your chicken.
- Dry Marinade: After tossing the chicken in the spice mix (without cornstarch), let it sit uncovered in the refrigerator for at least one hour, or even overnight. This allows the flavors to deeply penetrate the meat. Before baking, pat the chicken very dry to ensure crispiness, then toss with the cornstarch right before cooking.
- Wet Marinade: If using a wet marinade (like buttermilk, yogurt, or an oil-based mixture), ensure you thoroughly pat the chicken dry to remove all excess liquid before adding the dry spice and cornstarch coating. This is crucial for achieving a crispy skin.
- Make it a One-Pan Meal with Potatoes and Vegetables: Turn this into a more substantial and convenient meal by roasting vegetables alongside the chicken.
- Cut potatoes (like Yukon Gold or red potatoes) into 1-inch chunks, or use sweet potatoes, carrots, or Brussels sprouts.
- Toss the vegetables with a generous drizzle of olive oil or cooking spray and a portion of the same seasoning mix used for the chicken.
- Arrange the seasoned vegetables on the baking sheet around the chicken legs (ensuring not to overcrowd). This creates a delicious roasted chicken and potato (or veggie) recipe all on one pan, soaking up all those savory drippings.
- Utilize Other Chicken Parts: While this recipe is optimized for drumsticks, it’s adaptable for other bone-in, skin-on chicken pieces.
- Chicken Thighs: Chicken thighs are larger and meatier than drumsticks. You will likely need to increase the amount of seasoning and cornstarch by about 25-50% depending on the size and number of thighs. The baking time will also be longer, typically 45-55 minutes, or until they reach 185-190°F (85-88°C) internally.
- Chicken Wings: For crispy baked wings, follow the same method but reduce the baking time to about 30-35 minutes, aiming for an internal temperature of 175°F (79°C).

Frequently Asked Questions (FAQs)
For the absolute best results – meaning the crispiest skin and the most tender, juicy chicken meat – we strongly recommend baking chicken legs at 425 degrees Fahrenheit (220°C). This high temperature is key for achieving that desirable golden-brown, crackling skin. While you can certainly bake them at 400 degrees Fahrenheit (200°C) and still get a good result, the skin may not be quite as crispy, and the cooking time might be slightly extended. Baking at 350 degrees Fahrenheit (175°C) is generally too low for truly crispy skin on drumsticks and can lead to less desirable results.
No, you should absolutely keep the drumsticks uncovered while they bake in the oven. Covering them would trap steam, which prevents the skin from crisping up. The goal is to allow hot air to circulate freely around the chicken, encouraging the skin to become beautifully golden and crispy. Only cover chicken if you are braising it or aiming for very moist, stew-like results, which is not what we want for these crispy baked legs.
There are a few critical steps to prevent your chicken drumsticks from drying out. Firstly, and most importantly, avoid overcooking them. Use an instant-read meat thermometer and remove the chicken from the oven when it reaches an internal temperature of 185-190 degrees Fahrenheit (85-88°C). While 165°F is technically safe, cooking dark meat slightly higher ensures tenderness. Secondly, ensure your oven is preheated to a high temperature (425°F) to cook the chicken efficiently. Lastly, do not overcrowd your baking sheet, as this can lead to steaming rather than roasting, potentially drying out the meat. Patting the chicken dry and coating it well with oil also helps to seal in juices.
The cooking time for chicken legs can vary slightly depending on their size and your oven’s specific calibration. However, typically, chicken drumsticks baked at 425 degrees Fahrenheit (220°C) will take approximately 40-45 minutes to cook through. Always verify doneness by checking the internal temperature with a meat thermometer in the thickest part of the leg (avoiding the bone). Aim for 185-190°F (85-88°C) for the most tender, fall-off-the-bone results, though 165°F (74°C) is the minimum safe temperature.
Allow any leftover baked chicken legs to cool completely to room temperature (within 2 hours) before storing them. Place them in an airtight container and refrigerate for up to 3-4 days. For longer storage, you can freeze them in an airtight freezer-safe bag or container for up to 2-3 months. Thaw frozen chicken in the refrigerator overnight before reheating.
To best preserve the crispiness, avoid reheating chicken legs in the microwave. Instead, preheat your oven or a toaster oven to 350-375 degrees Fahrenheit (175-190°C). Place the chicken legs on a wire rack over a baking sheet and reheat for 15-20 minutes, or until heated through and the skin has re-crisped. An air fryer is also an excellent option for reheating, typically taking 8-12 minutes at 350-375°F.
More Delicious Chicken Recipes
Explore More Chicken Favorites
Chicken
Garlic Butter Chicken Thighs (Baked & Crispy)
Soup & Chili
Ground Chicken Chili with Beans
Asian
Easy Orange Chicken Recipe (No Deep Frying)
Side Dish
What To Serve with Chicken and Dumplings for Dinner (15 Best Sides)
Shop my Amazon Storefront for recommended kitchen tools!
If you try this exceptional recipe for crispy baked chicken legs, please leave a star rating in the recipe card below and/or share your feedback in the comments! Your insights are always deeply appreciated. For more delicious inspiration, follow me on Pinterest, Facebook & Instagram.

Print Recipe
Best Crispy Baked Chicken Legs
Equipment
-
Baking Sheets
-
Wire Rack
-
Tongs
Ingredients
- 8 (2 pounds) chicken legs (drumsticks)
- 1 Tablespoon cornstarch
- 1 Tablespoon Morton kosher salt*
- 1 Tablespoon EACH granulated garlic, onion powder, paprika, Italian seasoning, ground mustard, & white sugar
- fresh cracked black pepper
- spray oil
Instructions
-
Preheat the oven to 425 degrees Fahrenheit (220°C). In a large bowl or zip-top bag, combine all the chicken legs with cornstarch, kosher salt, granulated garlic, onion powder, paprika, Italian seasoning, ground mustard, white sugar, and fresh cracked black pepper. Toss thoroughly until all chicken pieces are evenly coated.8 (2 pounds) chicken legs (drumsticks), 1 Tablespoon cornstarch, 1 Tablespoon Morton kosher salt*, 1 Tablespoon EACH granulated garlic, onion powder, paprika, Italian seasoning, ground mustard, & white sugar, fresh cracked black pepper
-
Place a metal wire rack on a large, rimmed baking sheet. This setup is crucial for ensuring air circulation around the chicken, leading to crispier skin.
-
Arrange the seasoned chicken legs on the wire rack, making sure there is sufficient space between each piece. Generously spray all surfaces of the chicken with cooking oil.spray oil
-
Bake for approximately 40-45 minutes, or until the chicken reaches an internal temperature of 185-190 degrees Fahrenheit (85-88°C) when measured in the thickest part of the meat (avoiding the bone). For extra crispiness and even cooking, spray the chicken generously with oil 2-3 additional times during the baking process.
Notes
- Kosher Salt: All of my recipes are tested with Morton kosher salt unless noted otherwise. It is the best salt for everyday cooking because of its size and flavor. If using table salt, the amount should be reduced. I highly recommend picking up some kosher next time you are at the store!
- Roast at a High Temperature. Baking the chicken at a higher temperature (425°F) is essential for creating wonderfully tender legs and a perfectly crispy crust.
- Bake the drumsticks until they are 185-190 degrees internally. Technically, chicken only needs to be cooked to an internal temperature of 165 degrees Fahrenheit, but dark meat, especially drumsticks, will be significantly more tender and will literally fall off the bone at this slightly higher temperature.
- Use a wire rack. The best chicken leg recipes always utilize a wire rack on a baking sheet, as it dramatically improves hot air circulation around the drumsticks. This is critical for achieving an evenly crispy crust on all sides.
- Do not overcrowd the baking sheet. Baked chicken legs cook much more evenly and achieve maximum crispiness when there is ample space between them. If you have too many drumsticks for one baking sheet/wire rack, or if you’ve doubled the recipe, cook them in batches to ensure proper air flow.
- Pat Chicken Dry: Before seasoning, always pat the chicken legs thoroughly dry with paper towels to ensure the spices adhere well and the skin crisps up effectively.
Nutrition
Nutrition information is automatically calculated, so should only be used as an approximation.