
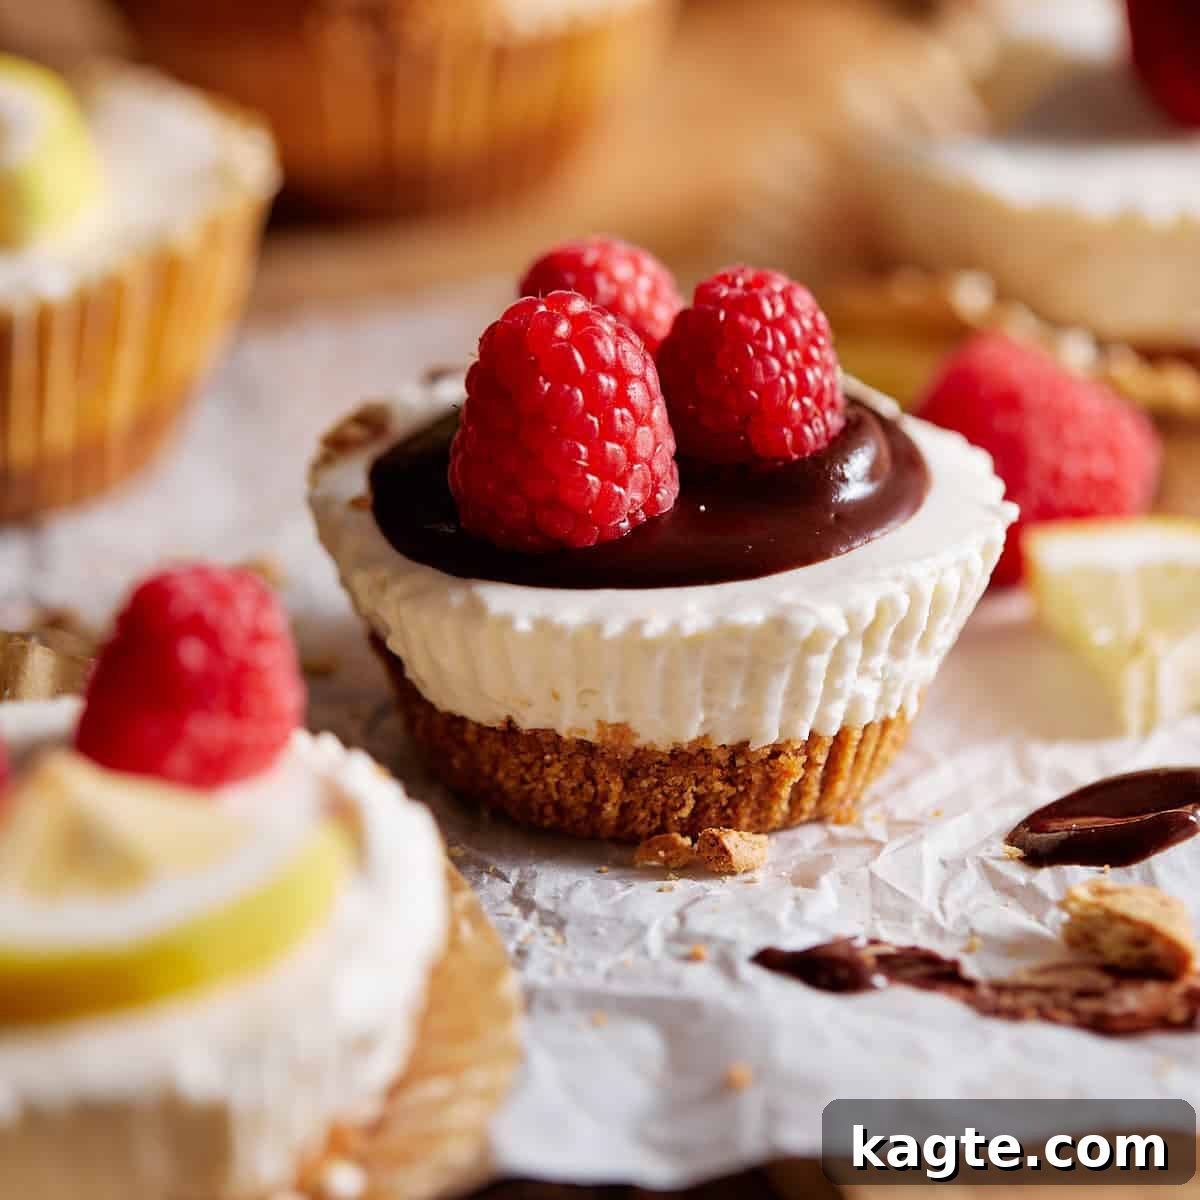
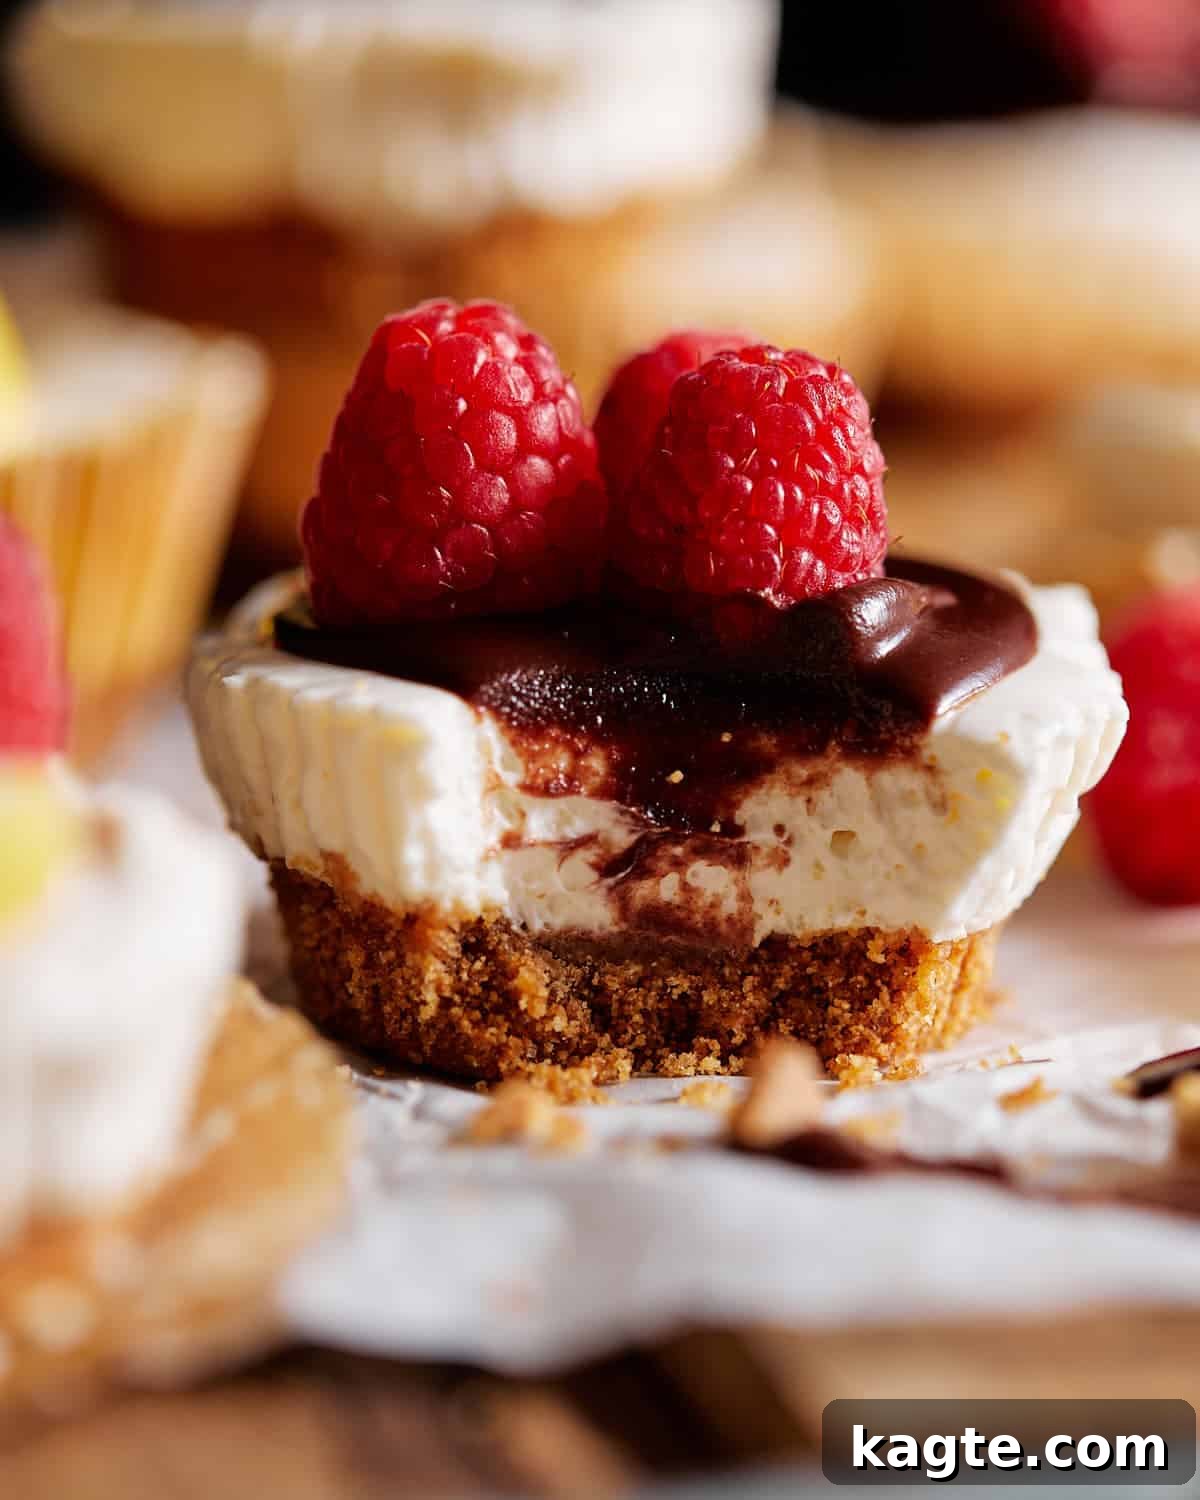
Welcome to the ultimate guide for creating exquisite **Mini No-Bake Cheesecakes** that are guaranteed to impress! Whether you’re a seasoned baker or a complete novice, this recipe is designed for ease and spectacular results. These individual cheesecakes are the quintessential crowd-pleaser, boasting a light, wonderfully creamy texture with just the right amount of tangy zest. Forget the oven – these delights come together effortlessly in a muffin tin, making them perfect for any gathering, big or small. Serve them plain for understated elegance, or unleash your creativity with a myriad of delicious toppings. Prepare to satisfy every sweet tooth with this incredibly simple yet sophisticated dessert!
Craving a classic, full-sized indulgence? You might also love our No-Bake Oreo Cream Cheese Pie for another delightful dessert experience.
Table of Contents
- Why You’ll Adore These Mini Cheesecakes
- Essential Ingredients & Smart Substitutions
- Step-by-Step Guide to Perfect Mini No-Bake Cheesecakes
- Elevate Your Cheesecakes: Topping & Serving Ideas
- Pro Tips for No-Bake Cheesecake Success & Variations
- Frequently Asked Questions (FAQs)
- Mini No-Bake Cheesecakes Recipe Card
- More Delectable Dessert Recipes
Why You’ll Adore These Mini Cheesecakes
These mini no-bake cheesecakes aren’t just a dessert; they’re a celebration of flavor and convenience. Here’s why this recipe will quickly become your new favorite:
- Irresistibly Sweet & Tangy Balance: The magic of any great cheesecake lies in its harmonious blend of sweetness and a refreshing tang. Our recipe perfectly balances the rich sweetness of sugar with the delightful acidity from cream cheese, a hint of sour cream, and a touch of lemon juice. This creates an unforgettable flavor profile that keeps you coming back for more, providing a sophisticated contrast that elevates each bite.
- Luxuriously Creamy Texture: Prepare your palate for an incredibly silky and smooth experience. The secret to our cheesecake filling’s decadent consistency is the strategic combination of full-fat cream cheese, rich sour cream, and freshly whipped heavy cream. Each ingredient plays a crucial role in creating a luscious, melt-in-your-mouth texture that is both light and satisfying, ensuring a truly indulgent dessert without being overly heavy.
- Perfectly Crispy, Buttery Crust: A great cheesecake starts with an exceptional crust. We use graham crackers infused with salted butter, which not only adds a wonderful depth of flavor but also provides essential moisture. The optional step of pre-baking the crust for just a few minutes is a game-changer; it ensures a sturdy, beautifully crispy foundation that won’t become soggy, perfectly complementing the creamy filling.
- Effortlessly Easy to Make: One of the biggest advantages of this recipe is its sheer simplicity. Since the filling contains no eggs, there’s no need for complicated baking or water baths, eliminating common cheesecake woes like cracks or over-baking. This means less time in the kitchen and more time enjoying your delicious creation. It’s a foolproof recipe, ideal for bakers of all skill levels.
- Endlessly Customizable: The beauty of these mini cheesecakes is their incredible versatility. They serve as a perfect blank canvas for your culinary imagination. Whether you prefer vibrant fresh fruits, rich chocolate sauces, crunchy nuts, or a medley of different flavors, the possibilities for toppings are truly limitless. You can even experiment by folding in various goodies directly into the filling for an extra burst of flavor and texture.
- Ideal for Summer & Warm Weather: When the temperatures rise, turning on your oven can be the last thing you want to do. These no-bake cheesecakes are the perfect solution for summer entertaining or simply enjoying a cool treat. Their lighter filling, compared to traditional baked cheesecakes, feels refreshing and less heavy, making them a superb dessert choice for those warmer months.
Essential Ingredients & Smart Substitutions
Crafting the perfect mini no-bake cheesecakes begins with understanding your ingredients. Here’s a closer look at what you’ll need and how you can adapt the recipe to your preferences:
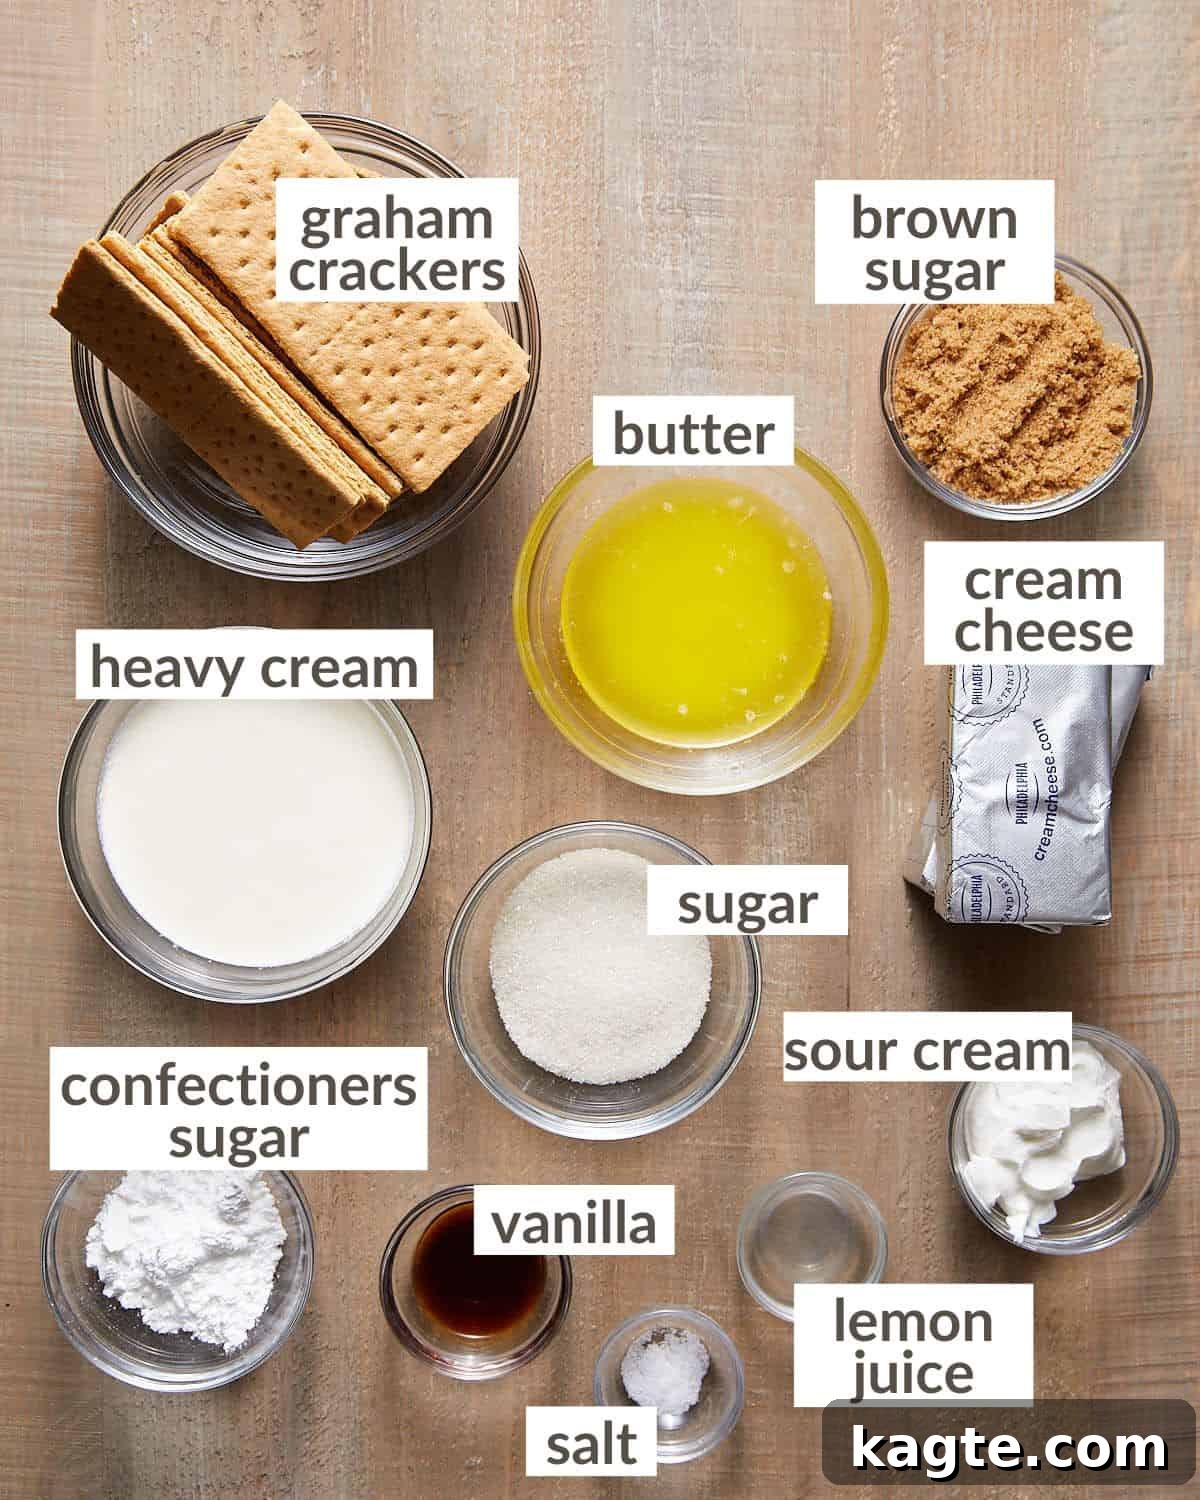
- Graham Crackers: For the crust, accuracy is key, so I highly recommend weighing your graham crackers. Different brands and sheet sizes can vary significantly. If graham crackers aren’t your preference, consider using whole Oreo cookies or pre-made Oreo crumbs for a rich, chocolatey crust. For whole Oreos, pulse them with the butter in a food processor until finely crushed. If using Oreo crumbs, you can omit the brown sugar and reduce the melted butter to 3 tablespoons, as Oreos are already sweet and rich. Alternatively, simply place a whole Oreo at the bottom of each muffin liner for an incredibly easy and delicious crust.
- Cream Cheese: The foundation of any great cheesecake! For the best results, ensure your full-fat cream cheese is softened to room temperature for about 60-90 minutes before you begin mixing. This crucial step prevents lumps and ensures a smooth, uniform filling. I typically use Philadelphia full-fat cream cheese for its consistent quality, but any reputable full-fat brick cream cheese will work. Avoid whipped cream cheese or cream cheese sold in tubs, as their consistency is too soft and will result in a runny filling.
- Lemon Juice: Don’t skip this ingredient! While it might seem counter-intuitive for a classic cheesecake, the lemon juice doesn’t impart a strong lemon flavor. Instead, it acts as a subtle enhancer, cutting through the richness of the cream cheese and adding a delicate tanginess that brightens the overall flavor profile. It’s an essential component for that signature cheesecake zing.
- Confectioner’s Sugar (Powdered Sugar): Beyond its sweetness, confectioner’s sugar plays a vital structural role in this no-bake recipe. It contains cornstarch, which acts as a stabilizer, helping the filling to set beautifully and achieve that firm yet creamy consistency without any baking. Make sure to use confectioner’s sugar, not granulated sugar, for the filling.
- Heavy Cream: This ingredient is non-negotiable for achieving the light, airy, and stable texture of our no-bake filling. The heavy cream must be whipped to stiff peaks, incorporating air that gives the cheesecake its mousse-like quality. Half-and-half or milk will not work as they lack the fat content necessary to whip and hold their shape, leading to an extremely runny and unsatisfactory filling. Always use cold heavy cream for optimal whipping.
A complete list of ingredients with precise amounts can be found on the recipe card below.
Step-by-Step Guide to Perfect Mini No-Bake Cheesecakes
Quick Overview
- Prepare the crispy graham cracker crusts.
- Whip up the smooth and creamy cheesecake filling.
- Chill thoroughly and serve.
Detailed Step-by-Step Instructions
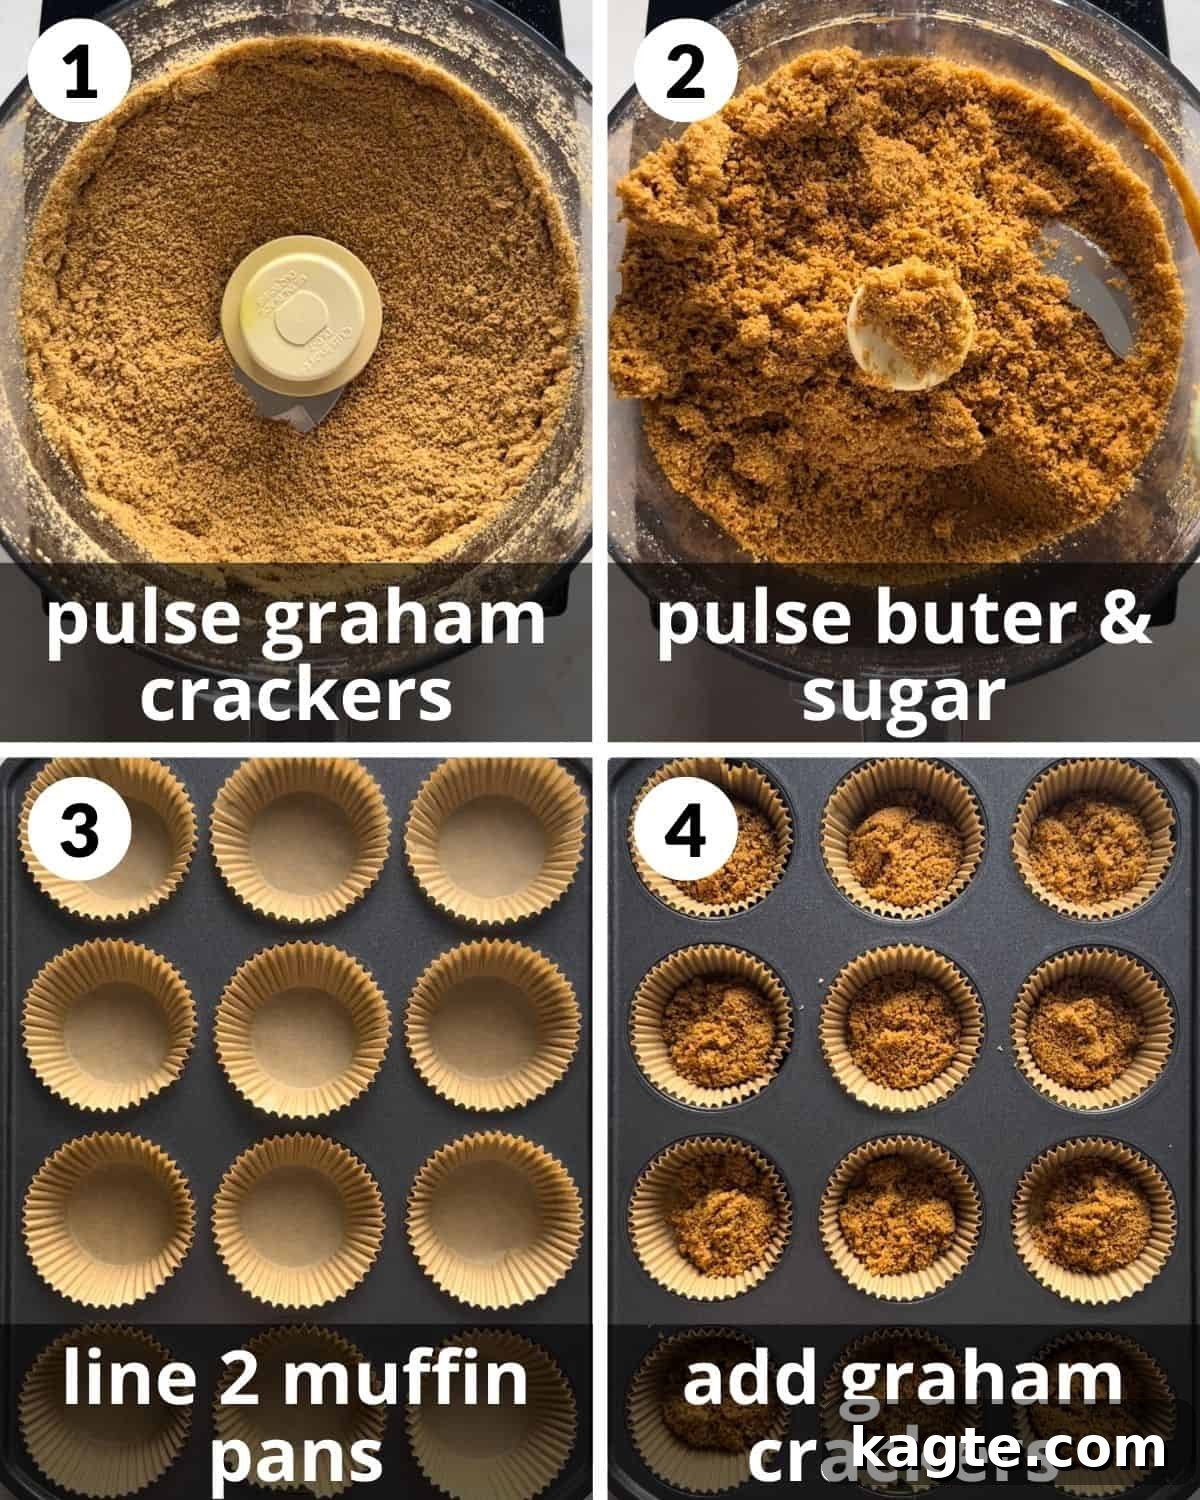
Pro Tip: Achieving very fine crumbs is essential for a cohesive and sturdy crust. Don’t leave any large chunks!
Step 1: Prepare the Graham Cracker Crumbs. In the bowl of a food processor, add the full graham cracker sheets. Pulse them until they transform into a very fine, sand-like crumb consistency. If you don’t have a food processor, you can easily achieve this by placing the graham crackers in a sturdy zip-top bag and crushing them with a rolling pin or the bottom of a heavy glass.
Step 2: Combine Crust Ingredients. Add the melted salted butter and the brown sugar to the graham cracker crumbs in the food processor. Pulse a few more times until all ingredients are thoroughly combined and the mixture resembles wet sand. Alternatively, if crushing by hand, transfer the crumbs to a bowl, add the butter and sugar, and stir vigorously until well mixed.
Step 3: Line Muffin Pans. Line two standard 12-cup muffin pans with cupcake liners. This recipe makes approximately 14-15 mini cheesecakes, so you’ll need one full pan and a few liners in the second.
Step 4: Distribute Crust. Spoon about 2 heaping tablespoons of the graham cracker mixture into the bottom of each prepared cupcake liner. Ensure an even distribution for consistent crust thickness.
Crucial Tip: Beat the cream cheese mixture until absolutely smooth. Any lumps at this stage will remain in your finished cheesecake filling.
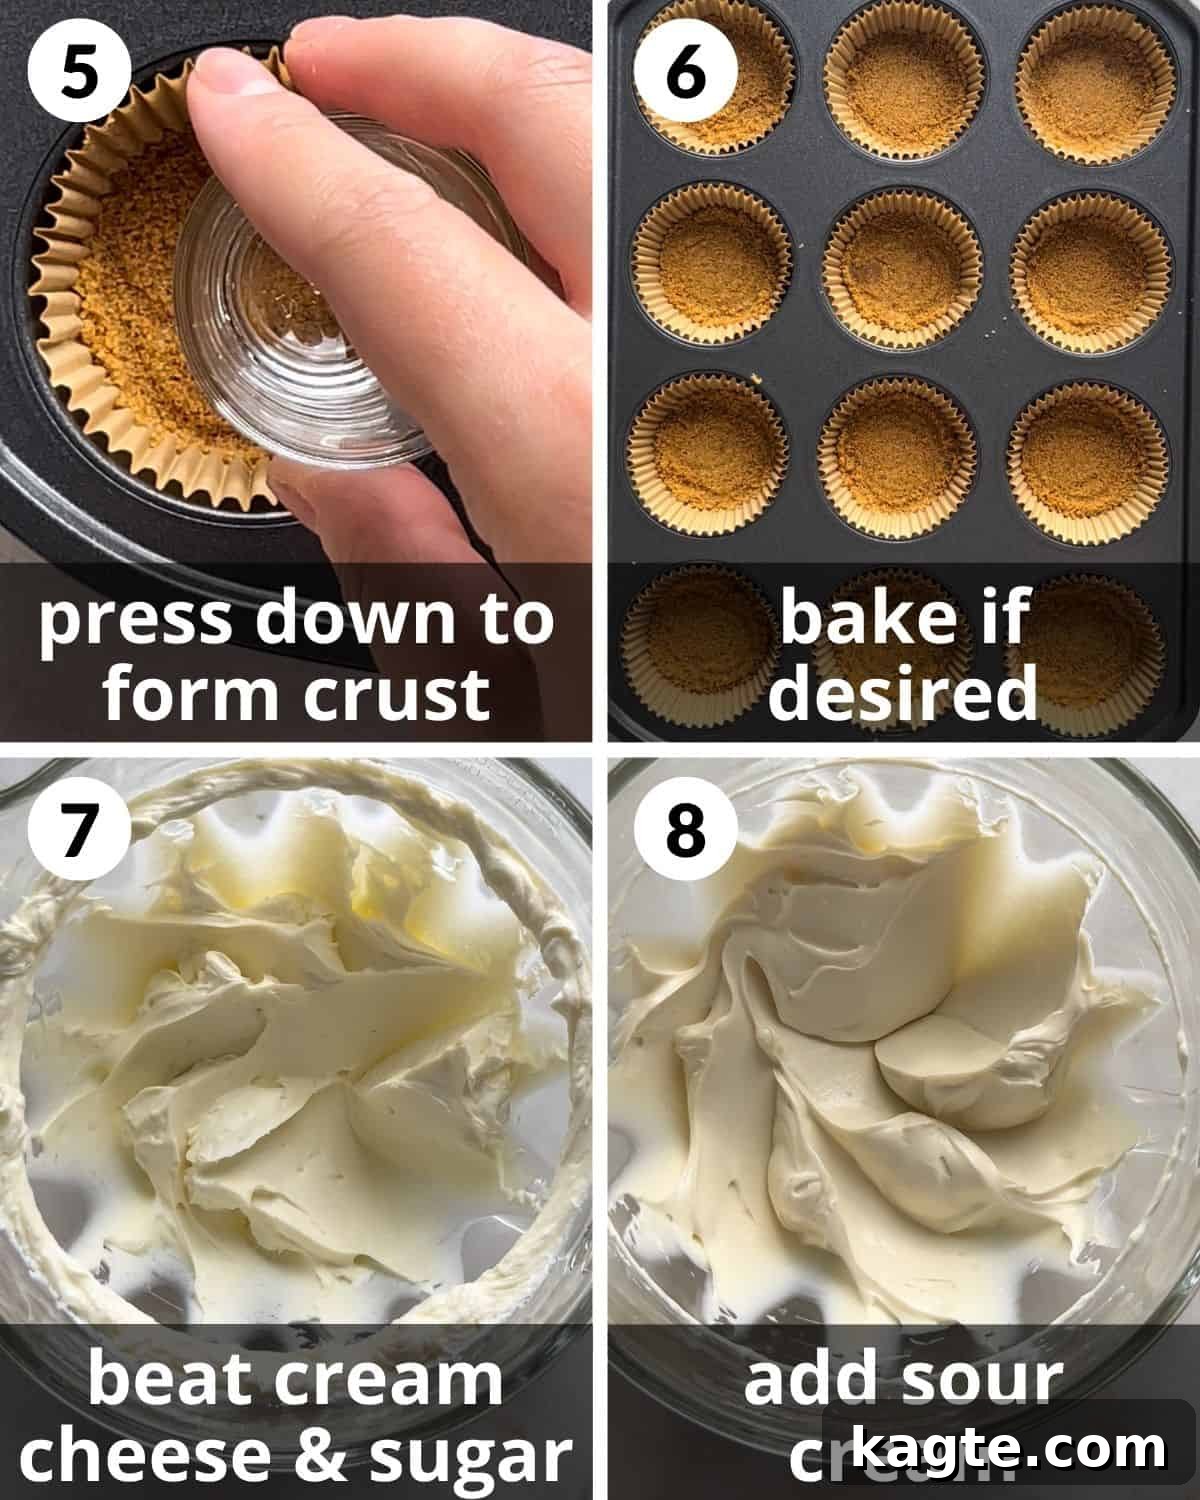
Step 5: Compact the Crusts. Using your fingers, the back of a spoon, or the bottom of a small shot glass, firmly press the graham cracker crumbs into the bottom of each liner. Compacting them tightly is essential for a sturdy crust that won’t crumble when serving.
Step 6: (Optional) Bake the Crusts. For an even sturdier and crispier crust, I highly recommend this optional step. Bake the compacted crusts in a preheated oven at 350°F (175°C) for 6-7 minutes. This short bake time helps to ‘set’ the butter and prevents the crust from becoming soggy. Once baked, remove them from the oven and allow them to cool completely before proceeding to the filling stage.
Step 7: Beat Cream Cheese and Sugars. In the bowl of a stand mixer fitted with a paddle attachment (or using an electric hand mixer), add the softened full-fat cream cheese, granulated sugar, and confectioner’s sugar. Beat on medium speed until the mixture is completely smooth and free of any lumps. This can take several minutes; be patient and scrape down the sides of the bowl as needed to ensure everything is incorporated.
Step 8: Add Remaining Wet Ingredients. To the smooth cream cheese mixture, add the sour cream, vanilla extract, lemon juice, and a pinch of salt. Mix on medium speed until just combined. Overmixing at this stage can incorporate too much air, which isn’t desirable for the cream cheese base. Scrape down the bottom and sides of the bowl once more to ensure uniform mixing.
Remember to Chill: Proper chilling time is paramount for the filling to set perfectly and achieve its ideal texture.
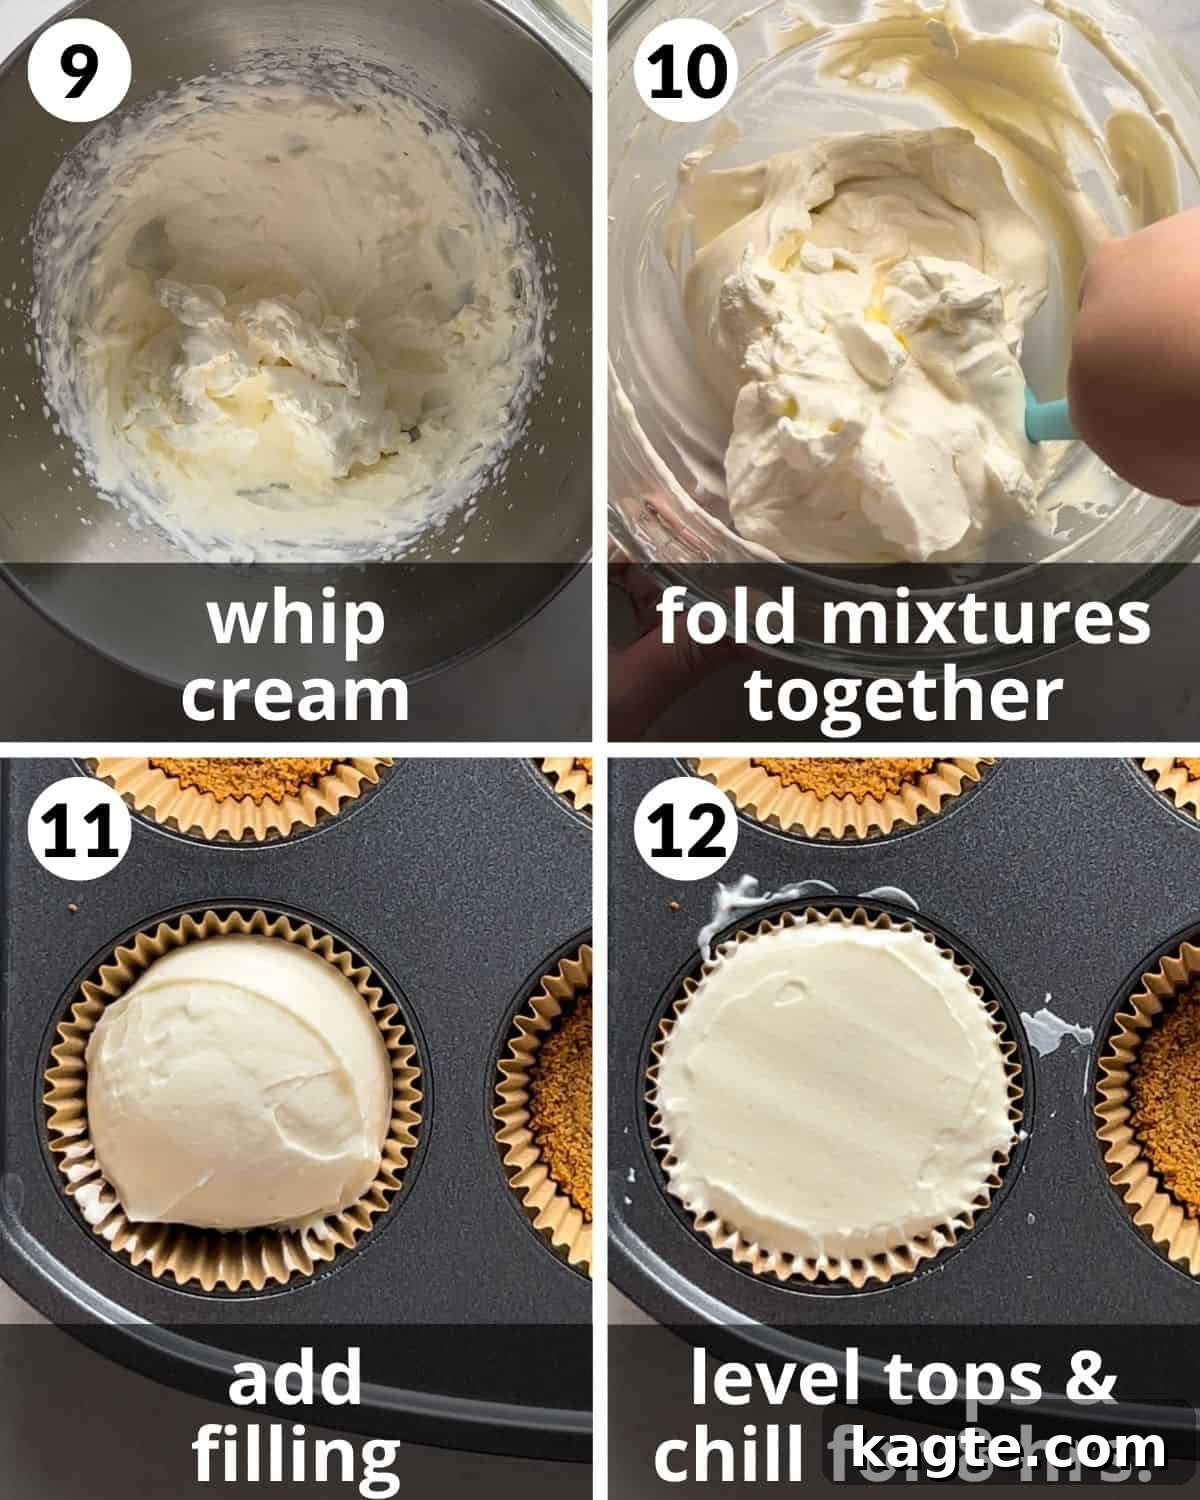
Step 9: Whip the Heavy Cream. In a separate, clean mixing bowl, use a stand mixer fitted with a whisk attachment (or an electric hand mixer) to whip the cold heavy cream on medium-high speed. Continue whipping until stiff peaks form. This means when you lift the whisk, the cream should hold its shape firmly without collapsing. Be careful not to over-whip, which can turn it grainy.
Step 10: Gently Fold in Whipped Cream. This step requires a delicate touch. Gently and slowly fold the whipped heavy cream into the cream cheese mixture using a spatula. Use an upward scooping motion, turning the bowl as you go. The goal is to incorporate the whipped cream without deflating the air you’ve just beaten into it. This process creates the light and airy texture of the cheesecake filling. Stop folding as soon as no streaks of white cream remain.
Step 11: Fill the Liners. Use an ice cream scoop (a 1/4 cup scoop works perfectly) or a large spoon to fill each cupcake liner with approximately 1/4 cup of the cheesecake filling. Ensure each liner is filled generously and evenly.
Step 12: Smooth and Chill. Use a small offset spatula or the back of a butter knife to gently smooth the tops of each cheesecake for a polished finish. Once filled, transfer the muffin pans to the refrigerator. These cheesecakes require a minimum of 8 hours of chilling time to allow the filling to properly set and firm up. For best results, I recommend chilling them overnight. Serve them well chilled, as the creamy filling can soften quickly at room temperature.
Elevate Your Cheesecakes: Topping & Serving Ideas
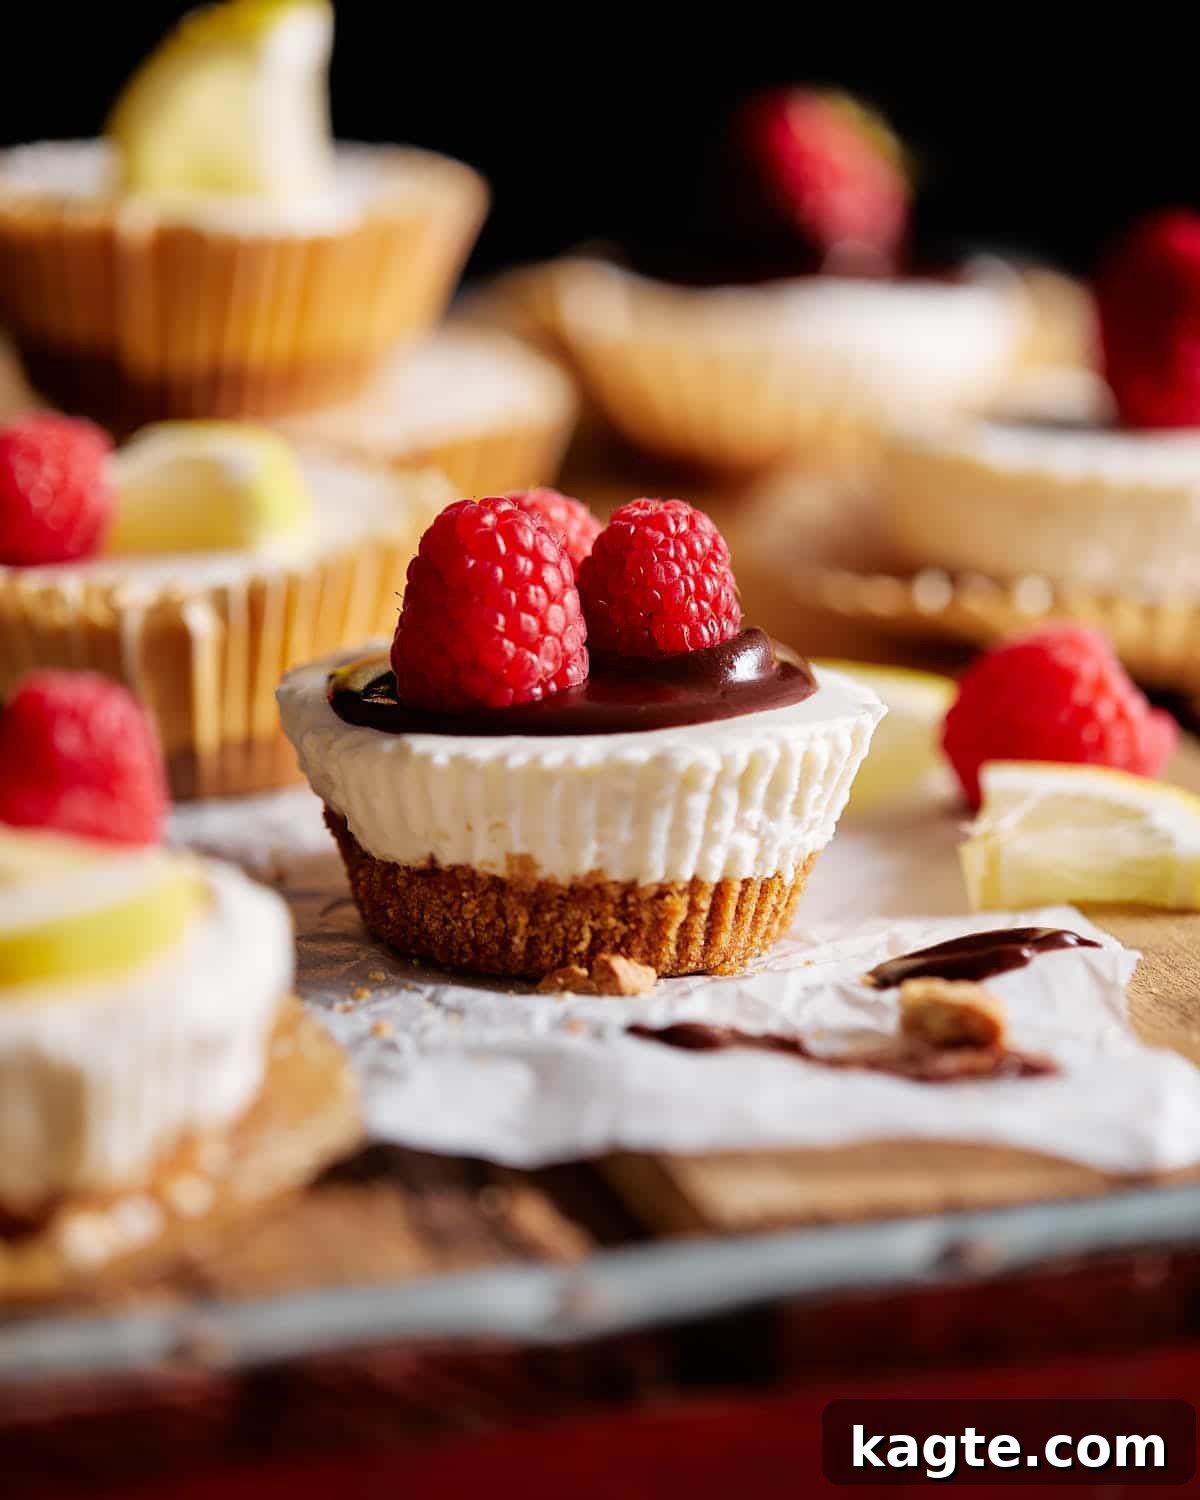
While these individual cheesecakes are truly delicious on their own, adding a thoughtful topping can transform them into an even more decadent treat. The possibilities are truly endless, allowing for creative expression and catering to diverse tastes. Here are some of my favorite ideas to inspire you:
- Homemade No-Egg Vanilla Ice Cream: A scoop of rich vanilla ice cream alongside a mini cheesecake is a match made in heaven, offering a delightful contrast in temperature and texture.
- Classic Whipped Cream: A dollop of freshly whipped cream is always a welcome addition, providing an extra layer of lightness and creamy indulgence.
- Rich Chocolate Sauces:
- Hot Fudge: A warm, gooey hot fudge sauce drizzled over a cold cheesecake is a classic combination that never disappoints.
- Chocolate Ganache: For a sophisticated touch, a silky smooth ganache (equal parts high-quality chocolate and heavy cream, gently heated until melted) adds deep chocolate flavor and a beautiful sheen.
- Fresh Fruit Medley: Bright, fresh berries like raspberries, strawberries, blueberries, or blackberries offer a burst of natural sweetness and a refreshing tang that beautifully complements the creamy cheesecake. A mix of seasonal fruits can also create a visually stunning presentation.
- Crunchy Delights:
- Crushed Oreos: If you didn’t use them for the crust, crushed Oreos make an excellent topping, adding a familiar crunch and chocolatey flavor.
- Chocolate Chips: Mini chocolate chips sprinkled on top provide a subtle chocolate accent and a slight textural contrast.
- Toffee Bits: For a buttery, caramel-like crunch, a sprinkle of toffee bits adds an irresistible element.
- Fruit Curds & Preserves:
- Luscious Apple Curd: A tangy-sweet apple curd brings a unique autumnal flavor.
- Sweet Strawberry Jam or other fruit preserves: A spoonful of your favorite jam or fruit preserve adds concentrated fruit flavor and a beautiful color.
- Caramel & Nutty Indulgences:
- Nutella: A swirl of creamy Nutella provides a delightful hazelnut-chocolate experience.
- Caramel or Dulce de Leche: A rich, buttery caramel sauce or decadent dulce de leche drizzled over the top offers a comforting, sweet finish.
- Seasonal & Holiday Toppings:
- Easter Chocolate Egg Candies: For a festive spring touch, miniature chocolate egg candies can add a playful and colorful element.
- Crushed Peppermint: During the holiday season, crushed peppermint candies can transform these into a minty, festive treat.
Pro Tips for No-Bake Cheesecake Success & Variations
Achieving perfectly set, delicious mini no-bake cheesecakes is simple when you follow these expert tips and consider these creative variations:
- Always Use Room Temperature Cream Cheese: This is arguably the most crucial tip for a lump-free, smooth filling. Cold cream cheese will not cream properly with the sugar, resulting in a chunky texture. Plan ahead and remove your cream cheese from the refrigerator 60-90 minutes before you intend to start mixing. This allows it to soften uniformly, making it much easier to beat into a silky consistency.
- Don’t Skip Baking the Crusts: While this is a “no-bake” cheesecake, a quick bake for the crust is highly recommended. Baking the graham cracker crust for just 6-7 minutes at 350°F (175°C) before adding the filling significantly improves its texture. It makes the crust sturdier, crispier, and prevents it from becoming soggy when it absorbs moisture from the filling. This small step makes a big difference in the overall integrity and enjoyment of your mini cheesecakes.
- Be Gentle: Do Not Overmix the Filling: Once you’ve added the delicate whipped cream to the cream cheese mixture, the key is to fold, not beat. Use a spatula and incorporate the whipped cream with gentle, slow, upward motions. Overmixing at this stage will cause the air beaten into the heavy cream to deflate, leading to a thinner, less stable, and potentially runny filling. Stop as soon as the ingredients are just combined.
- Chill Thoroughly and Keep Cold: Adequate chilling time is essential for the cheesecake filling to set and firm up properly. I strongly recommend preparing these cheesecakes a day in advance and allowing them to chill overnight in the refrigerator (at least 8 hours). This ensures they are perfectly set and easy to handle. To maintain their beautiful form and creamy texture, always store them in the refrigerator and only take them out right before serving, as they can melt quickly at room temperature. This also helps prevent them from sticking to the liners.
- No Crust Option: If you’re looking for an even lighter dessert or prefer to skip the crust entirely, you can simply fill the cupcake liners with the cheesecake mixture. For bite-sized treats, consider using mini muffin pans and corresponding liners. This creates delightful cheesecake bites that are perfect for sampling.
- Make it Gluten-Free: Adapting this recipe for gluten-free diets is incredibly simple. Just swap out traditional graham crackers for their gluten-free counterparts, or opt for gluten-free Oreo cookies. These alternatives will still provide a delicious and sturdy crust for your cheesecakes. You can also try my No-Bake Mini Oreo Cheesecakes recipe, using gluten-free Oreos.
- Lemon-Flavored Boost: If you desire a more pronounced lemon flavor, enhance the tanginess by zesting one whole lemon and adding it to the cream cheese mixture along with the lemon juice. The zest provides aromatic citrus oils that elevate the lemon notes without making it overwhelmingly sour.
- Chocolate Chip Variation: For a delightful textural contrast and a burst of chocolate in every bite, gently fold a handful (about 1/2 cup) of mini chocolate chips into the finished cheesecake filling before portioning it into the liners. This adds a sweet surprise and extra visual appeal.
Frequently Asked Questions (FAQs)
Both no-bake and baked cheesecakes offer delightful dessert experiences, but they differ significantly in texture and preparation. No-bake cheesecake, like this recipe, is lighter and typically easier to make as it doesn’t require an oven. Its filling is more mousse-like, airy, and creamy due to the incorporation of whipped cream. Baked cheesecake, on the other hand, is richer, denser, and often more challenging to perfect (prone to cracks if not baked correctly). It achieves its firm texture through eggs and heat, resulting in a more traditional, custardy dessert.
Absolutely, yes! Due to the fresh dairy ingredients like cream cheese and whipped cream, these mini cheesecakes must be refrigerated. The filling will become soft and lose its structure very quickly at room temperature, potentially leading to a melty mess. Always store them in the refrigerator and only remove them right before you plan to serve them to maintain their perfect consistency and freshness.
The key to a perfectly set no-bake cheesecake is sufficient refrigeration. The cornstarch in the confectioner’s sugar and the structure of the whipped cream require ample time to firm up. I strongly recommend refrigerating them overnight (at least 8 hours) before serving. This allows the filling to achieve its ideal firm yet creamy texture, preventing it from being too runny. For an even firmer, almost ice cream-like texture, you can also freeze the cheesecakes for an hour or two before serving them semi-frozen.
When stored properly in an airtight container in the refrigerator, these mini no-bake cheesecakes will remain fresh and delicious for 3-4 days. If you wish to extend their shelf life, they can be frozen for up to 2-3 months. To freeze, place the cheesecakes (without toppings) on a baking sheet until firm, then transfer them to an airtight freezer-safe container, separating layers with parchment paper. Thaw in the refrigerator before serving and add fresh toppings.
Yes, absolutely! These mini no-bake cheesecakes are an ideal make-ahead dessert, which is one of their many advantages for entertaining. Preparing them a day in advance allows them ample time to chill and set perfectly, ensuring they are ready to serve when your guests arrive. This also helps reduce stress on the day of your event, giving you more time to enjoy with your company. Simply add your desired toppings just before serving.
Explore my favorite baking essentials and kitchen gadgets on my Amazon Storefront!
More Delectable Dessert Recipes
Dessert
No-Chill Chocolate Chip Cookies (Easy)
Christmas
20 Sweet Peppermint Recipes for Christmas
Fall
20 Sweet Pumpkin Recipes for Fall (From Breakfast to Dessert)
Breakfast
Blueberry Coffee Cake with Greek Yogurt & Streusel
If you try this delightful recipe, please take a moment to leave a star rating in the recipe card below and/or a comment! Your feedback is always appreciated and helps others discover delicious recipes. Follow me on Pinterest, Facebook & Instagram for more culinary inspiration.
Print Recipe
Save Recipe
Mini No-Bake Cheesecakes
5 from 136 votes
These Mini No-Bake Cheesecakes are perfect for a crowd and come together in no time in a muffin tin. They are light, creamy, and a little tangy. Serve them as is or top them with a variety of goodies.
1 hour 30 minutes
8 hours
9 hours 30 minutes
14 people
Equipment
- Stand Mixer
- Mixing Bowls
- Kitchen Scale
- Muffin Pan & Liners
- Food Processor (optional, for crumbs)
Ingredients
Graham Cracker Crust
- 12 full graham cracker sheets (180 g)*
- 5 Tablespoons (71 g) salted butter, melted
- 5 Tablespoons (63 g) brown sugar
Cheesecake Filling
- 2 8-ounce bricks full fat cream cheese, softened to room temperature*
- 1/3 cup (67 g) granulated sugar
- 3 Tablespoons (24 g) confectioners sugar*
- 3 Tablespoons (45 g) sour cream
- 1 Tablespoon vanilla extract
- 1 teaspoon lemon juice*
- 1/4 teaspoon salt
- 3/4 cup heavy cream*
- chocolate ganache & berries (optional for topping, see notes*)
Instructions
- In the bowl of a food processor, add the graham crackers & pulse into a fine crumb. You can also use a zip-top bag to crush them.
- Add the melted butter and brown sugar to the crumbs. Pulse until completely combined. You can also stir them into the crumbs in a bowl.
- Line 2 standard muffin pans with cupcake liners.
- Add about 2 heaping Tablespoons of the graham cracker crumbs to each liner. There should be enough for 14-15 crusts.
- Use your fingers or the bottom of a shot glass to compact the crumbs tightly.
- OPTIONAL: Bake the crusts for 6-7 minutes at 350 degrees F (175 C). This creates a sturdier and crispier crust. Cool completely before adding the filling.
- Using a stand mixer fitted with a paddle or an electric hand mixer on medium, beat the cream cheese, granulated sugar, and confectioners sugar until completely smooth. There should not be any lumps.
- Add the sour cream, vanilla, lemon, and salt. Mix on medium until combined. Scrape down the bottom of the bowl if needed.
- In a separate bowl, using a stand mixer fitted with a whisk or an electric hand mixer on medium high, whip the heavy cream until stiff peaks form.
- Gently and slowly fold the whipped cream into the cream cheese so the whipped cream does not deflate.
- Use an ice cream scoop or spoon to fill the cupcake liners. Use about 1/4 cup of filling per cheesecake.
- Smooth the tops with an offset spatula or butter knife. Refrigerate for 8 hours before serving. Serve chilled. The cheesecakes melt quickly at room temperature.
Notes
- Graham Crackers: I recommend weighing the graham crackers because not all sheets are the same size. You can also use whole Oreos or Oreo crumbs for the crust. You can either weigh the Oreos and pulse them with the butter or you can just place a whole Oreo in the bottom of each muffin liner. Omit the sugar if using Oreo crumbs and reduce the butter to 3 Tablespoons.
- Cream Cheese: Remove the cream cheese from the refrigerator 60-90 minutes before beating it with the sugar. I used Philadelphia full-fat cream cheese, but any brand will work as long as it is full-fat and is not whipped or in a tub.
- Lemon Juice: The lemon juice does not give the cheesecake a strong lemon flavor. It just adds some tanginess that balances the sweetness.
- Confectioner’s Sugar: This contains cornstarch which helps add structure to the filling, crucial for a no-bake recipe.
- Heavy Cream: Since the cream must be whipped, half-and-half or milk will not work. The filling will be extremely runny if these are used. Ensure the heavy cream is very cold before whipping.
- Topping Suggestion (Chocolate Ganache): To make a simple chocolate ganache, use equal parts high-quality chocolate chips (or finely chopped chocolate) and heavy cream (e.g., 4 ounces chocolate & 1/2 cup cream). Heat the cream in a small saucepan over low heat until simmering, then pour over the chocolate. Let sit for 5 minutes, then stir until melted and smooth. Cool slightly before drizzling.
- Do not overmix the filling: Once the whipped cream is added to the cream cheese mixture, use gentle and slow motions to fold it together. If it is overworked, the whipped cream will lose the air that was beaten into it and the filling will be runny.
- Chill & keep cold: The filling has to cool before it will set. I recommend making them one day in advance so they can chill overnight. Be sure to pull them out of the fridge right before serving so the filling does not melt or stick to the liners.
Nutrition
Calories: 158 kcal |
Carbohydrates: 19 g |
Protein: 1 g |
Fat: 10 g |
Saturated Fat: 6 g |
Polyunsaturated Fat: 0.4 g |
Monounsaturated Fat: 3 g |
Trans Fat: 0.2 g |
Cholesterol: 28 mg |
Sodium: 122 mg |
Fiber: 0.2 g |
Sugar: 13 g
Nutrition information is automatically calculated, so should only be used as an approximation.