

Craving that smoky, tender barbecue goodness but don’t have a smoker? Look no further! This **BBQ Dutch Oven Pulled Pork** recipe is your ultimate solution for incredibly juicy and flavorful pulled pork, right from your oven. We’ll start by searing the pork to lock in those rich flavors, then slow-cook it to perfection until it effortlessly falls apart. Get ready to pile high those mouth-watering pulled pork sandwiches!
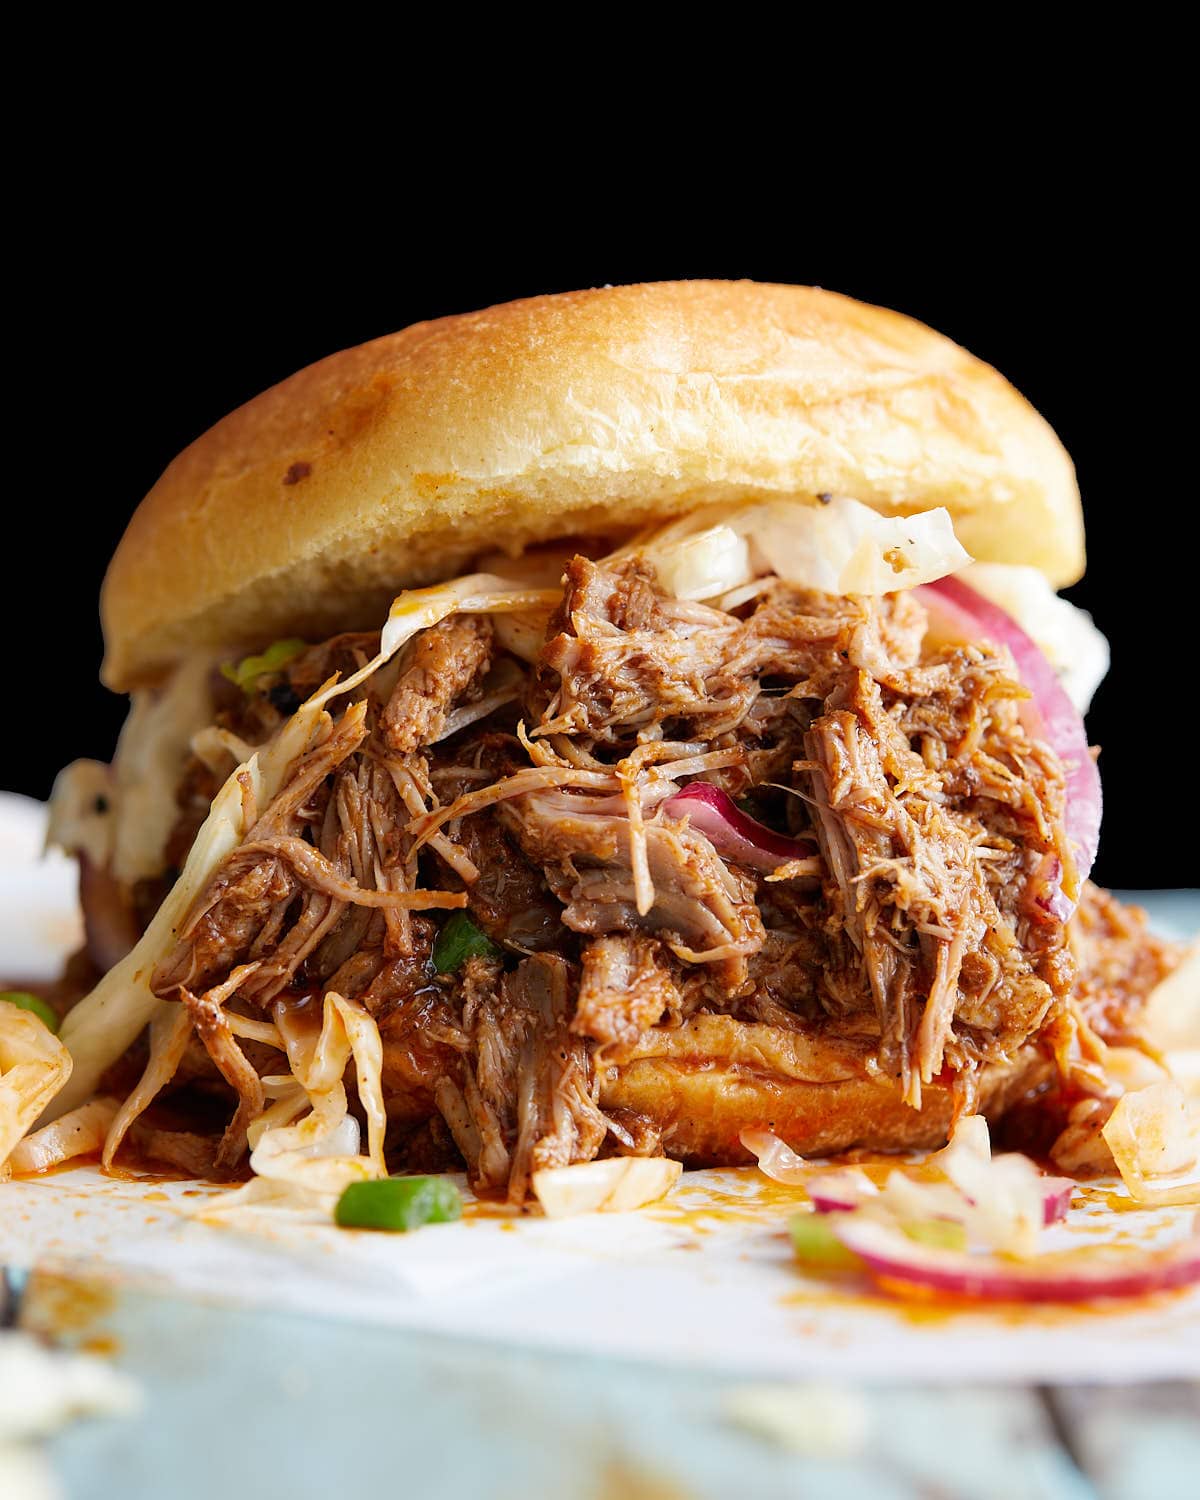
For those who love the rich taste of barbecue but prefer the comfort and convenience of indoor cooking, this cast iron Dutch oven pulled pork recipe is an absolute game-changer. Whether you live in an apartment without outdoor grilling space or simply prefer not to deal with charcoal and smoke, this method delivers authentic BBQ flavors. It’s similar to the ease and deliciousness of my Easy Dutch Oven BBQ Chicken.
If you’re a fan of indoor BBQ recipes, be sure to explore my other favorites like Baby Back Ribs in the Oven, Slow Cooker Dr. Pepper Ribs, or Oven Beef Kabobs.
For those who appreciate Mexican-inspired cuisine, you might also love my Authentic Carnitas recipe, which also utilizes a versatile pork butt.
Need more culinary inspiration for your Dutch oven? I’ve compiled a fantastic list of One Pot Dutch Oven Recipes that are perfect for any occasion.
Table of Contents
- What Is the Best Cut of Meat for Pulled Pork?
- Why You’ll Love This Dutch Oven Pulled Pork Recipe
- Ingredients & Smart Substitutions
- How to Make Pulled Pork in a Dutch Oven
- Effortless Shredding: How to Prepare Your Pulled Pork
- Slow Cooker Alternative: A Convenient Option
- Delicious Serving Suggestions for Pulled Pork
- Expert Tips & Flavorful Variations
- Frequently Asked Questions (FAQs)
- More Irresistible Main Dish Recipes
- Dutch Oven Pulled Pork Recipe Card
What Is the Best Cut of Meat for Pulled Pork?
When it comes to achieving that melt-in-your-mouth tender pulled pork, the cut of meat is absolutely crucial. My top recommendation for easy and consistently delicious results is a boneless pork butt, also known as Boston butt. This particular cut is renowned for its generous marbling and high fat content, which makes it exceptionally well-suited for a low and slow braising method. The fat renders down during cooking, infusing the meat with incredible moisture and flavor, preventing it from drying out.
While boneless is often preferred for ease of handling and shredding, bone-in pork butt can also be used. If you opt for bone-in, simply ensure you remove the bone once the pork is cooked and before shredding. The bone itself can add an extra layer of flavor to the braising liquid, so it’s a great option if you don’t mind the extra step.
Pork shoulder is another excellent choice and a very similar cut to pork butt. It’s slightly leaner than a pork butt but still contains enough fat and connective tissue to become incredibly tender when slow-cooked. Either pork butt or pork shoulder will yield fantastic pulled pork.
It’s important to remember that not all cuts of pork are suitable for this long, slow cooking method. I strongly advise against using leaner cuts like pork roast, pork loin, or pork chops for this recipe. These cuts lack the necessary fat and connective tissue to break down into tender, shreddable meat and will likely result in a dry, tough final product.
Why You’ll Love This Dutch Oven Pulled Pork Recipe
- Unbelievably Juicy: The secret lies in the braising process. The pork butt cooks submerged in a flavorful liquid, creating an incredibly moist and succulent result. The natural juices from the pork combine with the braising liquid to form a rich, savory sauce that you’ll want to spoon over every bite.
- Perfectly Sweet & Tangy Flavor: This recipe masterfully balances opposing flavors. The sweetness from the soda perfectly complements the richness of the pork, while the tanginess of the apple cider vinegar cuts through the fat, creating a complex and irresistible taste profile. It’s a harmonious blend that defines classic BBQ.
- Effortlessly Tender: Prepare for pork that is literally “fall-apart” tender. The long, slow cooking in the Dutch oven breaks down the tough connective tissues in the pork butt, transforming it into silky, shreddable meat that requires minimal effort.
- Simple and Mostly Hands-Off: Don’t let the cooking time intimidate you! While the pork braises for a few hours, the active preparation time is surprisingly minimal. After a quick sear and combining the liquids, the oven does most of the hard work, freeing you up to focus on other things.
- Ideal for Feeding a Crowd: Pulled pork is a fantastic, economical, and satisfying meal for entertaining. Whether it’s a summer backyard party, a family gathering, or a potluck, a large batch of Dutch oven pulled pork is always a crowd-pleaser and ensures everyone leaves happy and full.
- Incredibly Versatile: The possibilities are endless with this delicious pulled pork. While it shines in classic sandwiches, it also makes an amazing base for nachos, tacos, quesadillas, salads, or even as a topping for baked potatoes. It’s perfect for creative leftover meals.
- No Smoker Required: Enjoy authentic BBQ flavors without the need for specialized outdoor equipment. This Dutch oven method brings the deliciousness of slow-smoked pork right into your kitchen, making it accessible for apartment dwellers and anyone without a smoker.
Ingredients & Smart Substitutions

Crafting the perfect Dutch oven pulled pork starts with understanding your ingredients. Here’s what you’ll need and some helpful tips:
- Smoked Paprika: This is a non-negotiable ingredient for that signature smoky BBQ flavor. Ensure you use *smoked* paprika, not the sweet or hot varieties, as it imparts a deep, earthy smokiness that’s essential for this recipe.
- Kosher Salt: All recipes here are developed and tested using Morton kosher salt, unless otherwise specified. Its flake size and less intense salinity make it ideal for everyday cooking, allowing for better control over seasoning. If you are using standard table salt, which is much finer and more concentrated, you will need to reduce the amount by roughly half to prevent over-salting. I highly recommend investing in some kosher salt for your pantry.
- Soda/Beer: Root beer is my go-to for its sweet, caramel notes that beautifully complement the pork. However, other cola soft drinks or even a light beer can be delicious alternatives. If you choose beer, especially a less sweet variety, I suggest adding 2-3 tablespoons of brown sugar to the braising liquid to balance the flavors with some sweetness.
Should you find yourself without apple cider vinegar, fret not! You can read all about the best substitutes for apple cider vinegar to ensure your pulled pork still achieves that perfect tang.
A complete list of all ingredients and their exact quantities can be found on the recipe card below.
How to Make Pulled Pork in a Dutch Oven
Quick Overview
Making tender pulled pork in a Dutch oven is a straightforward process that yields fantastic results. Here’s a quick summary of the key steps:
- Season the pork generously with a flavorful spice rub.
- Sear the pork pieces until beautifully browned on all sides.
- Sauté aromatic onions in the same pot.
- Deglaze the pot and add the liquid ingredients.
- Braise in the oven for a few hours until fork-tender.
- Shred the cooked pork and toss it with the flavorful juices.
Step by Step Instructions
Follow these detailed steps to create perfectly tender and flavorful pulled pork:

**Pro Tip:** Searing the pork before braising creates a beautiful caramelized crust on the exterior of each piece. This Maillard reaction adds incredible depth of flavor that you absolutely do not want to skip!
Step 1: Begin by preheating your oven to 300°F (150°C). In a large mixing bowl, combine the pork pieces with the smoked paprika, chili powder, cumin, granulated garlic, onion powder, ground mustard, dried oregano, kosher salt, and freshly ground black pepper. Toss everything together thoroughly until the pork is evenly coated with the spice rub.
Step 2: Place a 6-quart Dutch oven over medium-high heat on your stovetop. Add the avocado oil and allow it to heat up until shimmering. Working in batches to avoid overcrowding the pot (which would steam rather than sear the meat), sear 2-3 pieces of pork at a time. Cook for approximately 1 minute on all sides, turning until each piece is deeply browned and a delicious crust has formed.
Step 3: Once seared, remove the browned pork pieces from the Dutch oven and set them aside on a plate. Repeat with any remaining pork until all pieces are seared.
Step 4: Reduce the heat to medium. Add the thinly sliced yellow onions to the same Dutch oven, using the residual fat and browned bits from the pork. Sauté the onions for about 5 minutes, stirring occasionally, until they soften and become translucent and lightly golden.
Step 5: Pour in the apple cider vinegar. Use a wooden spoon or spatula to scrape up any flavorful brown bits (fond) stuck to the bottom of the pot. This process, called deglazing, adds immense flavor to your braising liquid.
Step 6: Stir in the root beer (or chosen soda/beer), your favorite barbecue sauce, and the Worcestershire sauce. Mix well to combine all the braising liquid ingredients.
**Remember:** The goal is for the meat to be incredibly tender. After 3 hours of braising, the pork should practically fall apart with minimal effort, making it super easy to shred.
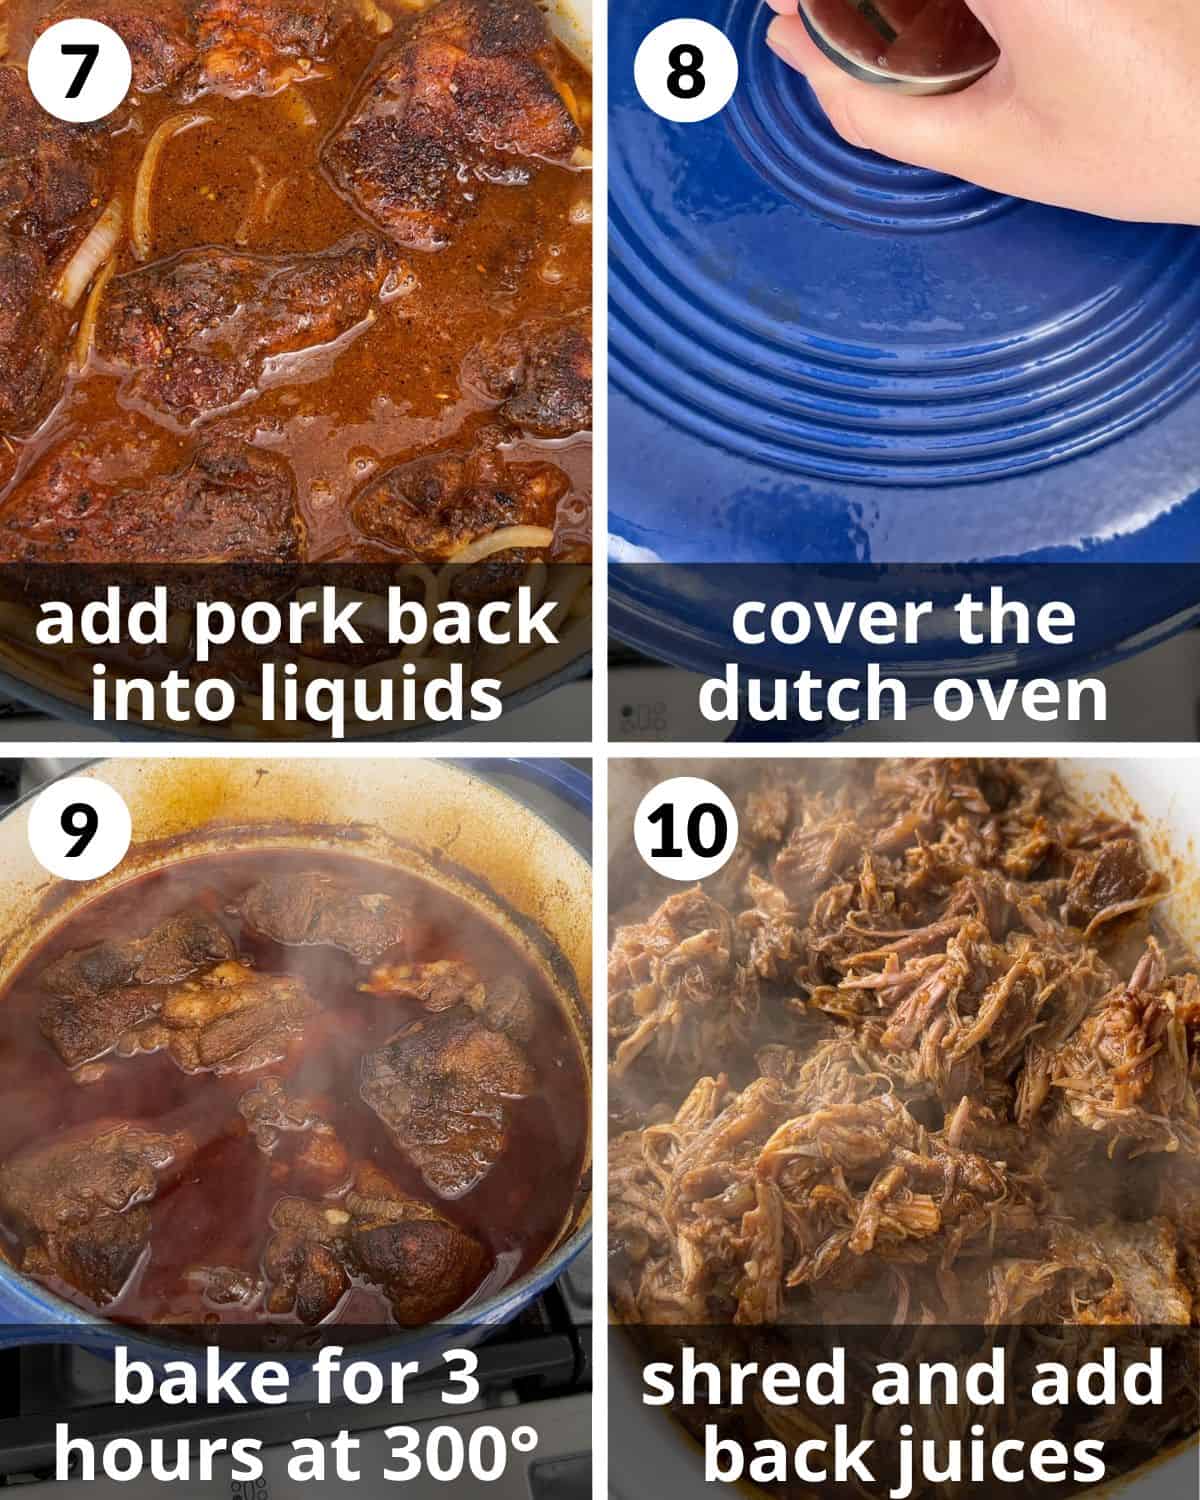
Step 7: Carefully return the seared pork pieces to the Dutch oven, ensuring they are mostly submerged in the braising liquid. Bring the liquid to a gentle boil on the stovetop.
Step 8: Once boiling, securely cover the Dutch oven with its lid and carefully transfer it to the preheated oven.
Step 9: Bake for 3 hours. Resist the urge to peek during this time, as keeping the lid on maintains the consistent temperature and moisture needed for optimal tenderness.
Step 10: After 3 hours, carefully remove the Dutch oven from the oven. Using tongs, transfer the cooked pork from the pot to a large, shallow bowl or baking dish. With two sturdy forks, begin to shred the pork. It should be so tender that it practically falls apart. Once shredded, transfer the pulled pork back into the Dutch oven with all its savory juices and onions. Toss to coat evenly and serve immediately.
Effortless Shredding: How to Prepare Your Pulled Pork
After hours of patient braising, your pork butt will be wonderfully tender and ready to be transformed into succulent pulled pork. There are a few effective methods for shredding, each with its own advantages:
- **The Two-Fork Method (My Preference):** This is the simplest and most accessible method, and it works perfectly given how tender the pork becomes. Simply place the cooked pork in a large, shallow bowl or on a cutting board. Using two sturdy dinner forks, pull the meat apart in opposite directions. The pork should shred effortlessly. It’s quick, easy to clean up, and doesn’t require any special tools.
- **Barbecue Claws:** If you find yourself making pulled pork frequently or are simply a BBQ enthusiast, a set of barbecue claws can be a handy tool. These specialized tools are designed to grip and shred large pieces of meat efficiently. They’re like an enhanced version of the two-fork method, offering more leverage and speed. They also make a fantastic gift for any BBQ lover!
- **Electric Mixer (Use with Caution):** For the fastest shredding, especially for very large quantities of pork, an electric mixer (either a hand mixer or a stand mixer with a paddle attachment) can be used. Simply place the hot pork in a large bowl and mix on low speed until shredded. However, I find this method can sometimes be overkill, as the pork is already so tender. It also risks over-mixing the meat, potentially making it too mushy, and creates more dishes to clean than the simple two-fork method.
No matter which method you choose, the key is to ensure the pork is cooked to the proper tenderness before attempting to shred. If it’s tough, it needs more cooking time.
Slow Cooker Alternative: A Convenient Option
While I personally favor the Dutch oven method for its ability to sear and braise in one pot (meaning fewer dishes for my husband!), this recipe can absolutely be adapted for a slow cooker or crock pot. It offers incredible convenience, allowing you to set it and forget it for several hours. Here’s how to do it:
- Follow the Dutch oven recipe instructions precisely through Step 5 (seasoning the pork, searing it in batches, setting it aside, sautéing the onions, and deglazing the pot with apple cider vinegar). The searing step is essential for flavor, even if you’re transferring to a slow cooker.
- Once you’ve completed these initial steps, transfer the seared pork and sautéed onions from your Dutch oven to the slow cooker insert.
- Add the soda (root beer or chosen alternative), barbecue sauce, and Worcestershire sauce directly into the slow cooker with the pork and onions. Stir everything gently to ensure the pork is well coated and submerged in the flavorful liquid.
- Cover the slow cooker with its lid and cook on the LOW setting for 6-8 hours, or until the pork is undeniably tender and can be easily shredded with two forks. Cooking on low heat for a longer duration ensures the best texture for pulled pork in a slow cooker.
This slow cooker version is perfect for busy days when you want to come home to a delicious, ready-to-eat meal with minimal fuss.
Delicious Serving Suggestions for Pulled Pork
This savory Dutch oven roasted pulled pork is incredibly versatile and can be the star of countless meals. While fantastic on its own, it truly shines when paired with complementary sides or integrated into other dishes. Here are some of my favorite ways to enjoy it:
Classic Side Dishes:
Serve the pulled pork hot, perhaps with a little extra sauce spooned over top, alongside any of these comforting sides:
- Lebanese Potato Salad: A fresh, tangy alternative to traditional potato salad.
- Fried Cabbage with Bacon: A hearty and flavorful vegetable side that complements rich meats.
- Air Fryer Cheesy Scalloped Potatoes: Creamy, cheesy, and perfectly crispy potatoes.
- Brown Sugar Honey Carrots: Sweet and tender carrots that add a touch of sweetness to the meal.
- No Buttermilk Cornbread: The perfect fluffy bread to soak up all the delicious juices.
- Boiled Corn on the Cob: A simple, sweet, and classic BBQ accompaniment.
- Zucchini Bacon Fritters: A creative way to add vegetables with a savory crunch.
For even more inspiration, check out my comprehensive guide on Sides To Serve With Pulled Pork Sandwiches.
Creative Ways to Use Pulled Pork:
Beyond traditional plates, pulled pork excels as an ingredient in other dishes:
- Sliders & Sandwiches: The most popular choice! Serve on soft buns with coleslaw and pickles.
- Tacos: Fill warm tortillas with pulled pork, your favorite salsa, avocado, and a squeeze of lime.
- Nachos: Pile pulled pork over tortilla chips with cheese, jalapeños, and all your favorite nacho toppings.
- Quesadillas: Layer pulled pork and cheese between tortillas and grill until golden and melty.
- Salads: Add a hearty protein boost to a fresh green salad with a BBQ ranch dressing.
- Baked Potatoes: Top a fluffy baked potato with pulled pork, sour cream, cheese, and chives.
Have fun experimenting and repurposing your leftovers – the possibilities are truly endless!
Expert Tips & Flavorful Variations
Mastering Dutch oven pulled pork is easy with a few expert tips. These suggestions will help you achieve the best flavor and texture every time, and even inspire some delicious variations:
- Cut into Even Pieces: Before seasoning, cutting the pork butt or shoulder into 6-7 relatively uniform pieces is key. This increases the surface area for your delicious spice rub to penetrate and for searing to create that flavorful crust. More importantly, it helps the pork cook more evenly and tenderize faster, as heat can reach the center of each piece more efficiently.
- Embrace the Slow Cook: Pulled pork is a dish that truly rewards patience. It cannot be rushed! While three hours in the oven might seem like a long time, it’s essential for the magic to happen. Pork butt is a tougher, very fatty cut of meat, and it requires sustained low heat to slowly break down its connective tissues into gelatin, resulting in that desired fork-tender, shreddable texture. If it’s tough, it simply needs more time.
- Don’t Skimp on the Sauce: The braising liquid in the Dutch oven transforms into an incredibly rich and flavorful sauce. After shredding the pork, make sure to either spoon plenty of this luscious sauce and onions directly over the meat on your serving platter, or better yet, toss all the shredded pork back into the Dutch oven with its juices. This ensures every strand of pork is coated and infused with maximum flavor and moisture.
- Smart Leftover Storage & Freezing: Pulled pork is fantastic for meal prep! Leftovers will remain fresh and delicious in an airtight container in the refrigerator for 3-4 days. For longer storage, I highly recommend freezing leftovers in freezer bags. Press out as much air as possible before sealing and store for up to 2-3 months. To reheat, simply transfer the frozen pork directly to a pot on the stovetop over low heat, adding a splash of water or broth if needed, until heated through. It will be just as juicy and tender as when freshly cooked!
- Spice Rub Variations: Feel free to customize your spice rub! For a smokier profile, add a pinch of chipotle powder. For a hint of sweetness, include a tablespoon of brown sugar. If you like a little kick, a touch of cayenne pepper can be a great addition.
- Liquid Flavor Profiles: While root beer and apple cider vinegar are classic, you can experiment with other liquids. Try a hard cider for a more autumnal flavor, or even a strong black coffee for a deeper, earthier note. Just ensure you maintain a balance of sweet and acidic elements.

Frequently Asked Questions (FAQs)
For the most balanced and flavorful pulled pork, I highly recommend a combination of a sugary liquid and an acidic liquid. A sweet soda (like root beer) or beer provides depth and cuts through the richness of the pork, while an acidic component (such as apple cider vinegar) adds a crucial tang and helps to further tenderize the meat by breaking down tough fibers. This blend creates a harmonious BBQ profile.
Always cook pulled pork in the oven *covered*. Keeping the Dutch oven sealed traps steam and moisture within the pot, creating a humid environment that is essential for tenderizing the pork butt. This method prevents the meat from drying out and ensures it remains incredibly juicy throughout the long cooking process.
Both methods can yield excellent results, but I generally prefer making pulled pork in the oven using a Dutch oven. The primary advantage is the ability to sear the pork directly in the same pot before braising, which develops a rich, caramelized crust and adds significant depth of flavor. A Dutch oven also tends to retain heat very efficiently and evenly, contributing to consistently tender pork. While a slow cooker is more hands-off, it often requires searing in a separate pan first, adding an extra step.
Generally, yes, up to a point. Pulled pork requires sufficient cooking time for the collagen and connective tissues in the pork butt to break down, resulting in tenderness. If the pork is tough or difficult to shred, it typically hasn’t been cooked long enough or was cooked at too high a temperature. The key is “low and slow” cooking. However, there is a limit; if meat is cooked for *excessively* long periods at the wrong temperature, it can eventually start to dry out, even if technically still tender. Aim for that perfect fork-tender stage where it effortlessly falls apart.
More Irresistible Main Dish Recipes
Chicken
Garlic Butter Chicken Thighs (Baked & Crispy)
Pasta
Baked Stuffed Shells with Meat Sauce
Fall
Dutch Oven Pot Roast
Soup & Chili
Ground Chicken Chili with Beans
Explore more kitchen essentials and favorites on my Amazon Storefront!
If you try this incredible Dutch Oven Pulled Pork recipe, I would be absolutely thrilled to hear your thoughts! Please leave a star rating in the recipe card below and/or drop a comment. Your feedback is always incredibly valuable to me. Don’t forget to follow me on Pinterest, Facebook & Instagram for more delicious recipes and kitchen tips!
Print Recipe
Save Recipe
Dutch Oven Pulled Pork
5 minutes
3 hours
3 hours 5 minutes
8 people
Equipment
-
6 Quart Dutch Oven
-
Mixing Bowls
-
8 inch Chef’s Knife
Ingredients
- 4-4.5 pound boneless pork butt or shoulder, cut into 6-7 pieces
Spice Rub
- 2 Tablespoons smoked paprika*
- 2 Tablespoons chili powder
- 2 teaspoons cumin
- 2 teaspoons granulated garlic
- 2 teaspoons onion powder
- 2 teaspoons ground mustard
- 1 teaspoon dried oregano
- 1 Tablespoon Morton kosher salt*
- 1 teaspoon freshly ground black pepper
Braising Liquid
- 2-3 Tablespoons avocado oil
- 2 yellow onions, thinly sliced
- 1/4 cup apple cider vinegar
- 1 12 ounce can root beer, cola, or light beer*
- 1/2 cup barbecue sauce
- 2 Tablespoons Worcestershire sauce
Instructions
-
Preheat the oven to 300 degrees F (150 degrees C). In a large bowl, toss the pork pieces with paprika, chili powder, cumin, granulated garlic, onion powder, ground mustard, oregano, salt, and pepper until well combined.
-
In a 6-quart Dutch oven, heat the avocado oil over medium-high heat. Working in batches, sear 2-3 pieces of pork at a time for about a minute on all sides until browned and a crust forms.
-
Remove the seared pork from the pot and set aside on a plate.
-
Turn the heat down to medium and add the thinly sliced onions. Sauté for 5 minutes until softened.
-
Deglaze the pot with the apple cider vinegar, scraping any flavorful brown bits off the bottom of the pot.
-
Stir in the root beer (or other chosen liquid), barbecue sauce, and Worcestershire sauce.
-
Add the seared pork back into the Dutch oven, ensuring it is mostly covered in the liquid. Bring to a gentle boil on the stovetop.
-
Cover the Dutch oven with its lid and transfer it to the preheated oven.
-
Bake for 3 hours, undisturbed, until the pork is fork-tender.
-
Remove the pork from the pot and place it in a large shallow bowl or baking dish. Using two forks, shred the pork until completely pulled apart. Transfer the shredded pork back into the Dutch oven with its juices and toss to coat thoroughly before serving.
Did you make this recipe? Leave a comment below!
Notes
- Smoked Paprika: Be sure to use smoked paprika (not plain). It adds a rich smoky flavor that gives it that signature barbecue taste.
- Kosher Salt: All of my recipes are tested with Morton kosher salt unless noted otherwise. It is the best salt for everyday cooking because of its size and flavor. If using table salt, the amount should be reduced significantly. I highly recommend picking up some kosher salt next time you are at the store!
- Soda: I usually use root beer for this recipe, but other cola soft drinks or a light beer are also delicious. If using beer, consider adding a couple of tablespoons of brown sugar for sweetness.
- Cut into pieces. Cutting the butt or shoulder into 6-7 pieces creates more surface area for seasoning and searing, and helps the pork cook/tenderize faster and more evenly.
- Slow cook. Pulled pork can’t be rushed. Three hours might seem like a while, but it takes time for the pork to break down and become tender as it is a tougher and very fatty cut of meat.
- Serve with extra sauce. Be sure to spoon lots of the flavorful sauce and onions from the pot over the meat when it’s done, or toss all of the shredded pork back with the juices for maximum flavor and moisture.
- Freeze leftovers. Leftovers will stay fresh in the refrigerator for 3-4 days in an airtight container. After that, I highly recommend freezing leftovers in freezer bags for 2-3 months. Heat from frozen on the stove when ready to serve – it will be just as juicy and tender!
Nutrition Information (Approximate)
Carbohydrates: 19g |
Protein: 44g |
Fat: 17g |
Saturated Fat: 5g |
Polyunsaturated Fat: 2g |
Monounsaturated Fat: 8g |
Trans Fat: 0.1g |
Cholesterol: 136mg |
Sodium: 1302mg |
Fiber: 2g |
Sugar: 13g
Nutrition information is automatically calculated and should only be used as an approximation. Values can vary based on specific ingredients and brands used.